

As a sourcing specialist, I’ve seen poorly chosen fittings cause major system failures. The right reducer is crucial, and the PVC invert reducer is a key solution for many challenges.
The best PVC invert reducer fitting is one that provides a smooth, reliable transition between different pipe sizes while maintaining proper flow and preventing blockages in drainage and sewage systems. It is designed with an eccentric, offset center to keep the pipe invert at a consistent level, which is critical for preventing sediment buildup and ensuring efficient waste transport.
Understanding this component is essential for any effective pipeline design. Let’s explore its functions, selection criteria, applications, and installation.
What Are the Main Functions of a PVC Invert Reducer Fitting in a Pipeline System?
A common issue we see is systems clogging at pipe transitions. This often happens when the wrong type of reducer is used.
The main functions of a PVC invert reducer are to connect pipes of different diameters efficiently and to maintain a constant invert elevation across the connection. This prevents sediment accumulation, minimizes turbulence and blockages, and ensures a smooth, uninterrupted flow, which is vital for gravity-driven systems like sewers and drains.
Connecting Different Pipe Sizes
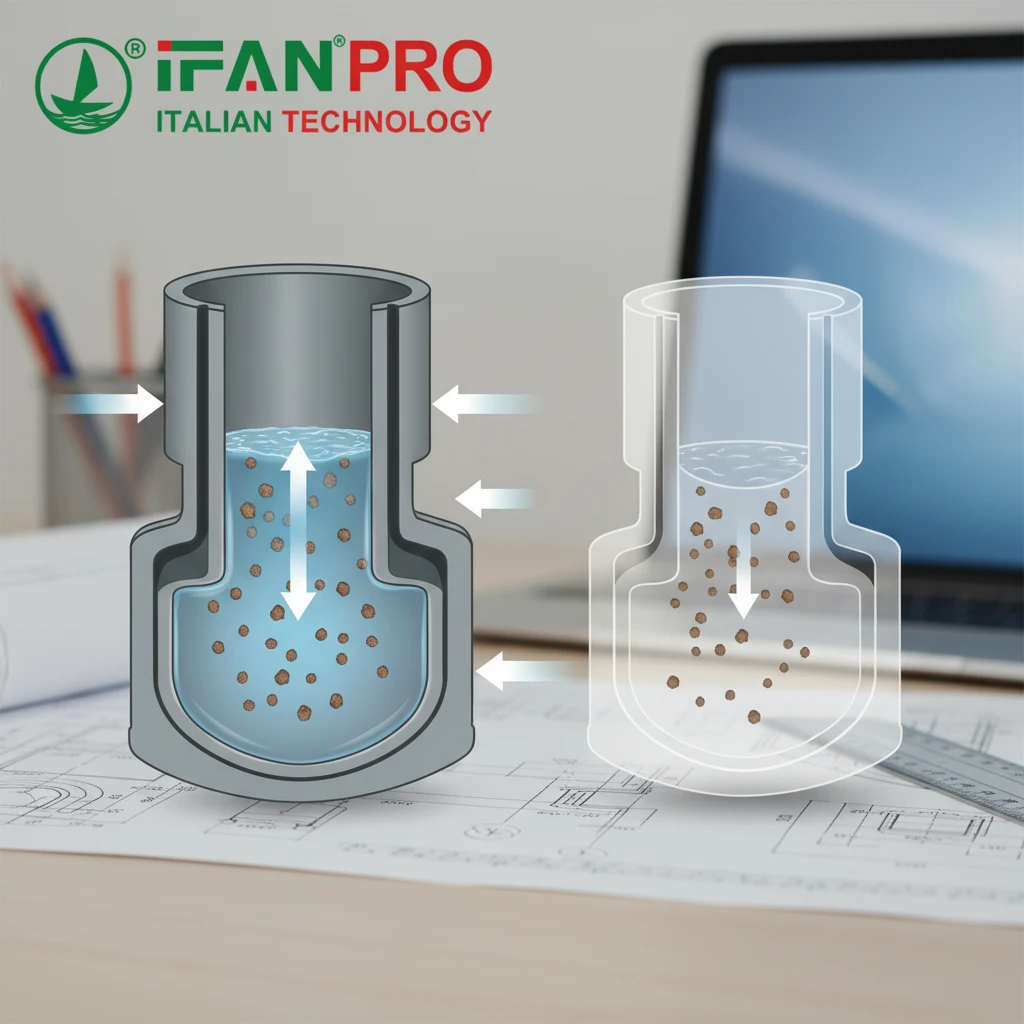
The most obvious job of any reducer is to join two pipes that have different diameters. However, a standard concentric reducer, which is symmetrical, can create a problem in drainage systems. It causes the bottom inside surface (the “invert”) of the pipe to suddenly step up or down at the connection point.
This step creates a small ledge or depression. In wastewater pipes, solids and sludge can get caught on this ledge. Over time, this accumulation leads to partial or complete blockages, which require costly maintenance to clear.
Maintaining a Constant Invert Elevation
The PVC invert reducer solves this problem. Its key feature is its eccentric, or offset, design. The top of the fitting is tapered, while the bottom remains flat. When installed correctly, with the flat side down, it allows the bottom inner surfaces of both the larger and smaller pipes to align perfectly.
This creates a continuous, level flow path at the bottom of the pipeline. There is no ledge for debris to catch on. This simple design principle is what makes it indispensable for gravity-flow applications where solids are present.
Key Functions in Practice
Let’s break down its core functions in a real-world system:
- Ensures Uninterrupted Flow: By eliminating the internal ledge, it allows liquids and solids to pass through the transition smoothly. This reduces hydraulic friction and maintains optimal flow velocity.
- Prevents Sedimentation: A constant invert prevents sand, grit, and other heavy solids from settling out of the flow at the junction. These materials are carried along to the next point of removal, like a catch basin or treatment plant.
- Reduces Maintenance Needs: Systems with proper invert reducers experience far fewer blockages. This translates to lower long-term costs for jetting, cleaning, and emergency repairs.
Function Comparison: Invert vs. Concentric Reducer
The table below shows why the invert reducer is the superior choice for drainage.
| Function | PVC Invert Reducer | Standard Concentric Reducer |
|---|---|---|
| Maintains Invert Level | Yes, keeps a flat, continuous bottom. | No, creates a step or ledge at the bottom. |
| Prevents Debris Accumulation | Excellent, smooth transition traps no solids. | Poor, the ledge readily catches debris. |
| Ideal for Gravity Flow | Yes, the primary design purpose. | No, better suited for pressurized lines. |
| Reduces Blockage Risk | High, significantly lowers maintenance. | Low, increases blockage frequency. |
In short, the main function of this fitting is to provide a hydraulically superior connection that protects the integrity and efficiency of the entire pipeline system.
How to Choose the Best PVC Invert Reducer for Your Specific Pipe Diameters?
Selecting the wrong size is a frequent and costly error. I’ve reviewed many projects where this simple mistake led to leaks and failures.
To choose the best PVC invert reducer, you must first accurately measure the outside diameters (OD) of both the larger and smaller pipes you are connecting. Then, select a reducer with matching socket sizes, ensuring it is rated for the correct pressure class (like Schedule 40 or SDR 35) and material type (PVC) to guarantee a compatible, leak-proof joint.
Step 1: Accurately Determine Your Pipe Sizes
The first and most critical step is measurement. You cannot assume pipe size based on a nominal label (like “4-inch pipe”). Always measure the outside diameter (OD) of both pipe ends with a caliper.
- Why OD Matters: PVC fittings are designed to connect to the outside of a pipe. The socket inside the fitting is made to fit snugly over the pipe’s OD. A mismatch here will result in a joint that is either too loose and leaks, or too tight and impossible to install properly.
- Note the Pipe Schedule: PVC pipe comes in different wall thicknesses, known as Schedules (e.g., Schedule 40, Schedule 80). A Schedule 80 pipe has a thicker wall, but the same nominal size as a Schedule 40 pipe will have a slightly different OD. Your reducer must match the schedule of your pipe.
Step 2: Match the Reducer’s Socket Sizes
Once you have your two ODs, find a reducer that lists those exact sizes as its inlet and outlet. The reducer will be labeled with two numbers (e.g., 6″ x 4″). This means one socket fits a 6-inch OD pipe, and the other fits a 4-inch OD pipe. Confirm which end is for the larger pipe and which is for the smaller.
Step 3: Consider Material and Pressure Rating
All components must be compatible.
- Material Type: Ensure both your pipes and the reducer are made from the same material grade (e.g., PVC Type 1, Cell Class 12454). Using mismatched materials can lead to different expansion rates and chemical resistances, causing joint failure.
- Pressure Class: For pressure applications, the fitting’s pressure rating must meet or exceed the system’s maximum operating pressure. For non-pressure drainage (SDR 35), the focus is on structural strength and compatibility.
Selection Checklist Table
Use this table as a guide when specifying your fitting.
| Selection Factor | What to Check | Why It’s Important |
|---|---|---|
| Pipe Outside Diameter (OD) | Measure both pipes with a caliper. | The fitting socket must match the pipe’s OD for a proper seal. |
| Reduction Size (e.g., 6″x4″) | Match reducer specs to your measured ODs. | Ensures the fitting will physically connect your two specific pipes. |
| Material Specification | Check that pipe and fitting are the same PVC type/class. | Prevents chemical incompatibility and ensures uniform joint cementing. |
| Pressure/Schedule Rating | Match Schedule (40, 80) or SDR (35, 26) rating. | Guarantees the fitting has the required wall strength for the application. |
| Application Standard | Confirm it meets standards for sewer/drain (e.g., ASTM D3034). | Ensures the product is manufactured to quality and performance benchmarks. |
By following these steps, you move from guessing to engineering your selection. This precision prevents wasted time, costly returns, and project delays.
Why Use a PVC Invert Reducer Fitting for Drainage and Sewage Applications?
Clients often ask why they can’t just use a cheaper, standard reducer. The answer becomes clear when we look at the problems it prevents.
You should use a PVC invert reducer in drainage and sewage applications because its eccentric design is specifically engineered to maintain a smooth flow path for water containing solids and debris. It prevents the sediment buildup and chronic blockages that are common with concentric reducers, leading to a more reliable, lower-maintenance, and longer-lasting pipeline system.
The Challenge of Moving Solids
Drainage and sewage systems are unique. They don’t just move water; they transport a mixture of water, human waste, toilet paper, grease, sand, and other solids. This mixture moves primarily by gravity, not pump pressure. Therefore, the design of the pipe must help carry these solids along without letting them settle.
Any interruption in the smooth inner surface of the pipe bottom can act as a trap. A standard concentric reducer creates exactly this kind of trap. The resulting blockages can cause sewage backups, overflows, and expensive emergency service calls.
How the Invert Reducer Solves This
The PVC invert reducer addresses the core physics of the problem.
- Maintains Velocity: In gravity systems, a constant invert helps maintain consistent flow velocity. A sudden drop or rise in the pipe bottom can slow the flow, allowing heavier particles to fall out of suspension and settle.
- Eliminates the Ledge: As discussed, the flat-bottom design of the invert reducer completely removes the internal ledge. Solids and sludge slide smoothly from the larger pipe into the smaller one without catching.
- Directs Flow Efficiently: The fitting’s shape guides the flow stream gradually, minimizing turbulence. Excessive turbulence can cause solids to separate from the liquid flow and deposit.
Real-World Benefits for System Owners
Choosing the right fitting has direct, practical benefits:
- Reduced Maintenance Costs: Systems with properly installed invert reducers require far less frequent jetting and cleaning. This saves significant money over the life of the infrastructure.
- Increased System Reliability: The risk of sudden, catastrophic blockages and overflows is greatly diminished. This is critical for municipal sewers, industrial waste lines, and building drainage where failures have severe consequences.
- Longer System Lifespan: Constant blockages and the aggressive cleaning they require (high-pressure jetting) can stress and damage pipes over time. A smoother-flowing system is a gentler, longer-lasting system.
Application Suitability Guide
This table shows where PVC invert reducers are essential versus where other fittings might suffice.
| Application Type | Recommended Fitting | Primary Reason |
|---|---|---|
| Gravity Sewer Mains | PVC Invert Reducer | Prevents sediment buildup at junctions, critical for public infrastructure. |
| Building Sanitary Drainage | PVC Invert Reducer | Avoids blockages in stacks and horizontal runs within walls and floors. |
| Storm Water Drainage | PVC Invert Reducer | Carries sand and grit without allowing settling at pipe size transitions. |
| Pressurized Water Lines | Standard Concentric Reducer | No solids transport; focus is on minimizing pressure drop and turbulence. |
| Vent Pipes | Standard Concentric Reducer | Only carries air; no risk of solid accumulation. |
In essence, using a PVC invert reducer for drainage is a proactive investment. It solves a predictable problem before it happens, ensuring system performance and reducing lifetime costs.
How Do You Properly Install and Connect a PVC Invert Reducer Fitting?
Even the best fitting will fail if installed incorrectly. Proper installation is non-negotiable for a leak-free, long-lasting joint.
To properly install a PVC invert reducer, first dry-fit the pipes to confirm alignment with the flat side down. Then, clean and prime all joining surfaces, apply a uniform layer of PVC solvent cement to both the pipe ends and the fitting sockets, and quickly push and twist the pipes fully into the sockets. Hold them firmly in place for about 30 seconds to allow the cement to set initially.
Pre-Installation: Planning and Dry Fitting
Never skip the preparation steps. First, ensure the pipe ends are cut square and deburred. A ragged cut prevents a proper seal.
- Identify Orientation: Look at the reducer. One side has a flat edge. This is the bottom. You must install the fitting with this flat side down to maintain the continuous invert. Mark the top of the fitting if necessary.
- Dry Fit: Without any cement, insert the pipes into the reducer sockets. Check that the pipes seat fully and that the overall alignment is correct. This confirms you have the right fitting and allows you to mark the insertion depth on the pipes with a pencil.
Step-by-Step Installation Process
Follow this sequence for a perfect joint:
Step 1: Clean and Prime
Wipe the outside of the pipe ends and the inside of the fitting sockets with a clean, dry rag to remove dirt. Then, apply a liberal coat of PVC primer (purple in color) to the same areas. The primer cleans and softens the PVC surface, ensuring a strong chemical weld. Let it dry for a few seconds.
Step 2: Apply Solvent Cement
Immediately after priming, apply a uniform, even layer of clear PVC solvent cement to the primed areas on the pipe. Apply a second light coat to the inside of the fitting socket. Do not let the cement dry before joining.
Step 3: Join and Align
Quickly push the pipe into the fitting socket, twisting it about a quarter turn as you go. This twisting action spreads the cement evenly and ensures a complete seal. Push until the pipe bottoms out in the socket, aligning with your depth mark. For the reducer, double-check that the flat side is still oriented downward.
Step 4: Hold and Set
Hold the pipe and fitting together firmly, without movement, for at least 15 to 30 seconds. This prevents the pipe from pushing back out as the cement initially sets. Wipe away any excess cement that squeezes out of the joint.
Step 5: Cure Time
Allow the joint to cure for the manufacturer’s recommended time (usually 15 minutes for handling, 2-24 hours for full strength and pressure) before moving or testing the pipeline.
Common Installation Mistakes to Avoid
Awareness of pitfalls is key to quality work.
- Mistake 1: Skipping Primer. This drastically weakens the joint. Always use primer for pressure and sewer applications.
- Mistake 2: Using Too Little or Too Much Cement. A thin, uneven coat won’t seal; a globby, excessive coat can weaken the pipe or cause an internal obstruction.
- Mistake 3: Incorrect Orientation. Installing the reducer upside down (flat side up) creates the exact ledge you are trying to avoid, rendering it useless.
- Mistake 4: Not Twisting. A simple push can create uneven cement distribution and a potential leak path. The quarter-turn twist is crucial.
Installation Quick-Reference Table
Keep this checklist handy during work.
| Task | Key Action | Tip for Success |
|---|---|---|
| Preparación | Cut pipe square, deburr, dry fit. | Mark insertion depth on the pipe. |
| Orientation | Ensure flat side of reducer is DOWN. | Mark the “TOP” of the fitting with a marker. |
| Cleaning & Priming | Apply purple primer to pipe end and fitting socket. | Coverage should be even and liberal. |
| Cement Application | Apply cement to pipe end and a light coat inside the socket. | Work quickly before cement dries. |
| Únase a | Push and twist pipe 1/4 turn into socket until it bottoms out. | Hold alignment, check flat-side-down position. |
| Setting | Hold joint steady for 30 seconds. | Do not disturb until fully cured. |
Proper installation locks in all the benefits of the PVC invert reducer. It transforms individual components into a single, integrated, and reliable system.
Conclusión
Choosing and installing the correct PVC invert reducer is vital for efficient, blockage-free drainage systems. For high-quality, reliable PVC fittings that meet exact specifications, source your project components from IFAN.


Comentarios recientes