

A client once called me in a panic—their water tank was overflowing, flooding their warehouse. The culprit? A failed float valve. This common frustration is often caused by a few key, fixable issues.
A float valve fails or leaks constantly mainly due to worn internal seals, a damaged float that cannot rise properly, blockage from mineral scale and debris, or a bent float arm that misaligns the entire mechanism. These problems prevent the valve from creating a tight seal or from shutting off at the correct water level.
Understanding each specific cause is the first step to a reliable fix and long-term prevention.
How Does a Worn or Damaged Valve Seat Washer Cause Continuous Leakage?
That constant dripping or trickle from the valve, even when the tank is full, drives up water bills and wastes resources.
A worn or damaged valve seat washer causes continuous leakage because it can no longer form a watertight seal against the valve seat. Once this rubber or silicone washer becomes cracked, deformed, or hardened, water under pressure continuously seeps past it, resulting in a leak that doesn’t stop.

The Critical Role of the Washer
The valve seat washer is a small but vital part. It acts like a gasket. When the float rises and shuts the valve, this washer is pressed firmly against a metal or plastic opening called the valve seat. This action blocks the flow of water completely.
However, this washer faces constant pressure, friction, and chemical exposure from water. Over time, these forces cause it to degrade. The process is slow but sure, and it is the most common reason for a persistent leak.
How Wear Happens and What to Look For
Let’s break down how wear happens and its effects:
- Hardening and Cracking: Many washers are made from rubber. Constant contact with water, especially chlorinated water, and temperature changes can cause the rubber to lose its flexibility. It becomes hard and brittle. A hard washer cannot conform to the shape of the valve seat to create a seal. Eventually, it cracks, creating direct paths for water to leak through.
- Deformation and Grooving: Even if it doesn’t crack, the washer can become permanently deformed. The spot where it presses against the valve seat can develop a groove or indent. This groove prevents the flat, even contact needed for a complete seal. You might see a small, steady stream of water entering the tank.
- Chemical and Mineral Attack: Water sometimes contains chemicals or minerals that slowly break down the washer material. The surface can become pitted or rough, again breaking the seal.
Common Symptoms of a Worn Washer:
- A constant dribble or stream of water from the valve inlet into the tank, even when the water level is above the float.
- The valve may hiss or squeal as water forces its way through a tiny gap.
- The toilet keeps running, or the water tank never seems to stop filling.
Solutions and Proactive Advice
The fix is usually straightforward: replace the washer. But choosing the right one matters.
- Material Matters: A standard rubber washer might last a year or two. A higher-quality silicone or polymer washer, like those used in IFAN’s float valve kits, is far more resistant to hardening and chemical damage.
- Regular Inspection: As part of routine maintenance, check the washer every 6-12 months for signs of cracking or deformation.
- Clean the Seat: When replacing the washer, always check and gently clean the valve seat itself. A piece of mineral scale or debris on the seat will ruin a new washer’s seal immediately.
| Problem | Symptom | Immediate Fix | Long-Term Prevention |
|---|---|---|---|
| Hardened Washer | Constant trickle; hissing sound. | Replace the washer. | Install a washer made of durable silicone or EPDM rubber. |
| Cracked Washer | Visible leak; water spray. | Replace the washer. | Check water chemical levels; use chemical-resistant parts. |
| Deformed/Grooved Washer | Inconsistent seal; slow leak. | Replace the washer and check valve seat. | Ensure the valve mechanism is aligned to prevent uneven pressure. |
Why Might a Punctured or Water-Logged Float Fail to Shut Off the Valve?
If the float can’t rise, the valve can’t close. I’ve seen many “mystery” leaks solved by simply checking the float.
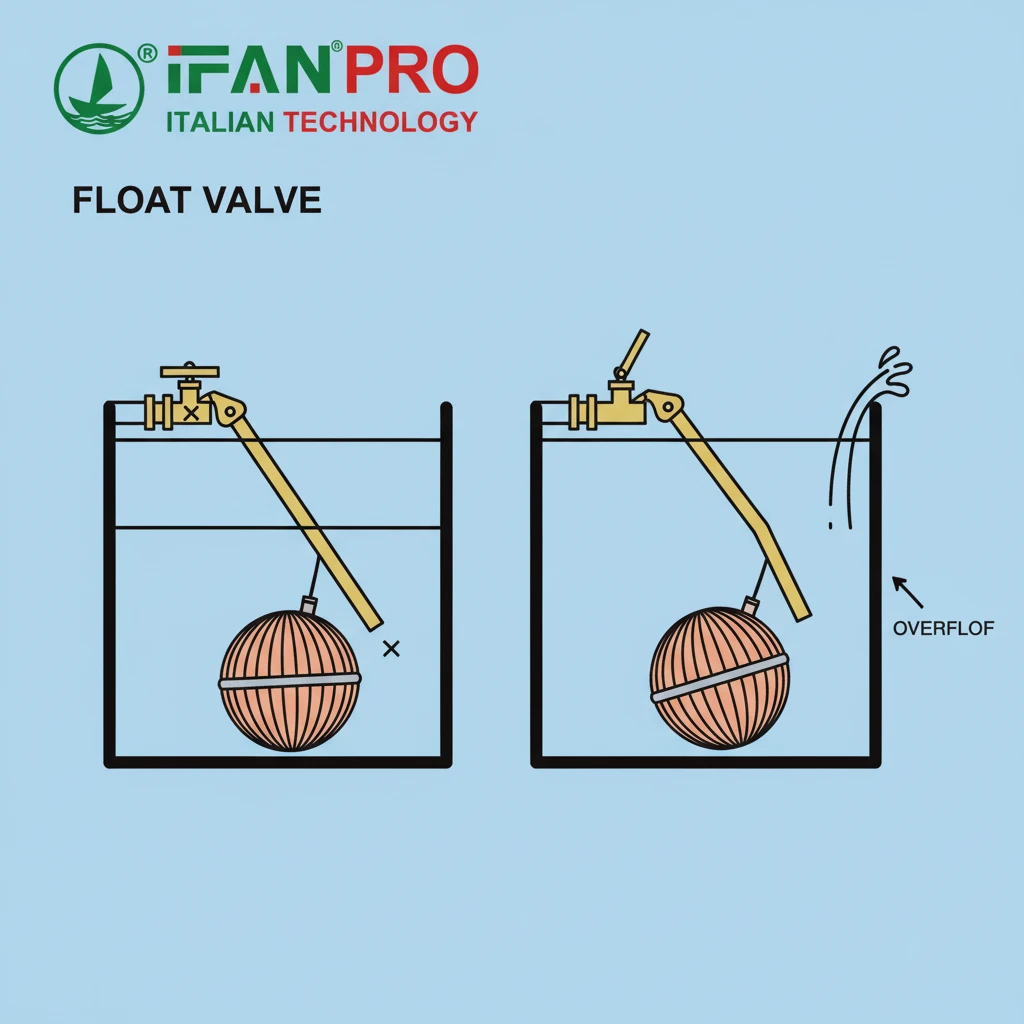
A punctured or water-logged float fails to shut off the valve because it loses its buoyancy. It becomes too heavy to rise with the water level. Since the float’s rising motion is what pushes the valve shut, a sinky float means the water inlet stays open, causing an overflow.

How the Float is Supposed to Work
Think of the float as the “brain” of the valve. It is a hollow, sealed ball or cup, usually made of plastic or copper. Its job is simple: to float on the surface of the water. As the tank fills, the water level lifts the float. The float is connected to the valve shut-off mechanism by an arm. When the float reaches a set height, it has lifted the arm enough to mechanically close the valve.
This system relies entirely on the float being lighter than water. Its hollow interior filled with air provides the necessary buoyancy.
The Two Ways a Float Fails
There are two main ways this system breaks down:
1. A Punctured or Cracked Float
If the float’s shell develops a crack or hole—from impact, age, or material fatigue—water enters the hollow space. This replaces the light air with heavy water. The float may partially fill or become completely full. Even a small amount of water inside adds significant weight. A water-filled float will not rise properly. It will sit lower in the water, allowing the water level to rise far above the intended shut-off point before it can trigger the valve to close. Often, it becomes so heavy it doesn’t rise at all, leading to continuous overflow.
2. A Water-Logged “Sealed” Float
Some cheaper plastic floats are not perfectly sealed. Over a very long time, plastics can allow tiny amounts of water vapor to permeate through the walls. This water slowly condenses and accumulates inside the float. After several years, enough water can collect to affect its buoyancy. This is a slower failure mode but very common in old systems.
Identifying and Fixing Float Problems
Diagnosing this is easy. With the water shut off, gently lift the float arm by hand. If it moves easily and the valve shuts off, the mechanism is fine. Now, shake the float. If you hear water sloshing inside, it’s compromised.
- For a punctured float: Replacement is the only option. A temporary field fix like sealing the hole with waterproof epoxy might work short-term, but replacement is safer.
- For a water-logged float: Similarly, it must be replaced. Drilling a hole to drain it destroys its function.
Pro Tip from IFAN’s Service Team: When replacing a float, consider a solid, foam-filled float instead of an air-filled one. IFAN’s float valves often use closed-cell foam floats. Even if the outer shell cracks, the foam itself retains buoyancy, preventing a complete failure and giving you time to schedule a repair, not an emergency fix.
How Can Mineral Scale and Debris Prevent the Valve from Closing Tightly?
Clean water is key. The number of service calls we get for valves clogged with sand or lime scale is surprisingly high.
Mineral scale and debris prevent the valve from closing tightly by physically blocking the valve seat or jamming the moving parts. Limescale (calcium carbonate) can crust on the seal, while sand or rust particles can get trapped between the washer and seat, creating a permanent leak path and stopping the plunger from moving freely.
The Two Types of Blockage
Debris doesn’t just affect one part; it attacks the valve system in two main areas, causing different problems.
1. Blockage at the Valve Seat and Washer
This is the most direct cause of leakage. The water supply can carry tiny particles: sand, rust flecks from old pipes, or mineral particles. When the valve tries to close, one of these hard particles can get stuck between the soft washer and the hard valve seat. The washer cannot compress the particle, so a tiny channel for water remains open.
Similarly, in areas with hard water, dissolved minerals like calcium and magnesium come out of solution and form a hard, crusty deposit called limescale. This scale can build up on the valve seat itself, creating a rough, uneven surface. The washer cannot seal against this rocky surface. The scale can also coat the washer, making it hard and ineffective.
2. Blockage in the Valve Body or Plunger Guide
Some float valve designs use a piston or plunger that moves up and down. Sediment and scale can build up in the chamber that guides this plunger. This grit acts like sand in a machine, causing the plunger to stick in the “open” position. Even if the float rises, it cannot overcome the friction to push the plunger shut.
Impact and Symptoms
The results are often intermittent or worsening leaks:
- A valve that seems to shut off slowly or never fully stops the flow.
- A leak that starts and stops or sprays erratically, as debris moves around.
- Visible crusty white or green deposits (scale) around the valve inlet.
- Gritty particles in the tank bottom, indicating a debris problem in the supply line.
A Practical Prevention and Solution Guide
Fixing this involves cleaning and prevention.
| Source of Blockage | How it Causes Failure | Immediate Action | How to Prevent it |
|---|---|---|---|
| Sand & Grit | Trapped between washer/seat; jams moving parts. | Shut off water, disassemble valve, clean all parts, flush line. | Install an in-line sediment filter before the valve. |
| Limescale | Crusty buildup on seat and parts prevents sealing. | De-scale with vinegar or commercial descaler; scrub seat clean. | Install a water softener if hardness is very high. |
| Rust Flakes | Acts like grit; can also stain and corrode components. | Flush supply line; clean valve; replace if components are corroded. | Replace galvanized steel pipes with PP-R or other non-corroding pipes. |
Our Recommendation: For clients in regions with hard water or old pipe networks, we always advise installing a simple mesh filter before the float valve. It’s a low-cost part that prevents most debris-related failures. Furthermore, valves with a simple, robust design and easy-to-clean components, like those from IFAN, minimize areas where scale and grit can accumulate and cause problems.
What Misalignment or Bending of the Float Arm Leads to Improper Operation?
Not all leaks come from broken parts. Sometimes, the mechanism is just out of place. A bent arm is a frequent find after someone tries to adjust a valve incorrectly.
Misalignment or bending of the float arm leads to improper operation by changing the critical angle and leverage needed to shut the valve. A bent arm may cause the float to rub against the tank wall, preventing it from rising fully, or it may not press the plunger down squarely, resulting in a partial seal and constant water seepage.
The Mechanics of the Float Arm
The float arm is the lever that connects the buoyant force of the float to the shut-off valve. Its length and angle are precisely calibrated. When the water lifts the float, the arm pivots. This pivoting motion is translated into a vertical or horizontal pull/push that closes the valve firmly.
For this to work perfectly, three things must be aligned:
- The Pivot Point: Must be free and not corroded.
- The Arm: Must be straight and at the correct angle relative to the water level.
- The Float: Must move freely without touching the sides of the tank.
How Bending and Misalignment Happen
This alignment is easily disturbed:
- Accidental Impact: During tank cleaning or installation of other equipment, the arm can get hit and bent downward or upward.
- Incorrect Adjustment: Trying to change the water level by forcibly bending the arm (instead of adjusting via a screw or clip) is a common mistake. This crude bending alters the geometry.
- Loose Mounting: The valve body itself can become loose in its mounting, tilting the entire assembly out of its proper position.
Consequences of a Bent Arm
A misaligned arm creates several specific failure modes:
Scenario 1: Arm Bent Downward
If the arm is bent downward, the float sits lower in the water from the start. The water level must rise much higher than intended before the float lifts enough to trigger the shut-off. This leads to an overfilled tank and potential overflow from the tank’s own outlet before the valve closes.
Scenario 2: Arm Bent Upward
If the arm is bent upward, the float sits too high. It will trigger the shut-off valve while the tank is only partially full. This results in a tank that never fills to its usable capacity.
Scenario 3: Float Rubbing on Tank Wall
If the arm is bent sideways, the float can press against the side of the tank. Friction prevents it from rising smoothly. It gets stuck, leaving the valve open and causing continuous filling and overflow.
Scenario 4: Improper Force on the Plunger
If the arm’s end that pushes the plunger is bent, it may not press it down squarely. This can cause the plunger to jam at an angle or for the washer to seal unevenly, resulting in a persistent leak.
Fixing and Aligning the System
The solution is careful inspection and correction:
- Shut off the water and empty the tank.
- Observe the mechanism. Manually lift the float. It should move smoothly in an arc without touching anything.
- Check the arm. It should be straight. Gently bend it back to its original shape if needed, but avoid weak points by bending near the middle.
- Tighten all mounting points. Ensure the valve body is secure.
- Adjust the water level correctly. Use the adjustment screw or clip if the valve has one. If it doesn’t, the correct method is to carefully bend the arm at the designated bending point (often near the valve), not in the middle.
A well-designed valve will have clear markings or an easy-to-use adjuster. IFAN’s float valves feature reinforced arms and intuitive adjustment mechanisms to prevent this common issue, ensuring the float always moves freely and transmits force correctly to shut off the water cleanly.
Conclusión
Most constant float valve leaks stem from simple, fixable issues: worn washers, faulty floats, debris, or bent arms. For a durable, reliable solution, choose IFAN’s high-quality float valves and replacement parts designed to withstand these common failures.


Comentarios recientes