
I once saw a misaligned PEX elbow cause a persistent leak months after installation. That headache taught me that perfect alignment isn’t just careful—it’s critical.
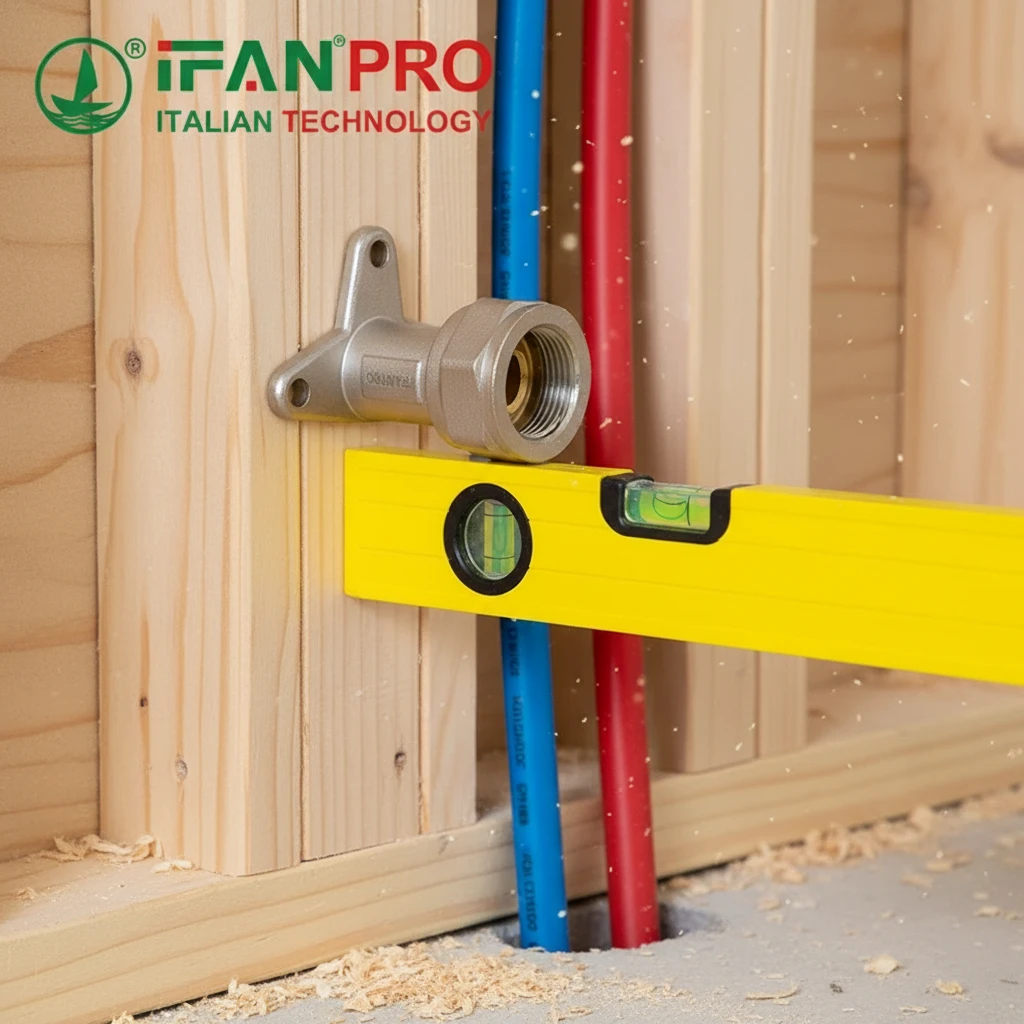
You ensure proper alignment by first using the elbow’s integrated mounting holes to secure it loosely to a stud or backing, which sets the correct orientation. Then, you use a level or an angle finder tool to verify it is perfectly plumb and level before making the final, permanent PEX connection and tightening all fasteners.
Getting this sequence right prevents stress on the piping system. Let’s go through each step to guarantee a perfect, trouble-free installation every time.
How Do You Use the Seat’s Mounting Holes as a Guide for Alignment?
Many installers forget this simple first step. They hold the elbow by hand, which often leads to mistakes.
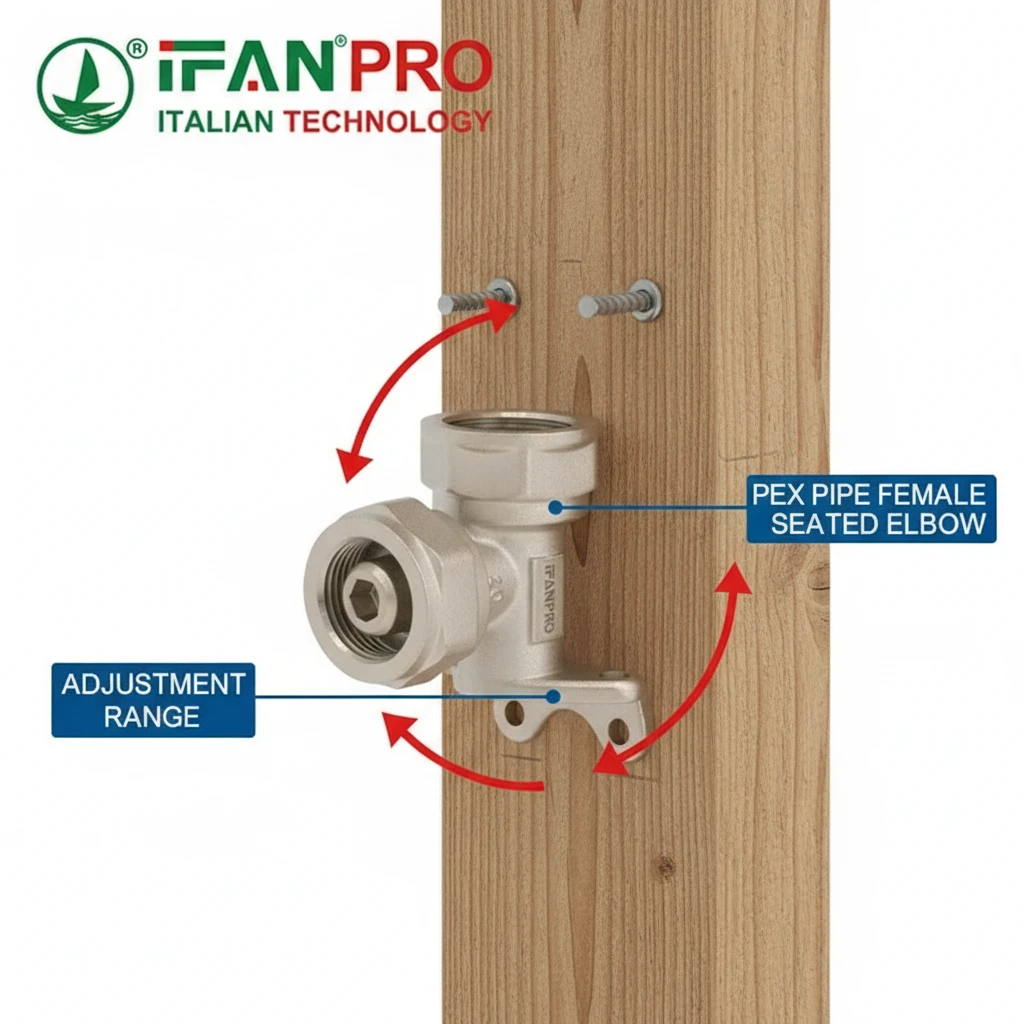
You use the seat’s mounting holes by first loosely screwing the elbow to a wooden stud or a sturdy backing board. Do not tighten the screws completely. This allows you to slightly pivot and adjust the elbow’s body while keeping its basic position and outlet direction fixed, providing a stable starting point for fine-tuning.
The Step-by-Step Mounting Process
The mounting holes on the flat plate (seat) of the elbow are your best friend for initial alignment. They are there for a reason. Here is how to use them correctly.
First, hold the elbow against the wall or surface where you want it. Mark the spots for the screws through the mounting holes. Next, drive your screws through the holes and into the stud or backing material. But here is the key part: only tighten them about halfway. The elbow should be held firmly enough not to fall, but you should still be able to wiggle it slightly with a gentle push.
This method is much better than trying to hold the elbow perfectly in place with one hand while working with the other. It acts like a third hand. The mounting holes set the “rough” position. Then, you have a stable base to make your final, precise adjustments.
Why Loose Mounting is Essential
If you tighten the screws all the way immediately, you lose all ability to adjust. Any small error gets locked in. A loose mount gives you control. You can now nudge the body of the elbow up, down, left, or right by a few millimeters. This is often all you need to get the perfect angle for the PEX pipe to connect without bending or pulling.
Think of it like hanging a picture frame. You put the nail in the wall, but you don’t hammer it flat until the picture is straight. The mounting screws are your nails, and the elbow is your picture. Final tightening happens only after everything is perfectly aligned.
What Tools Help Verify the Elbow is Perfectly Level Before Final Tightening?
Guessing is not an option. The right tools take the uncertainty out of installation.
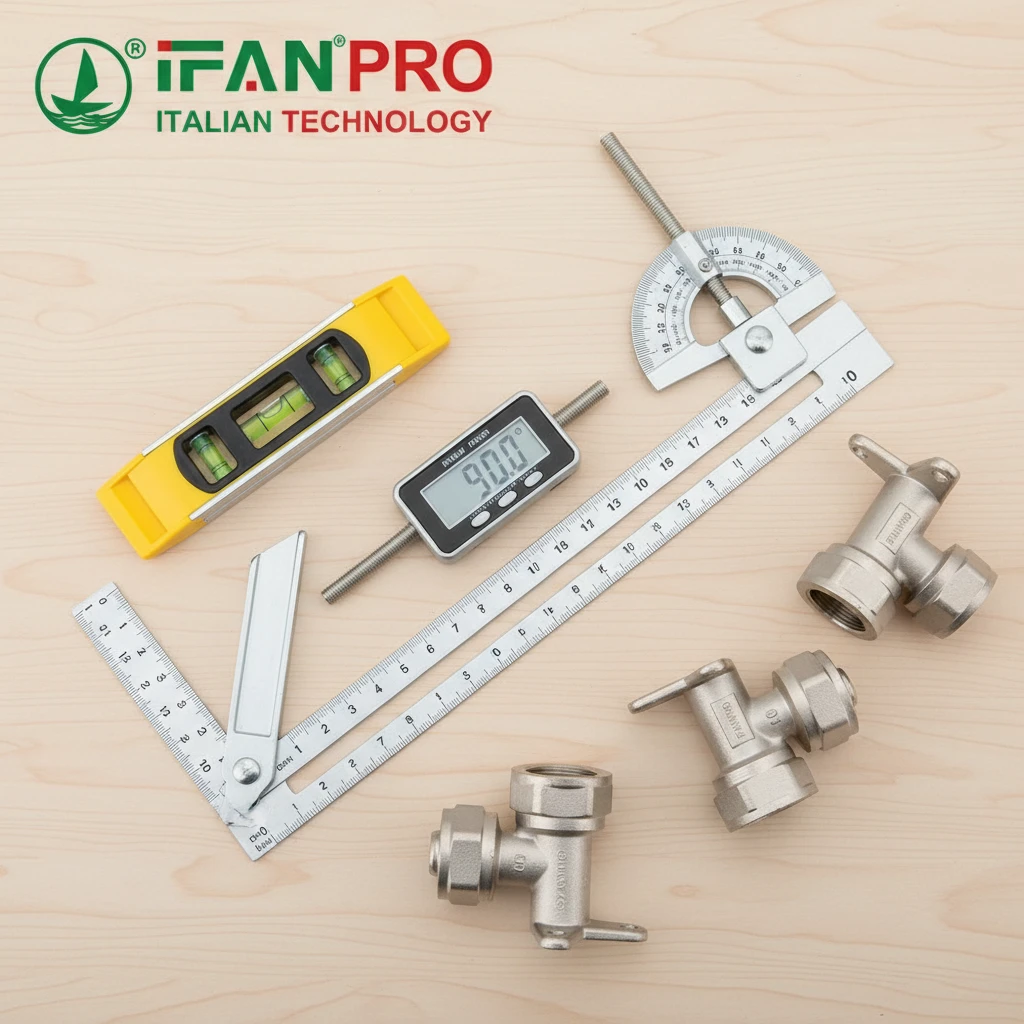
Two essential tools help verify the elbow is level: a small spirit level (or bubble level) and an angle finder (protractor). Place the level on the flat mounting seat to check for plumb (vertical) and level (horizontal) alignment. Use the angle finder to confirm the exact angle of the outlet if a standard 90 or 45 degrees is required.
The Primary Tool: The Spirit Level
A small, high-quality spirit level is the most important tool for this job. Do not rely on large contractor levels. A level that is 2-4 inches long is perfect for fitting on the elbow’s seat.
Here is how to use it:
- Check for Level (Horizontal): Place the level on the top flat edge of the elbow’s mounting seat. Look at the bubble. Adjust the elbow gently until the bubble sits perfectly between the two marked lines.
- Check for Plumb (Vertical): Turn the level 90 degrees and place it against the side of the elbow’s seat or body. Again, adjust until the bubble is centered.
You must check both directions. An elbow can be level from front to back but tilted side to side, which is just as bad. Doing both checks ensures the outlet is pointing exactly where you need it.
The Precision Tool: The Digital Angle Finder
For critical applications or non-standard angles, a digital angle finder is excellent. You place its base on the flat seat or against the outlet of the elbow. It gives you a precise digital readout of the angle (e.g., 90.0°, 45.0°). This removes any doubt. You can set the exact angle you need with scientific accuracy.
A Simple Comparison of Tools
The table below shows which tool to use for different situations.
| Tool | Best For | How to Use It | Pro Tip |
|---|---|---|---|
| Small Spirit Level | Standard 90° installations, checking for plumb and level. | Place on flat surfaces of the elbow seat. | Ensure the level itself is accurate by testing on a known-flat surface first. |
| Digital Angle Finder | Non-standard angles, precision work, verifying exact outlet degrees. | Zero it on a reference surface, then place against the elbow outlet. | Use the “hold” function to lock the reading while you make adjustments. |
| Combination Square | Quick visual check for a right angle (90°) against a reference line. | Hold the square’s ruler against the pipe outlet and the head against the wall. | Good for a fast double-check after using a level. |
Once your tools confirm perfect alignment, you can proceed. First, fully tighten the mounting screws to lock the elbow’s position. Only then should you connect and fasten the PEX pipe.
Why is Correct Alignment Crucial for the PEX Pipe’s Stress-Free Connection?
Alignment isn’t about looks. It’s about the long-term health of your plumbing system.
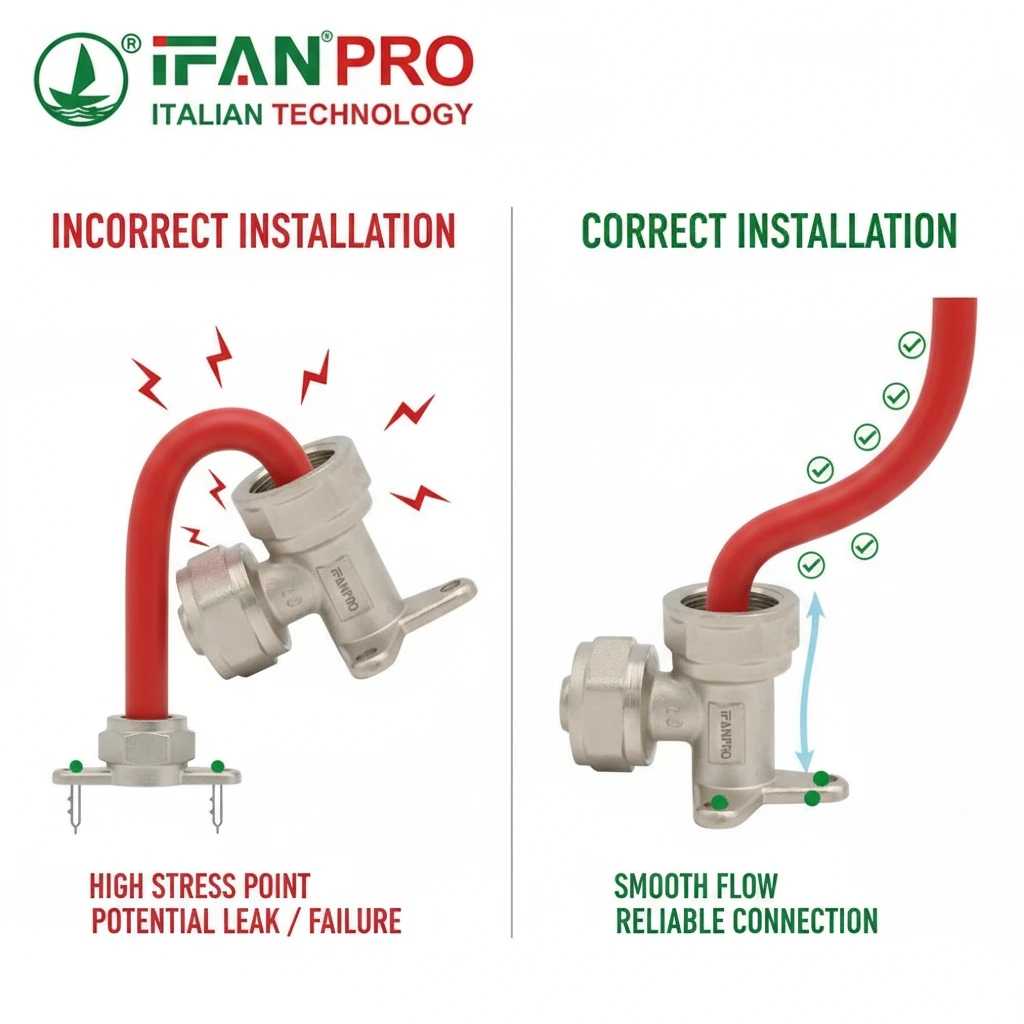
Correct alignment is crucial because it allows the flexible PEX pipe to connect in a natural, relaxed curve. A misaligned elbow forces the PEX to bend, kink, or stretch unnaturally to make the connection, creating constant internal stress that weakens the pipe, strains fittings, and leads to premature failure.
The Physics of a Happy PEX Pipe
PEX tubing is flexible, but it has a preferred, natural state. When you run a piece of PEX between two points, it wants to take the smoothest, most gentle path. A correctly aligned elbow respects this.
Imagine the elbow is a guide for the pipe. If the elbow’s outlet points exactly at the next connection point, the pipe can make a smooth, sweeping curve. There is no sharp bend. There is no sideways pull. The pipe is not under tension. This is a “stress-free” connection. The pipe and the fitting are working together naturally.
The Consequences of Internal Stress
Now, think about a misaligned elbow. The outlet points off to the side. To connect the pipe, you must pull or bend the PEX sharply to meet the next fitting.
This does several bad things:
- Creates a Kink Point: A sharp bend can partially collapse the inner diameter of the PEX, restricting water flow.
- Causes Constant Strain: The pipe is always trying to spring back to its natural shape. This puts a continuous pulling or pushing force on the connection points—the elbow’s crimp ring and the next fitting.
- Accelerates Fatigue: Over time, with water pressure cycles and temperature changes, this constant stress causes material fatigue. The PEX can slowly degrade at the stress point, or the fitting connection can slowly work itself loose.
A stress-free connection has none of these problems. The system is stable, reliable, and built to last for decades.
Visualizing the Difference
The table below contrasts the two scenarios.
| Tipo de conexión | PEX Pipe Condition | Force on Fittings | Long-Term Risk |
|---|---|---|---|
| Correctly Aligned | Relaxed, gentle curve. | Minimal to none. | Very low. Stable, long-life installation. |
| Misaligned | Bent, stretched, or twisted. | Constant pull or push (side load). | High risk of leaks, fitting fatigue, and pipe failure at the stress point. |
Taking ten extra minutes to align the elbow perfectly saves hours of future repair work and prevents potential water damage.
How Can Misalignment During Installation Lead to Future Problems?
A small mistake during installation can become a big problem later. I’ve seen the costly results.
**Misalignment leads to three main future problems: 1) *Premature leaks* from stressed fitting connections, 2) Reduced water flow and pressure from kinked or constricted pipes, and 3) Noise and vibration as water surges against pipe walls under tension. These issues often appear months later, making diagnosis difficult and repair disruptive.**
Problem 1: The Slow, Mysterious Leak
This is the most common and insidious problem. A misaligned elbow puts a sideways force (a “side load”) on the PEX connection. The crimp ring or clamp is designed to seal under direct pressure, not constant sideways pulling.
Over weeks and months, this stress can cause the seal to slowly give way. A tiny drip starts inside the wall. You might not notice it until you see water stains on the ceiling or wall, often far from the actual leak source. Repairing it means opening up the wall, a messy and expensive job that could have been avoided.
Problem 2: Poor System Performance
If the misalignment forces a sharp bend, it can kink the PEX pipe. Even a slight kink reduces the inner diameter. This acts like a clog, restricting water flow.
You might experience:
- Low water pressure at your faucets or shower.
- One fixture running slowly while others are fine.
- Strange noises as water forces its way through the restriction.
These performance issues are frustrating and hard to pinpoint without inspecting every joint.
Problem 3: Noises and Long-Term Wear
A pipe under tension behaves differently. When water flows or suddenly stops (water hammer), the stressed pipe can vibrate or move slightly. This causes knocking or ticking noises in your walls. Furthermore, the constant stress accelerates the aging of the PEX material, making it brittle over time near the fitting.
A Summary of Troubleshooting Symptoms
If you experience these issues after a new installation, misalignment could be the culprit.
| Symptom | Possible Cause from Misalignment | Likely Time to Appear |
|---|---|---|
| Damp spots or mold on walls/ceilings | Slow leak from a stressed, failed seal. | Months to a year. |
| Reduced water pressure | Kinked or constricted PEX pipe at the elbow. | Immediately or soon after. |
| Knocking or ticking sounds in pipes | Pipe vibration due to internal stress and side load. | Immediately, may worsen. |
| A single fixture has low flow | Localized kink or restriction at that fixture’s supply elbow. | Immediately. |
The solution is always the same: prevent it during installation. Careful alignment is a small investment of time that protects the entire system’s future.
Conclusión
Proper alignment of a PEX seated elbow is simple with the right steps and tools, and it prevents major future issues. For reliable, easy-to-install fittings, choose IFAN’s PEX female seated elbows with clear mounting guides.


Comentarios recientes