

I’ve seen too many PVC projects ruined by ragged, uneven cuts that leak. Choosing the right tool from the start makes all the difference.
An ideal pipe cutter combines a sharp, hard steel blade with a precise rolling/squeezing action to shear the PVC cleanly without crushing it. This design ensures smooth, burr-minimal cuts that are ready for fitting, unlike saws which often leave rough edges and plastic debris that compromise seal integrity.
Therefore, let’s break down the specific features and techniques that turn a simple pipe cutter into your most reliable tool for perfect PVC joints.
How Does the Blade Design of a Pipe Cutter Ensure Smooth PVC Cuts?
A dull blade mashes plastic; a sharp one shears it. This fundamental difference is why blade design is critical.
The blade in a PVC pipe cutter is typically a single, replaceable, ultra-sharp wheel made of hardened steel or carbide. Its sharp edge and rounded profile concentrate immense pressure on a small point as it rolls around the pipe, creating a clean scoring and shearing action that slices through the plastic fibers smoothly, preventing cracks and rough fractures.
The Mechanics of a Sharp Blade
The primary job of the blade is to initiate and guide a clean fracture. PVC is a brittle thermoplastic. When you apply a dull tool, it deforms and tears the material, leaving a crushed and ragged edge. A sharp blade, however, works differently.
As you tighten the cutter and roll it around the pipe, the sharp edge of the wheel creates a deep, controlled score line. With each rotation and incremental tightening, this score line becomes a precise fracture path. The blade doesn’t “push through” the plastic like a saw tooth; it guides the material to break cleanly along this pre-defined line. This process is similar to how a glass cutter works.
Key Blade Design Features
Not all cutter wheels are the same. The best ones have specific traits:
- Material Hardness: The blade must be harder than the PVC to avoid dulling quickly. Hardened steel is common, but carbide-tipped blades last much longer, especially on larger pipes or frequent use.
- Edge Geometry: The edge is finely ground to a sharp angle. A well-maintained sharp edge reduces the force needed and produces a cleaner cut. A dull or chipped edge will crush and tear.
- Blade Profile: The wheel is usually slightly rounded or bevelled. This shape helps it roll smoothly around the pipe and concentrate the cutting force on a very narrow contact line.
Comparison of Cutting Blade Types
Here’s how different blades affect the cut:
| Blade Type | Материал | Best For | Cut Quality | Durability |
|---|---|---|---|---|
| Standard Hardened Steel | Hardened Alloy Steel | Light to medium DIY use | Good, smooth finish | Moderate, needs occasional sharpening/replacement |
| Carbide-Tipped | Steel body with Carbide edge | Professional, heavy-duty, or large-diameter pipe | Excellent, very clean cut | Very High, resists wear exceptionally well |
| Standard Utility Knife | Thin Steel Blade | Scoring or very small soft pipes | Poor, tends to wander and crush | Low, dulls almost immediately |
The Result of Proper Blade Design
When all these elements come together, the result is a cut that is nearly square and has a slight, uniform burr that is easy to remove. The pipe’s round shape is maintained because the cutter applies uniform, radial pressure. This is crucial because an out-of-round pipe will not seat properly in a fitting, leading to gaps and potential leaks. The right blade design is the first and most important step in achieving a perfect, pressure-tight connection.
What Are the Advantages of a Pipe Cutter Over Saws for PVC Piping?
While a saw might seem versatile, it introduces problems a pipe cutter is designed to avoid.
A pipe cutter offers four main advantages over saws: it produces cleaner, squarer cuts with minimal debris; it works faster with less physical effort in tight spaces; it ensures the pipe stays perfectly round; and it creates a safer work environment with no flying plastic chips or risk of blade binding.
Advantage 1: Superior Cut Quality and Cleanliness
This is the most significant advantage. A saw, whether a hacksaw or a power saw, uses abrasive teeth to grind through the PVC. This action:
- Creates Plastic Dust: It generates fine PVC dust that gets everywhere and can be hazardous if inhaled.
- Leaves a Rough Kerf: The cut edge is frayed and covered in loose plastic strands (burs). This debris must be thoroughly cleaned out, or it can wash into the system and block valves or damage seals.
- Often Causes Chattering: A saw can vibrate or “chatter,” leading to an uneven cut line.
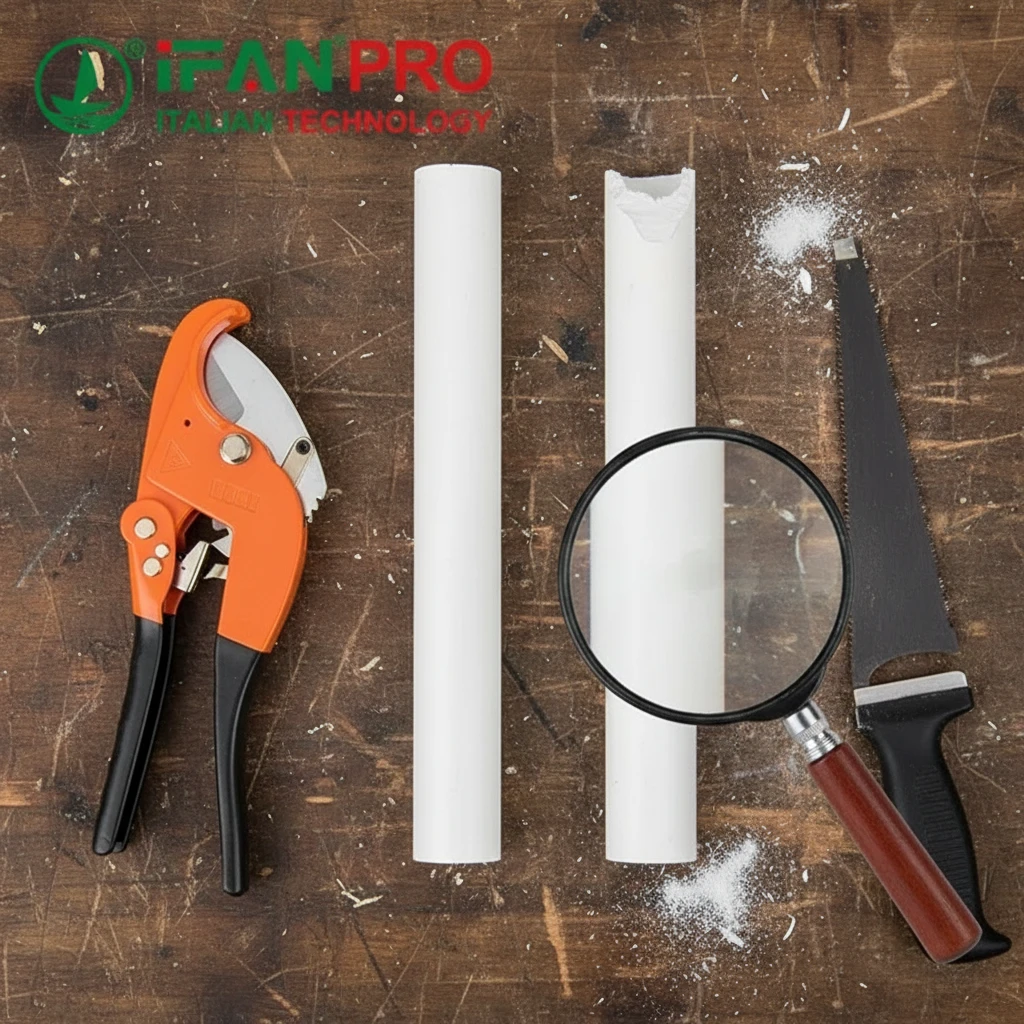
A pipe cutter shears the plastic cleanly. It produces a small, solid plastic curl as a byproduct—no dust. The resulting edge, while having a small burr, is fundamentally smooth and solid, requiring a simple swipe with a deburring tool.
Advantage 2: Speed, Efficiency, and Accessibility
Using a pipe cutter is fundamentally faster for single pipes. You simply place it, tighten, and rotate. In just a few spins, the pipe is cut. There’s no need for clamps, saw horses, or making sure your cut line is perfectly vertical to avoid angling the saw.
Furthermore, pipe cutters excel in confined spaces. Trying to use a full-size hacksaw or power saw next to a wall, in a trench, or inside a cabinet is extremely difficult. A compact ratcheting pipe cutter can fit into incredibly tight spots where a saw simply cannot operate.
Advantage 3: Maintaining Pipe Integrity
A saw can easily distort the pipe’s shape. The pressure and vibration from sawing can squeeze the pipe out of round, especially on thinner-walled Schedule 40 or flexible PVC. An out-of-round pipe will not create a uniform seal with a fitting. A pipe cutter applies even, radial pressure, ensuring the pipe remains perfectly circular right up to the moment of the clean break.
Advantage 4: Safety and Control
Sawing, especially with power tools, carries risks of kickback, binding, or the blade slipping. It also sends plastic chips flying, requiring eye protection. A pipe cutter is a controlled, hand-powered tool with no risk of binding or kickback. The cutting action is contained, making it a much safer option, particularly for new installers.
Tool Comparison Table
The table below summarizes the key differences:
| Task / Characteristic | PVC Pipe Cutter | Hacksaw / Power Saw |
|---|---|---|
| Cut Cleanliness | Very Clean, minimal debris | Rough, creates dust and plastic strands |
| Cut Squareness | Excellent, self-guiding | Requires skill/jig to maintain square |
| Speed for 1-2 Cuts | Very Fast | Slower (setup, cutting, cleanup) |
| Ease in Tight Spaces | Excellent | Poor to Impossible |
| Physical Effort | Low | Moderate to High |
| Post-Cut Cleanup Needed | Minimal (deburring only) | Extensive (deburring, dust removal) |
| Safety | High (contained action) | Lower (flying debris, blade hazards) |
| Pipe Distortion Risk | Very Low | Moderate to High |
For any plumbing work where seal integrity is paramount, the pipe cutter is the unequivocally superior tool.
What Techniques Guarantee a Square and Clean Cut with a PVC Pipe Cutter?
Having the right tool is only half the battle; using the correct technique is the other.
To guarantee a square cut, always mark the pipe around its entire circumference using a marking pen and a wrap-around guide (or a piece of paper). Position the cutter wheel directly on this line, apply firm and even pressure while rotating, and avoid over-tightening in a single step to prevent the blade from wandering or deforming the pipe.
Step-by-Step Technique for Perfect Cuts
A flawless cut is a methodical process. Rushing leads to mistakes.
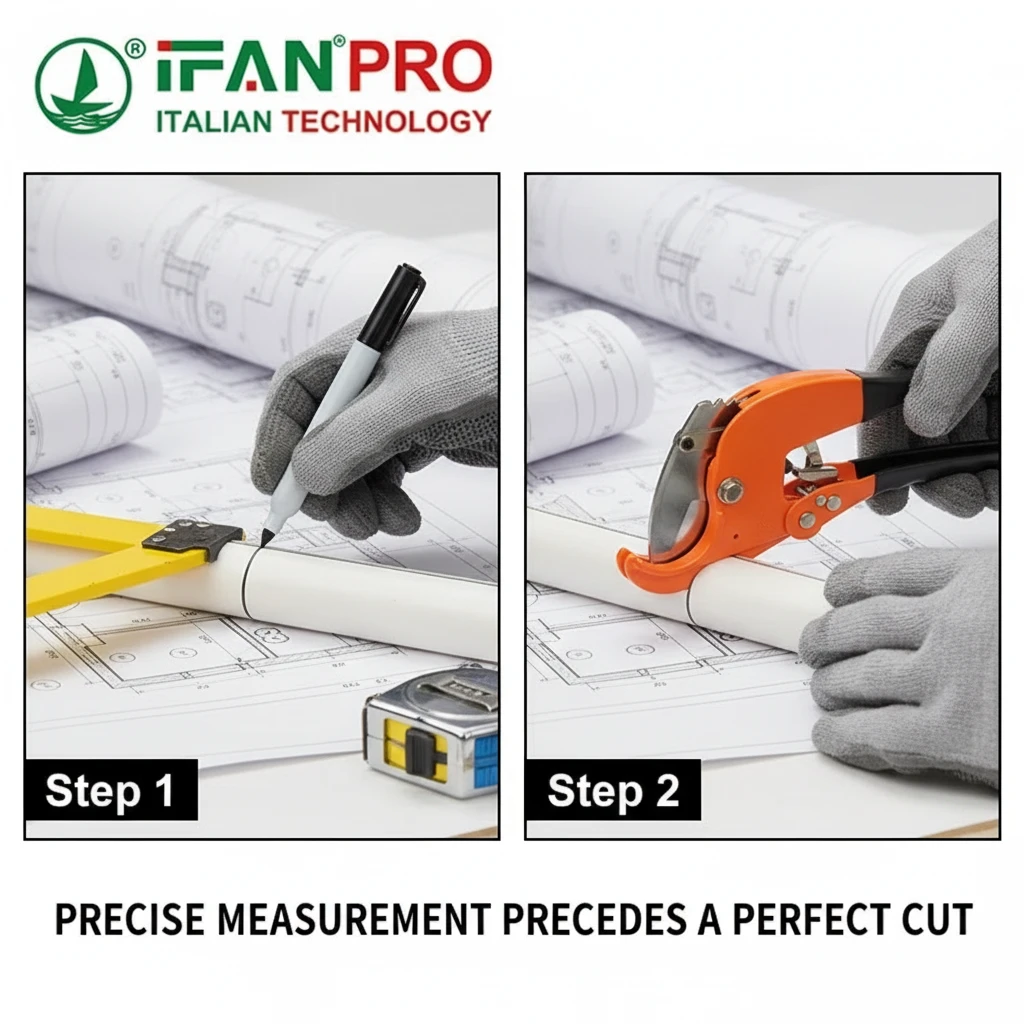
Step 1: Marking the Cut Line (The Most Important Step)
You cannot cut square if you don’t mark square. Do not just draw a single line on one side of the pipe. The pipe is round, and your eye can trick you.
- Use a PVC Marker or a permanent fine-tip marker. Pencil lines can be too faint.
- The best tool is a wrap-around pipe marker. If you don’t have one, take a square piece of paper and wrap it snugly around the pipe. Align the edges of the paper so they are straight and even around the circumference, then draw your line along this paper edge. This creates a perfect 90-degree line around the pipe.
Step 2: Positioning the Cutter
Open the cutter and place the pipe inside, snug against the rear rollers or anvils. Visually align the cutting wheel exactly on the mark you made. Before tightening, look from above to ensure the cutter body is perpendicular to the length of the pipe. A slight angle here will result in an angled cut.
Step 3: The Cutting Motion
- Initial Tightening: Close the handles and apply enough pressure to make the wheel bite into the PVC. You should feel firm resistance.
- Rotate, Then Tighten: Rotate the cutter one full turn around the pipe. Do not tighten while rotating on the first turn; just let the wheel follow the score line it creates.
- Incremental Tightening: After one rotation, tighten the cutter handle a little more—about a quarter to a half turn. Then rotate again. This cycle of “Tighten a little, Rotate a full turn” is key.
- Avoid Force: Never use extreme force. If you cannot rotate it, you have tightened too much. Back off slightly. The goal is to let the sharp blade do the work, not your muscle.
Common Mistakes and How to Avoid Them
Here is a table of common errors and the techniques to fix them:
| Mistake | Consequence | Correct Technique |
|---|---|---|
| Single-side marking | Angled, non-square cut. | Use a wrap-around guide to mark the entire circumference. |
| Not aligning the wheel on the line | Cut is in the wrong place. | Visually center the wheel on the mark before tightening. |
| Over-tightening before rotating | Blade digs in and deforms pipe; hard to rotate. | Tighten only until firm, then rotate to establish a score line first. |
| Using a dull blade | Crushed, ragged cut that requires excessive force. | Replace or sharpen the blade. A sharp cutter should require moderate effort. |
| Cutting too fast | Uneven fracture; rough edge. | Use a steady, rhythmic “tighten-rotate” cycle. |
By following this disciplined approach, you will produce perfectly square, clean cuts every time, ensuring your pipes fit together seamlessly.
How Can a Deburring Tool Improve PVC Pipe Cutter Results for Fitting?
The cut is clean, but the job isn’t done. The small burr left behind is a hidden threat to your plumbing system.
A deburring tool removes the internal and external plastic ridge (burr) created during cutting. This simple step is critical because it allows the pipe to seat fully and smoothly into the fitting socket, prevents the burr from washing into the system and causing blockages, and ensures the O-ring or solvent weld can form a perfect, uninterrupted seal.
Why Deburring is Non-Negotiable
When a pipe cutter shears the PVC, a small, raised ridge of displaced plastic is formed on both the inside and outside edges of the pipe. This ridge is the burr. It might seem insignificant, but it causes major problems:
- It Blocks Proper Seating: In a push-fit or solvent-weld fitting, the pipe must go in all the way to a defined depth stop. An internal burr acts as a speed bump, preventing the pipe from seating completely. This creates a gap, which is a guaranteed leak path.
- It Compromises the Seal: An external burr can scrape and damage the rubber O-ring inside a push-fit fitting as the pipe is inserted. For solvent welding, it creates a physical barrier that prevents the primer and cement from creating a continuous bond between the pipe and fitting wall.
- It Creates Turbulence and Debris: The internal burr disrupts smooth water flow, creating turbulence and noise. More dangerously, water pressure can eventually break this burr off, sending a piece of plastic downstream to clog a valve, faucet, or appliance.
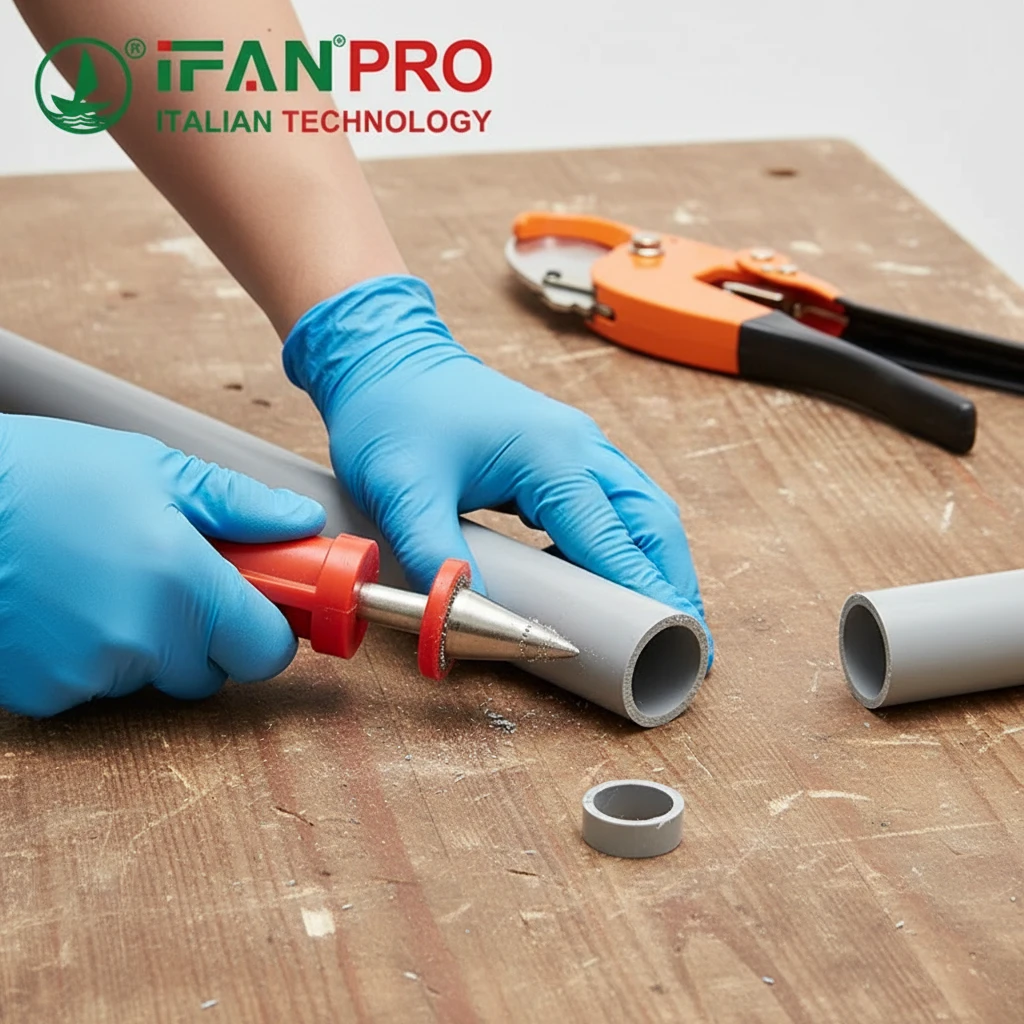
How to Use a Deburring Tool Correctly
A deburring tool is simple but must be used properly. The most common type is a dual-headed plastic tool with a conical reamer for the inside and a hooked blade for the outside.
For the Outside Edge:
- Hold the pipe firmly.
- Place the hook-shaped blade of the tool over the outside edge of the pipe.
- Apply light pressure and rotate the tool around the pipe 2-3 times. You will feel and see a thin curl of plastic come off.
- The goal is to create a slight, smooth chamfer (bevel), not to remove a lot of material.
For the Inside Edge (More Critical):
- Insert the conical reamer end into the pipe end.
- Apply firm pressure and rotate it several times until it moves smoothly without catching.
- This scrapes away the internal ridge and also slightly bevels the inner edge.
The Impact on Different Fitting Types
The need for deburring is universal, but its importance is magnified with certain systems:
| Fitting System | Risk from an Undeburred Pipe | Result of Proper Deburring |
|---|---|---|
| Solvent Cement (Glue) | Cement cannot penetrate fully; burr creates a leak path. | Allows full, deep seating and a continuous, strong chemical weld. |
| Push-Fit / Slip Fit | Pipe cannot seat fully; burr can cut the O-ring. | Ensures pipe hits the depth stop and provides a smooth surface for the O-ring to seal against. |
| Threaded Adaptors | Burr can cross-thread or damage the female threads. | Creates a clean edge for easy, straight thread engagement. |
| All Systems | Loose burr causes downstream blockages. | Eliminates a source of system contamination and failure. |
This one-minute step is the cheapest and most effective insurance policy for a leak-free, reliable installation. Never skip it.
Заключение
A sharp blade, the right technique, and a final deburring are the trio for perfect PVC cuts. For professional-grade PVC cutters, deburring tools, and all associated fittings, trust the reliability of IFAN’s tooling and components for your next project.


Последние комментарии