
I once saw a newly installed PVC drain line fail because the glue joint wasn’t right. It wasn’t a leak; it was a total separation. That moment taught me that PVC glue is more science than simple paste.
PVC glue creates a permanent seal by chemically welding the pipe and fitting together. It is not just an adhesive. The solvent in the glue softens the surfaces of both PVC pieces, and the PVC resin inside the glue then fuses them into a single, continuous piece of plastic as the solvent evaporates, forming a bond stronger than the original pipe material.
So, how does this chemical magic work in practice? Next, let’s break down the process, the steps, and the common mistakes to understand how to achieve a perfect, permanent seal every time.
How Does PVC Glue Chemically Bond with the Pipe Surface to Create a Seal?
Many think PVC glue works like regular glue, sticking things together. This misunderstanding leads to joint failures. However, the truth is far more interesting.
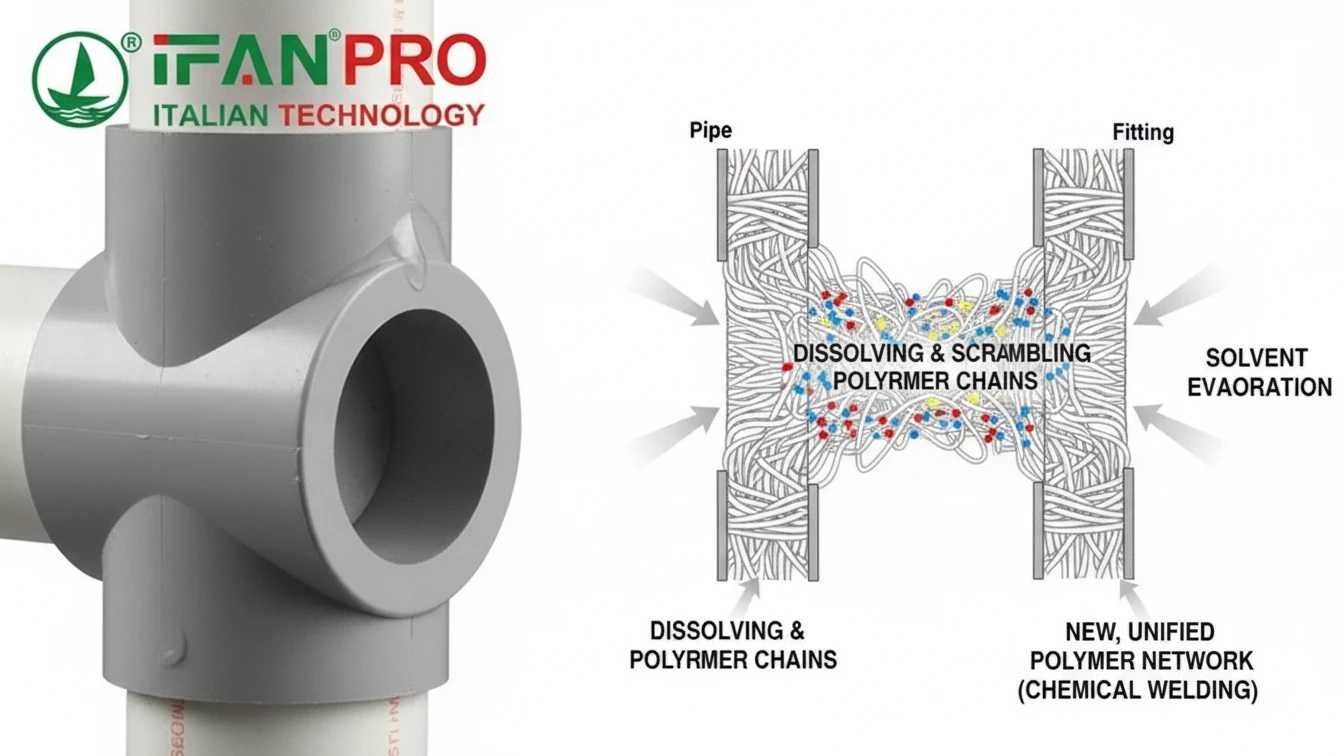
PVC glue chemically bonds by using powerful solvents to melt the top layers of the PVC pipe and fitting. This creates a liquid PVC “puddle” where the two pieces meet. The PVC resin particles in the glue mix into this puddle. As the solvents evaporate, the PVC re-hardens into one solid, homogenous piece, effectively creating a welded joint at a molecular level.
It’s Welding, Not Gluing
The key is to stop thinking of it as “glue” and start thinking of it as a chemical welding agent or solvent cement. To explain, a physical adhesive, like wood glue, holds things together by clinging to their surfaces. In contrast, PVC solvent cement works by making the two surfaces become one.
The process happens in three main stages. First, softening occurs. Specifically, when you apply the cement, the primary solvents immediately attack and dissolve the surface of the PVC. This action breaks down the polymer chains on the very top layer, turning it into a softened, gel-like state.
Next is mixing and fusion. After softening, you quickly push the pipe into the fitting. Consequently, the softened material from both the pipe and the fitting, now in a semi-liquid state, mixes together. At the same time, the PVC resin particles suspended in the cement are added to this mix, providing extra material for the bond.
Finally, the setting and curing stage begins. At this point, the solvents start to evaporate. As they leave, the PVC polymer chains from the two original pieces and the new resin re-form and entangle with each other. As a result, they re-harden into a single, solid mass. Therefore, this new material has no seam or boundary line.
Why This Bond is So Strong
This fusion creates a monolithic joint. Because of this, there is no distinct layer of “glue” between the pipe and fitting that can peel or separate. In fact, the bond line is often the strongest part of the assembly. The reason is that the newly formed PVC in the joint can be denser.
Think of it like welding two pieces of metal. The heat melts the edges, they flow together, and when they cool, they are one piece. Similarly, PVC cement does the same thing, but it uses chemicals instead of heat to melt the plastic.
The Role of Ingredients in PVC Cement
A typical PVC solvent cement has three critical components. Each one plays a specific role in creating a strong weld.
| Ingredient | Primary Role | Analogy |
|---|---|---|
| Solvents | Dissolve and soften the PVC surface to enable fusion. | Like a brush cleaner that breaks down dried paint. |
| PVC Resin | Provides additional PVC material to fill gaps and strengthen the joint. | Like adding extra metal filler rod in welding. |
| Fillers (e.g., silica) | Adds body to the cement to prevent runoff and fill minor imperfections. | Like thickener in a sauce. |
Understanding this chemical process makes it clear why proper technique is non-negotiable. Ultimately, you are facilitating a chemical reaction, not just applying a sticky layer.
What Are the Proper Steps for Applying PVC Glue to Ensure a Permanent Seal?
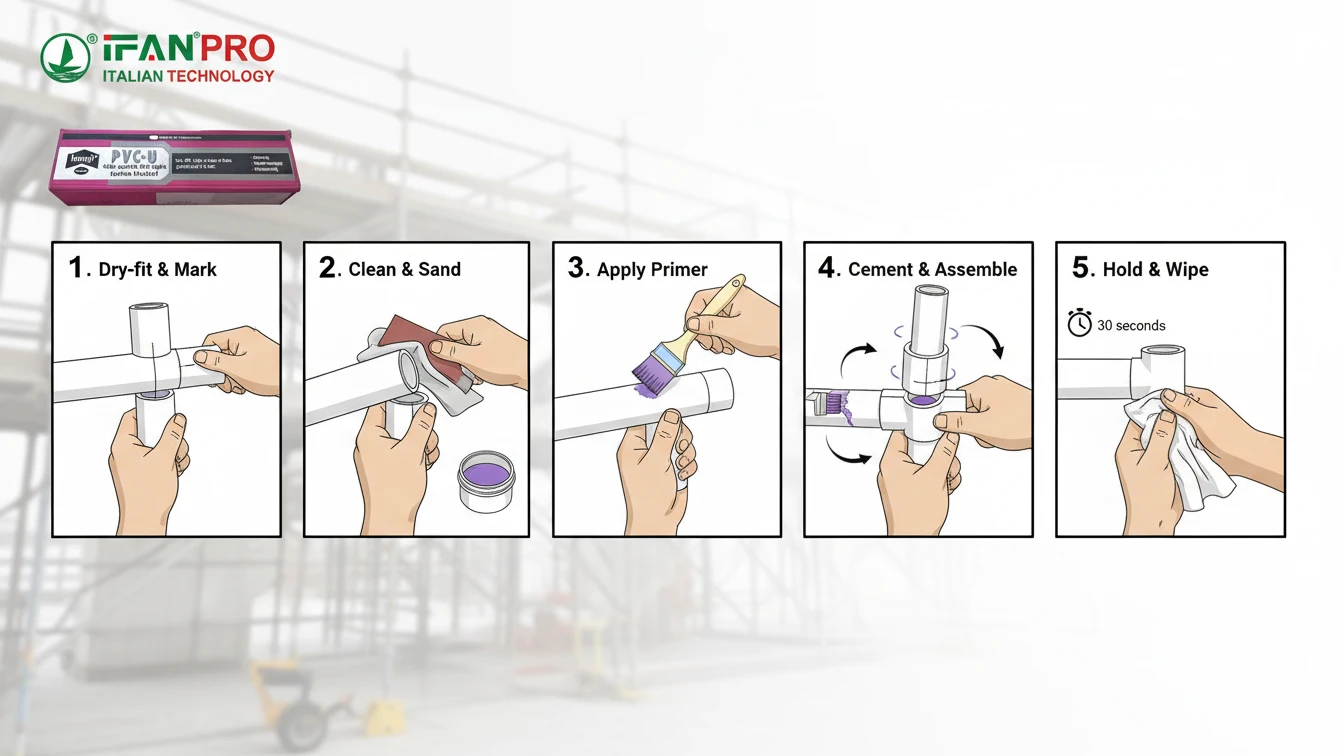
Rushing the steps is the fastest way to a weak joint. Therefore, I follow and teach a simple, non-negotiable five-step process to ensure success every time.
The proper steps are: 1) Dry-fit and mark the pieces, 2) Clean and prime the surfaces (if required), 3) Apply a thin, even coat of cement to both the pipe and fitting socket, 4) Quickly assemble with a quarter-turn, and 5) Hold firmly for 30 seconds and allow full cure time before pressurizing.
Step 1: Dry-Fit and Mark the Pieces
First, always dry-fit the pipe into the fitting without any cement. This initial check ensures the pipe is cut squarely and fits properly. Then, mark the pipe and the fitting with a line so you know the correct insertion depth. This simple step helps you achieve full insertion later when the cement is slippery.
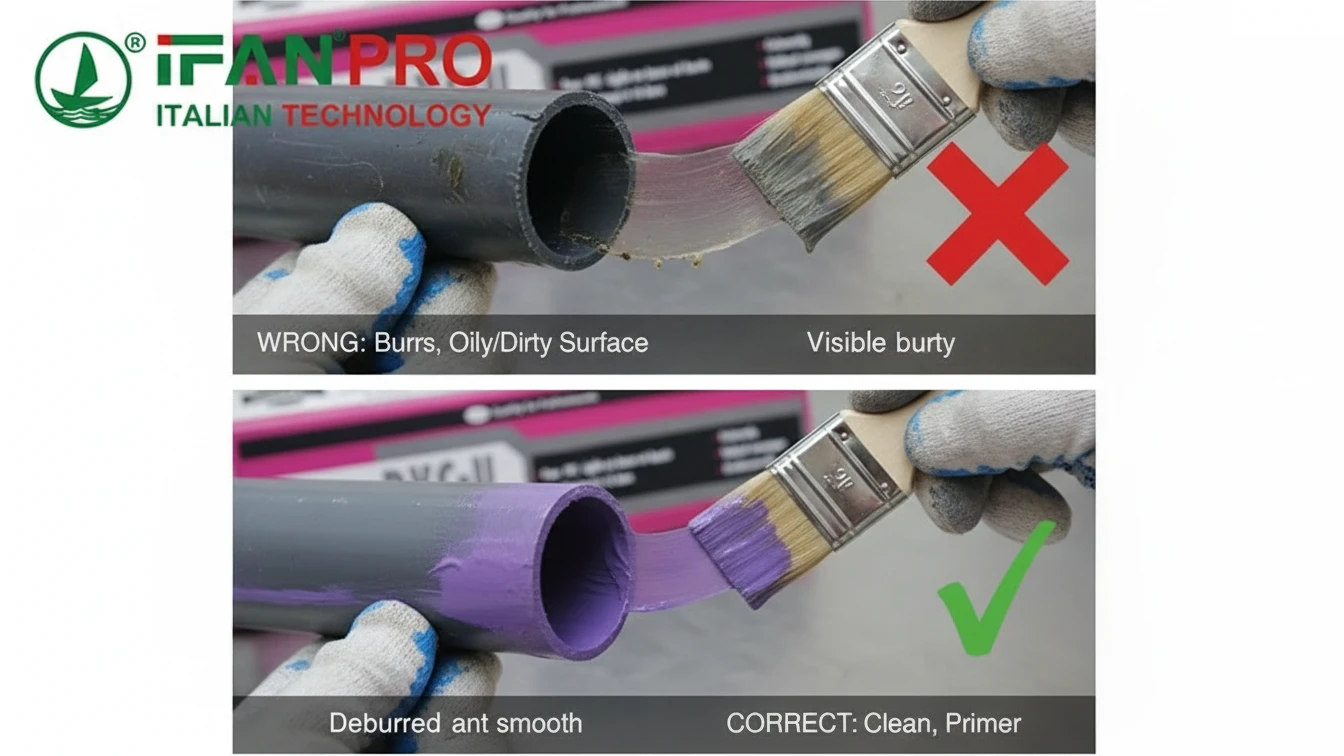
Step 2: Clean and Deburr the Surfaces
Next, use a clean, dry rag to wipe away any dirt, moisture, or grease from the pipe end and inside the fitting. Any contamination here will block the chemical weld. After that, use a deburring tool or fine sandpaper to remove the plastic burr from the cut pipe end. Remember, a burr can scrape cement off the fitting as you insert the pipe, creating a direct path for leaks.
Step 3: Apply Primer (If Specified or Recommended)
For pressure applications (like water lines) or in cold weather, PVC primer is often required or strongly recommended. Primer is a cleaner and mild softener. Its main job is to prepare the surface for the cement.
- First, apply purple primer to the pipe end and inside the fitting.
- It will dry quickly. Its function is to clean and lightly etch the PVC for a better, deeper bond.
Step 4: Apply Cement and Assemble Immediately
First, shake the cement can well. Using the applicator brush, apply a thin, even coat of cement to the outside of the pipe, going past your depth mark. Then, apply a light coat to the inside of the fitting socket.
- Important: Do not let the cement dry before assembly. Typically, you have only 10-30 seconds of working time.
- Immediately push the pipe into the fitting, twisting it about a quarter turn as you go. This twisting action spreads the cement evenly.
- Push all the way in until the pipe bottoms out in the fitting socket. Finally, align your marks.
Step 5: Hold and Allow Full Cure Time
Hold the joint firmly together for about 30 seconds. This prevents the pipe from pushing back out, which can happen as the solvents expand the plastic slightly. Then, wipe away any excess cement bead around the joint with a rag.
Now, the most critical waiting period begins. Although the joint sets quickly, it cures slowly.
Critical Cure Times
The table below shows why patience is essential. Rushing this stage is a common error.
| Action | Time to Wait | What’s Happening |
|---|---|---|
| Handling Strength | 2-5 minutes | The joint is solid enough to handle carefully for further assembly. |
| Full Cure for Water Pressure | At least 2 hours (24 hours is best) | The solvents are still evaporating; the PVC is reaching full strength. |
| Final Full Cure | 24-48 hours | The chemical welding process is complete, achieving maximum strength. |
Never test or pressurize a system before the recommended cure time. In short, impatience here is a leading cause of joint failure.
Why Does Improper Surface Preparation Cause PVC Glue Joints to Fail?
In my audits, over 70% of failed PVC joints can be traced back to poor surface prep. It’s the foundation of the entire bond, and a weak foundation always fails.
Improper surface preparation causes joints to fail because it prevents the chemical welding process. Dirt, grease, or water creates a barrier that stops the solvent from softening the PVC. A glossy, un-primed surface or a burred pipe end leads to incomplete fusion, leaving microscopic gaps that become leak paths under pressure.
Barrier Effect: Dirt, Grease, and Moisture
The chemical weld requires direct, intimate contact between the solvent cement and the pure PVC material. Consequently, any foreign substance acts as a barrier.
- Dirt and Dust: These particles get embedded in the softened PVC layer. Therefore, they prevent the polymer chains from the pipe and fitting from fully intertwining. The result is a weak, porous joint filled with tiny solids instead of solid PVC.
- Grease and Oil: These are especially damaging. The reason is that most solvents in PVC cement cannot break down oils. As a result, the grease layer simply stays between the two pieces, creating a perfect failure plane. The joint may hold initially but will separate easily with stress or temperature changes.
- Water/Moisture: Water is a solvent killer. It dilutes the cement and dramatically slows down the evaporation of the primary solvents. This can cause the cement to gel improperly or not cure at all, leaving a soft, tacky, and weak joint.
Surface Tension: The Need for Primer
New PVC pipe has a smooth, sometimes glossy surface. This smoothness can prevent the cement from properly “wetting” the surface—meaning it doesn’t spread and soak in evenly.
This is the specific purpose of PVC primer. The primer (often purple or clear) contains aggressive chemicals that perform three key actions:
- Clean the surface of any invisible contaminants.
- Etch/Soften the glossy surface, creating a microscopically rough texture for the cement to grip into.
- Begin the softening process so the cement can work faster and more deeply.
Skipping primer on a pipe that needs it means the cement is trying to bond to a hard, slick surface. Ultimately, the bond will be superficial and weak.
Cutting Errors: Burrs and Angled Cuts
How you cut the pipe matters immensely. For example, consider these two common errors:
- Burrs: A ragged burr on the pipe end is a disaster. When you insert the pipe, this hard, raised ridge of plastic will scrape off the beautiful layer of cement you just applied inside the fitting. It creates a clean, un-cemented path straight through your joint.
- Non-Square Cuts: If the pipe is cut at an angle, it cannot bottom out properly in the fitting socket. This leaves a large gap that the cement must fill. While cement has resin to fill gaps, excessive gaps create a thick, weak layer of cured cement that is prone to shrinkage cracks.
Common Prep Failures and Results
Here is a table linking bad practices to specific types of joint failure:
| Improper Preparation | Likely Type of Joint Failure |
|---|---|
| Dirty, Oily, or Wet Surfaces | Complete lack of bond; pipe pulls out easily or leaks immediately. |
| Failure to Use Primer (when needed) | Brittle joint; fails under vibration or thermal stress; cracks over time. |
| Un-deburred Pipe | Localized leak path along the scrape mark left by the burr. |
| Un-square Cut | Uneven cement distribution and potential voids, leading to leaks under pressure. |
Simply put, surface preparation is not a suggestion; it is the most critical part of the procedure. The best cement in the world cannot overcome a poorly prepared surface.
What Are the Professional Tips for Achieving a Strong, Leak-Proof PVC Seal?
Beyond the basic steps, pros have tricks that guarantee success. These tips come from seeing what works on thousands of joints in the field.
Professional tips include: using the right cement for the job and conditions, applying cement liberally to the pipe but lightly inside the fitting, always twisting during assembly, supporting pipes during cure to prevent stress, and performing a simple air or soap test before final use to catch any leaks early.
Tip 1: Select the Correct Cement Type
Not all PVC solvent cements are the same. Therefore, using the wrong one is a common mistake. Here’s a quick guide:
- For different pipe types: Use clear cement for PVC, and a specific CPVC cement for CPVC pipe (which handles hotter water). They are chemically different and not interchangeable.
- For different conditions: Use medium-bodied cement for most jobs. Conversely, use heavy-bodied cement for large-diameter pipes, loose fittings, or vertical applications where the cement needs to stay in place. Alternatively, use fast-set cement for quick repairs in dry conditions, but be prepared to work very fast.
- Check the label: Always use cement that is approved for potable water if you are working on drinking water lines.
Tip 2: Master the Application Technique
The way you apply the cement makes a big difference. Follow these specific methods:
- The “Pipe-Heavy, Fitting-Light” Rule: Apply a generous, even coat on the pipe. Then, apply a thin, even coat inside the fitting. Why? Because when you insert the pipe, the cement on the pipe will be pushed into the fitting, ensuring full coverage without creating an excess puddle that can weaken the joint or block the pipe.
- The Quarter-Turn Twist: Always twist the pipe about 1/4 turn as you push it in. This is non-negotiable. It ensures the cement spreads perfectly evenly around the entire circumference, eliminating dry spots.
- Watch for the Bead: A small, continuous bead of cement should squeeze out all around the joint. This is a good sign that you used enough cement and achieved full contact. Finally, wipe it off with a rag for a clean look.
Tip 3: Control the Cure Environment
The environment affects how the solvents evaporate and the weld forms. Pay attention to these factors:
- Temperature Matters: Ideal application temperature is between 40°F and 110°F (5°C to 45°C). In cold weather, the chemical reaction slows dramatically. So, you must use cold-weather cement, consider priming, and double the cure time. On the other hand, in hot weather, the solvents evaporate too fast, giving you less working time.
- Support the Pipe: After assembly, support the pipes so the joints are not under any bending or pulling stress while curing. Otherwise, a stressed joint can be pulled slightly apart as the PVC is soft, creating a micro-fracture.
- Ventilation: Always work in a well-ventilated area. The reason is that the fumes from the solvents are strong and flammable.
Tip 4: Always Test the Joints
A professional never assumes a joint is good; they verify it. Here’s how:
- Visual Inspection: First, check for a complete cement bead and full insertion depth.
- The Soap Test: For drain lines or low-pressure systems, you can perform a simple test. Plug one end, and pour water into the line. Then, check all joints for slow drips. For a more sensitive test, spray a soapy water solution on dry joints and look for bubbles.
- Pressure Test: For water supply lines, a proper air or water pressure test is standard. Pressurize the sealed system to 1.5 times its operating pressure and monitor the gauge for drops over 15-30 minutes. This is the only sure way to confirm integrity.
Pro vs. Amateur Mistakes Summary
| Professional Practice | Common Amateur Mistake | Result of the Mistake |
|---|---|---|
| Uses primer on pressure joints. | Skips primer to save time or money. | Joint is brittle and fails under stress. |
| Cuts pipe squarely and deburrs. | Makes rough cuts and ignores the burr. | Burr scrapes cement, creating a leak path. |
| Applies cement to both pipe and fitting. | Applies cement only to the pipe. | Incomplete coverage inside the fitting. |
| Twists during assembly. | Pushes straight in without twisting. | Uneven cement distribution, leading to dry spots. |
| Allows full 24-hour cure. | Tests the system after 1 hour. | Joints blow apart or leak under pressure. |
Заключение
A permanent PVC seal relies on chemical welding, not just glue. Perfect your surface prep, follow the steps, and allow full cure time. For guaranteed results, use high-quality IFAN PVC solvent cements, primers, and fittings designed to work perfectly together.


Последние комментарии