
I once watched a newly installed pressure system fail because a single port on a brass cross leaked. That moment taught me that true reliability comes from a precise, step-by-step process, not just guesswork.
To ensure leak-proof sealing on all four connections of a brass cross, you must combine the correct thread sealant for each port, follow a specific criss-cross tightening sequence to prevent body distortion, use a torque wrench for consistent force, and always perform a final pressure test. Missing any one of these steps risks a failure.
Leaks often happen not because of the fitting’s quality, but because of how we install it. Let’s break down the exact process to guarantee a perfect seal every time.
What is the Correct Thread Sealing Technique for Each Port of a Brass Cross?
Choosing the wrong sealant is the fastest way to a leak. I’ve seen everything from pipe dope to hemp used incorrectly, leading to immediate or gradual failures.
The correct technique is to use a high-quality, paste-style thread sealant compatible with your fluid and pipe material on the male threads of all four ports. For gas lines or high-vibration applications, use PTFE tape as a secondary seal, wrapping it clockwise 4-6 times, but never use tape alone on tapered pipe threads as it can cause cracking.
Understanding Thread Types and Sealant Roles
First, you must know what you’re working with. Most brass cross fittings use NPT (National Pipe Tapered) threads. The “taper” means the threads get slightly wider. The goal of the sealant is not to fill gaps, but to lubricate the threads so they can be tightened deep enough for the metal-to-metal contact at the taper to create the primary seal. The sealant itself fills only the microscopic imperfections.
Using the wrong product can cause big problems. Liquid pipe thread sealants that cure hard can make future disassembly impossible and may shrink, causing leaks. Teflon tape used alone on NPT threads is risky; the tape can prevent the threads from engaging fully, leading to under-tightening and leaks, or over-tightening and cracked fittings.
Step-by-Step Application Guide
Here is the recommended method, developed from countless installations:
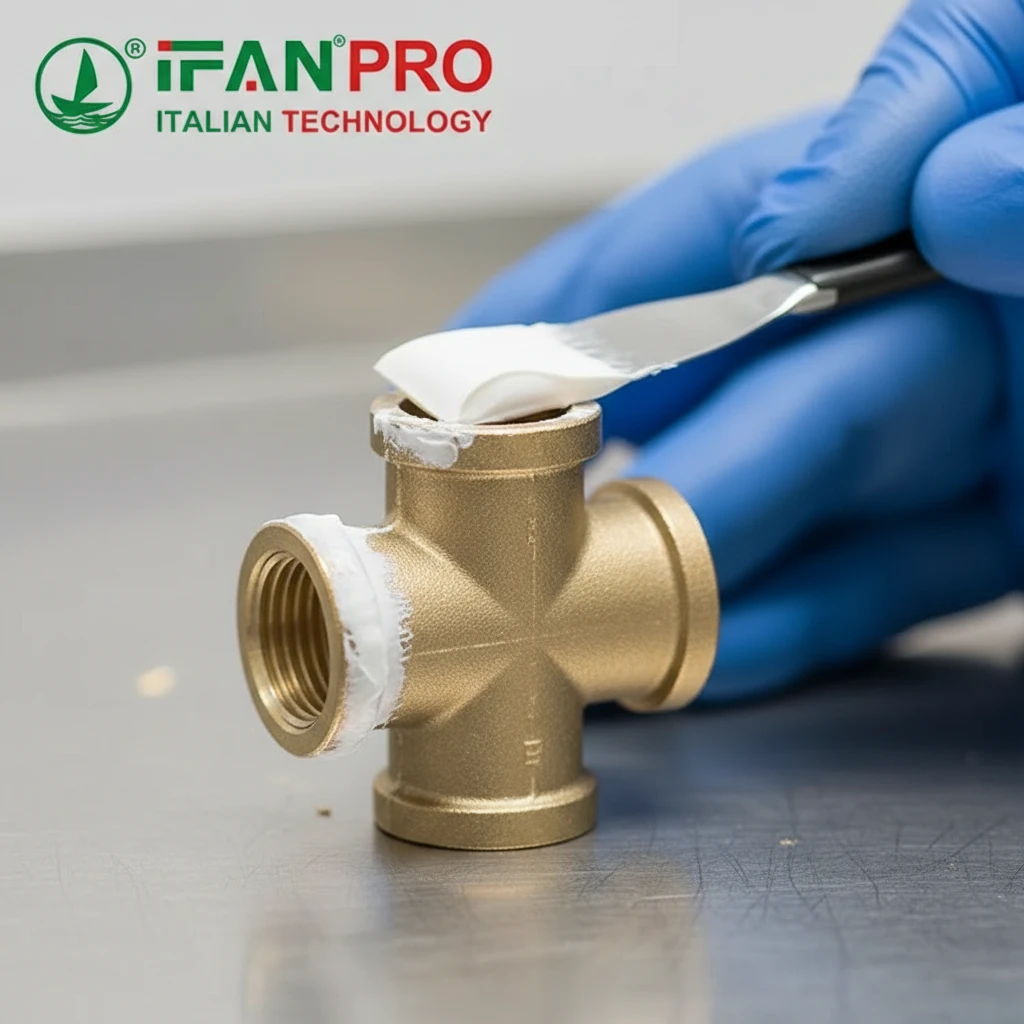
- Clean the Threads: Use a clean rag to remove all dirt, oil, and metal chips from both the male and female threads. Any debris will compromise the seal.
- Apply Paste Sealant: For all standard water, oil, or compressed air applications, apply a generous, even layer of a non-hardening paste sealant (like a quality PTFE paste) to the male threads only. Start 1-2 threads back from the end and cover all threads completely.
- Optional Tape for Critical Lines: For gas lines or systems with high vibration, combine sealants. First, wrap high-density PTFE tape clockwise (as you look at the end of the thread) 4-6 times over the male threads. Then, apply a thin layer of paste sealant over the tape. This combination is extremely reliable.
- Hand-Tighten First: Screw the fitting in by hand until it becomes snug. This ensures the threads are properly engaged before you use a tool.
Thread Sealant Selection Guide
| Application | Recommended Sealant Type | Key Reason | What to Avoid |
|---|---|---|---|
| Standard Water Lines | High-quality PTFE Paste | Easy disassembly, reliable seal. | Hard-setting compounds. |
| Gas Lines | PTFE Tape + PTFE Paste Combo | Extra security against gas molecule leakage. | Tape alone; it’s not rated for gas by many codes. |
| Oil / Fuel Lines | Paste Sealant Rated for Fuels | Resists chemical breakdown from hydrocarbons. | Standard water-based sealants. |
| Oxygen Systems | Specialized Teflon Paste | Non-flammable and oil-free to prevent combustion. | Never use standard sealants or tape. |
Following this technique ensures you have the right foundation for a leak-proof connection at every port.
Should You Tighten the Ports in a Specific Sequence to Prevent Distortion?
Tightening ports in a random order is like tightening lug nuts on a car wheel unevenly – it warps the entire component. I’ve measured distorted crosses that leaked immediately because of this simple mistake.
Yes, you absolutely must tighten the ports in a specific sequence. Tightening ports opposite each other in a criss-cross pattern prevents distorting the body of the cross. This keeps all thread alignments perfect and ensures even sealing pressure on every connection.
Why Sequence Matters: The Science of Stress
A brass cross is a single casting with four openings. When you tighten a fitting into one port, you apply tremendous force that pushes against the opposite side of the fitting’s internal cavity. If you then tighten the port directly opposite, you compound that stress, potentially pulling the fitting out of round or creating tiny cracks. Tightening adjacent ports one after another can twist the entire body.
The goal is to distribute this clamping force evenly around the center of the cross. The correct sequence minimizes internal stress and keeps the fitting perfectly aligned, so all threads seat squarely and seal correctly.
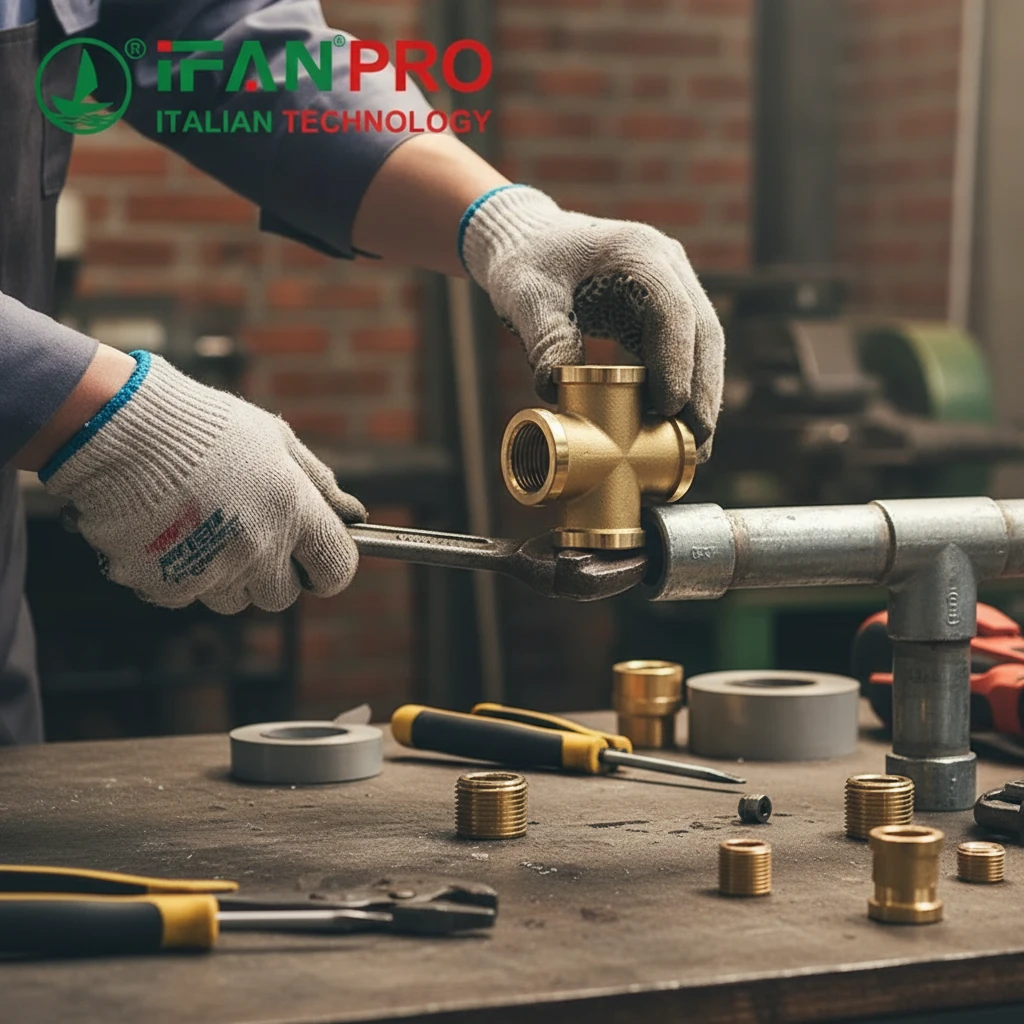
The Recommended Tightening Procedure
Follow this sequence as if you were tightening the head bolts on an engine:
- Hand-Tighten All Ports First: Run all connectors (pipes, adapters) into their respective ports by hand until snug. Do not use tools yet. This gets all threads started straight.
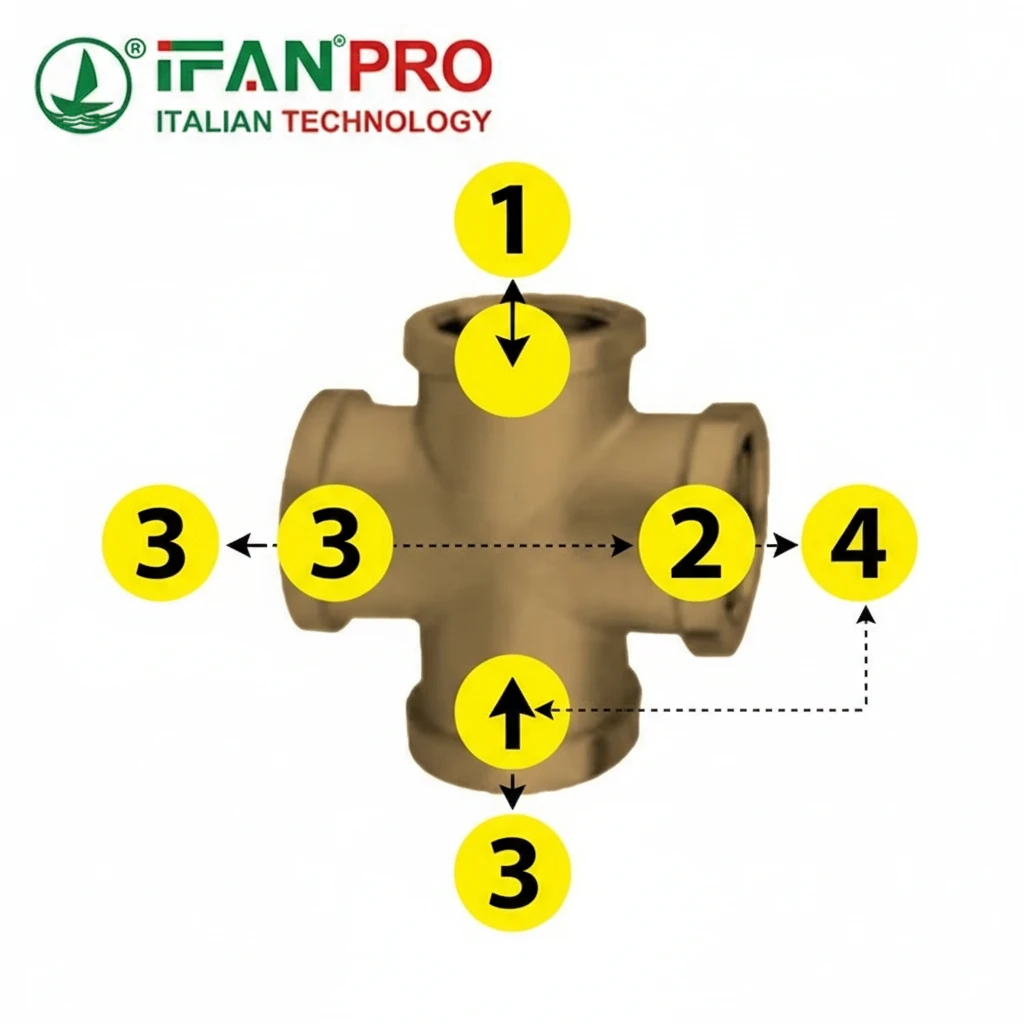
- Apply Initial Tool Tightening (50% Torque): Using a wrench, go to each port in the following order and tighten each to about half your final torque value.
- Step 1: Port A (choose any as your starting point).
- Step 2: Port C (the port directly opposite A).
- Step 3: Port B (adjacent to A).
- Step 4: Port D (opposite B).
- Apply Final Tightening (100% Torque): Repeat the exact same criss-cross sequence (A, C, B, D) to bring all connections up to the full, specified torque value.
This two-step, criss-cross method ensures that pressure builds uniformly. The fitting body remains stable and true, giving every thread sealant the best possible surface to work against.
Common Mistakes and Their Results
Ignoring sequence leads to predictable problems:
- Leaking from a “Seated” Port: You tighten one port fully, then the one opposite. The cross body distorts, breaking the seal on the first port you tightened, even though you didn’t touch it again.
- Difficulty Threading the Last Connector: If the body twists, the threads on the last port will no longer be aligned straight, making it hard to screw in the final pipe and guaranteeing a poor seal.
- Hidden Stress Points: Uneven stress creates weak points that may fail later under system pressure or thermal cycling.
By following the disciplined sequence, you treat the cross as a complete system, not just four separate holes.
How Does Using a Torque Wrench Improve Sealing Reliability on All Threads?
“Good and tight” is not a technical specification. I’ve calibrated enough failed joints to know that human feel varies wildly; a torque wrench replaces guesswork with engineering precision.
Using a torque wrench improves sealing reliability by applying the exact, manufacturer-recommended clamping force to every connection. This ensures the tapered NPT threads are pulled together perfectly to form a metal-to-metal seal without the risk of under-tightening (which causes leaks) or over-tightening (which can strip threads or crack the fitting).

The Problem with “Feel” and Standard Wrenches
When you use a standard wrench or adjustable spanner, you rely on your own strength and experience. One person’s “snug” is another person’s “loose.” Furthermore, as you move from one port to the next, your arm gets tired, and the force you apply changes. This inconsistency is the enemy of a uniform, leak-proof assembly.
Over-tightening is a more common and dangerous problem than under-tightening. People often think “tighter is better.” With tapered pipe threads, this is false. Excessive force can:
- Strip the threads, especially in softer materials like brass.
- Crack the fitting body at the base of the port.
- Deform the threads, destroying the precise taper needed for sealing.
- Make future disassembly nearly impossible without damaging the entire assembly.
How a Torque Wrench Solves This
A torque wrench is a calibrated tool that measures the rotational force (torque) you apply. When you set it to a specified value, it will click or indicate when that exact force is reached. This gives you three major advantages:
- Consistency: Every single port is tightened with identical force. This is critical when following the criss-cross sequence, as each step in the sequence relies on uniform pressure distribution.
- Prevention of Damage: You cannot accidentally apply 100 ft-lbs of force when the specification calls for 35 ft-lbs. The tool physically stops you, preventing costly breaks and replacements.
- Compliance with Standards: Manufacturer specifications and engineering codes provide torque values for a reason. Using a torque wrench ensures your installation meets that professional standard.
Finding and Applying the Correct Torque Value
You cannot use the same torque for a 1/2″ pipe as a 2″ pipe. The correct value depends on the pipe size, material, and the sealant used. A general guideline comes from formulas based on thread size, but the best practice is to refer to the fitting manufacturer’s data sheet.
| Nominal Pipe Size (NPT) | Recommended Torque Range (ft-lbs) for Brass Fittings | Notes |
|---|---|---|
| 1/4″ | 8 – 10 ft-lbs | Easy to over-tighten. Use a small torque wrench. |
| 1/2″ | 15 – 20 ft-lbs | The most common residential size. |
| 3/4″ | 25 – 30 ft-lbs | |
| 1″ | 35 – 40 ft-lbs | Significant force is needed; “feel” is very unreliable here. |
| 2″ | 70 – 85 ft-lbs | Requires a large torque wrench and proper leverage. |
Important: These values are examples. Always confirm the specific torque for your fitting. When in doubt, start at the lower end of the range, test, and adjust if needed. Using a torque wrench transforms installation from an art into a repeatable science, guaranteeing that all four ports are sealed with optimal, uniform pressure.
What is the Final and Essential Step to Verify a Leak-Proof Installation?
Even a perfect installation can have a hidden flaw. The final test is not a formality; it is the only way to be sure. I never let a system go live without it.
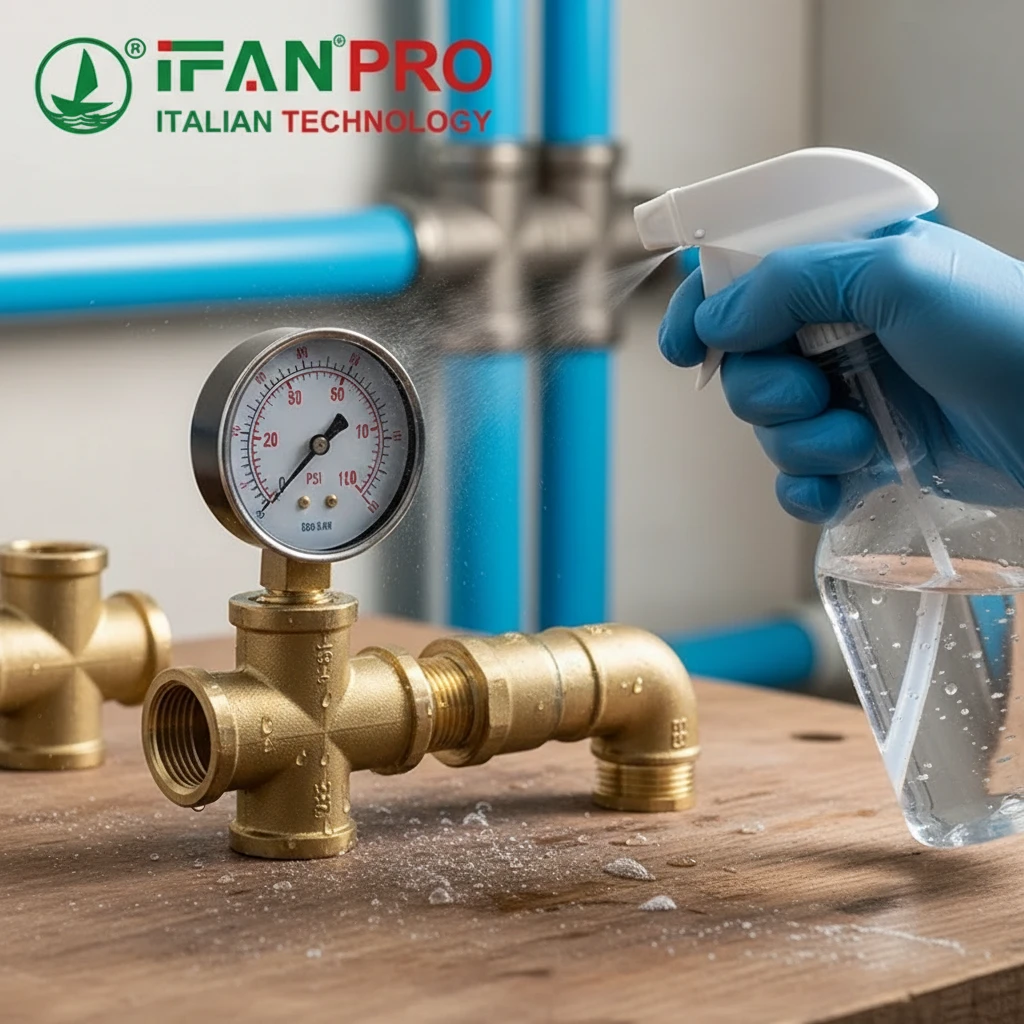
The final and essential step is a full system pressure test. This involves isolating the section with the new brass cross, filling it with water or air, pressurizing it to 1.5 times the system’s normal operating pressure, and holding it for a minimum of 15-30 minutes while carefully inspecting all four connections and threads for any drop in pressure or visible weeping.
Why Visual Inspection is Not Enough
You cannot see a microscopic leak. A connection can feel rock solid and look perfect but still seep fluid under pressure over time. This is especially true with gases. The pressure test is the definitive proof that your techniques—the sealant, the sequence, the torque—have all worked together successfully.
Skipping this step means accepting risk. A leak that appears days or weeks later is far more expensive and disruptive to fix than one caught immediately before the walls are closed up or the system is energized.
How to Perform a Proper Pressure Test
Follow this methodical procedure:
- Isolate the Section: Close valves before and after the newly installed brass cross to create a test loop. If valves aren’t present, you may need temporary caps or plugs.
- Install Test Points: Install a pressure gauge and a fill/bleed valve in the test loop. A hand pump for air or a water line connection for hydrostatic testing will be needed.
- Pressurize the System:
- For Water Systems (Hydrostatic Test): Fill the loop completely with water, purging all air. Connect a pump and raise the pressure to 1.5 x the maximum operating pressure (e.g., if normal pressure is 50 PSI, test at 75 PSI).
- For Air/Gas Systems (Pneumatic Test): Extreme caution is needed due to stored energy. Use a regulated air supply to slowly raise pressure. Often, a lower test pressure is used with a soap solution for bubble testing. Always follow local safety codes for pneumatic testing.
- Hold and Observe: Once at test pressure, close the supply valve. The pressure must hold steady for a minimum of 15-30 minutes. Watch the gauge closely. Any drop indicates a leak.
- Physical Inspection: While pressurized, thoroughly inspect all four connections of the brass cross, the threads, and the body itself. For air tests, spray a soapy water solution over every joint and look for the formation of bubbles, which pinpoint even the tiniest leak.
Pressure Test Log Sheet
Documenting your test is a professional practice.
| Test Parameter | Detail/Result | Pass/Fail |
|---|---|---|
| System Type | (e.g., Domestic Cold Water) | |
| Test Medium | Water | |
| Operating Pressure | 60 PSI | |
| Test Pressure | 90 PSI | |
| Test Start Time & Pressure | 10:00 AM – 90 PSI | |
| Test End Time & Pressure | 10:30 AM – 90 PSI | |
| Visual/Bubble Inspection | No drops, no bubbles observed. | |
| Overall Result | PASS |
If the test fails, depressurize the system completely before tightening any connection. Often, a very slight additional turn on the leaking port is enough, but you may need to disassemble, re-clean, and re-apply sealant. Never tighten fittings under pressure.
This final test is your quality assurance. It turns a “hopefully leak-free” installation into a guaranteed leak-proof one.
Заключение
Achieving a leak-proof brass cross requires methodical steps: correct sealant, a criss-cross tightening sequence, a torque wrench for precision, and a final pressure test. For fittings engineered to make this process reliable, choose IFAN’s premium brass cross fittings, known for their precise threading and consistent quality.


Последние комментарии