

I once saw a storage tank overflow because someone bent a float arm the wrong way. That messy lesson taught me that proper adjustment is a simple but crucial skill.
You adjust the water level on a float valve by changing the position or angle of the float. For most common valves, you gently bend the metal float arm up to raise the water level or down to lower it. For valves with an adjustment screw, you turn the screw to move the float. The goal is to set a level that leaves safe space at the top of the tank.
Getting it right prevents waste and damage. Let’s walk through the correct steps and key safety tips.
What is the Standard Method for Bending the Float Arm to Change Level?
Most people’s first instinct is to bend the arm, but doing it wrong can break the valve. I’ve replaced several valves damaged by brute force.
The standard method is to gently bend the metal float arm by hand to change the water level. To raise the shut-off level, bend the arm upward. To lower the shut-off level, bend the arm downward. Always apply pressure close to the hinge/pivot point of the arm, not at the middle or near the float ball, to avoid damaging the valve seal or breaking the arm.

Understanding the Float Arm Mechanism
The float arm is a simple lever. The float ball at the end sits on the water. As the water level rises, the ball lifts the arm, which slowly closes the valve. When you bend the arm, you change the angle at which the float ball sits. This changes the water level needed to lift the ball high enough to shut off the valve.
The key is to bend the arm at the right spot. Think of the arm as having three parts:
- The end with the float ball.
- The middle section.
- The section closest to the valve body (the pivot point).
You must apply bending pressure near the pivot point, right where the arm connects to the valve. This allows for a controlled, gentle bend that changes the angle without twisting or warping the rest of the mechanism.
Step-by-Step Bending Guide
Here is a safe process to follow:
- Turn Off the Water: Always shut off the water supply to the tank before making any adjustments. This prevents the tank from refilling while you are working.
- Flush the Tank: Flush the toilet or drain the tank so the water is below the current shut-off level. This gives you room to work and see the float’s current position.
- Identify the Pivot Point: Locate where the float arm connects to the valve body. This is your bending zone.
- Bend Gently with Both Hands: Use one hand to hold the valve body steady. Use your other hand to grip the float arm firmly, just a few centimeters away from the pivot point. Apply slow, steady pressure to bend the arm up or down. Do not jerk or use excessive force.
- Test the Adjustment: Turn the water supply back on and let the tank fill. Observe the new shut-off level. If it’s not correct, turn the water off, drain the tank a little, and repeat the gentle bending process.
Comparison of Bending Techniques
The table below shows the right and wrong way to bend.
| Action | Correct Method | Incorrect Method | Result of Incorrect Method |
|---|---|---|---|
| Bending Point | Apply pressure near the valve pivot point. | Bending the middle of the arm or at the float ball. | Can kink or break the arm. Puts stress on the valve seal. |
| Force Used | Slow, steady, controlled pressure. | Quick, jerking, or excessive force. | Over-adjustment, leading to a level that’s too high or low. |
| Tool Use | Use hands only for standard brass/plastic arms. | Using pliers or wrenches without protection. | Tools can crush or crack the arm, causing leaks. |
Remember, small bends make a big difference. It is better to make two small adjustments than one large, incorrect bend that ruins the valve.
How Do You Adjust Valves with a Threaded Rod or Screw Mechanism?
Modern valves often have a screw adjustment. This is easier than bending, but you must know which way to turn it. I prefer this design because it allows for very precise control.
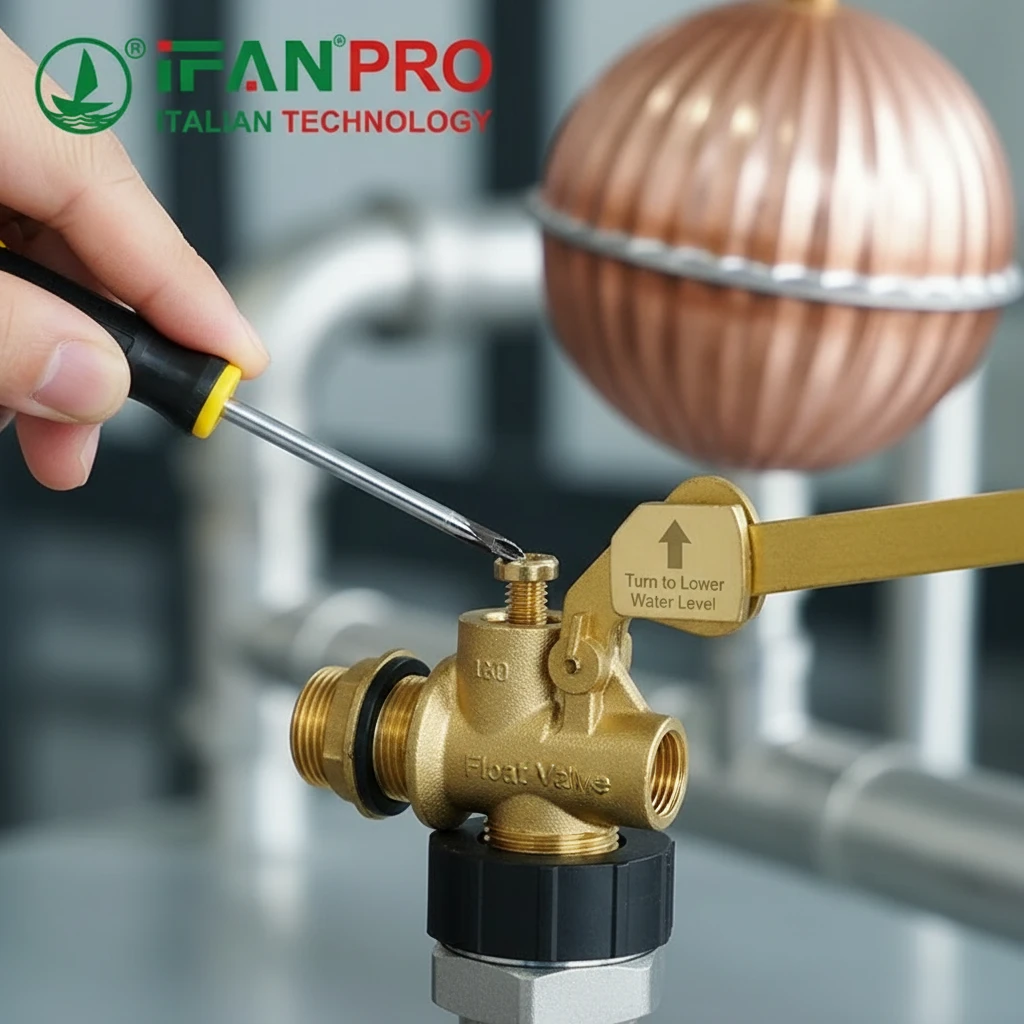
You adjust valves with a threaded rod or screw by turning the adjustment mechanism. Typically, turning a screw clockwise or rotating a threaded plastic rod will raise the float, which lowers the final water level. Turning it counter-clockwise lowers the float and raises the water level. Always refer to the manufacturer’s instructions, as the direction can sometimes vary.
Identifying the Adjustment Type
Many newer float valves, especially in toilets and larger industrial tanks, use a screw or threaded rod for adjustment. This design is more user-friendly and precise. You will usually see one of two things:
- A Plastic Screw: Located on top of the valve where the fill valve enters, or on the float cup itself.
- A Threaded Plastic Rod: The float is attached to a vertical rod with threads. Turning the rod or a dial at the top moves the float up or down on the threads.
The general rule is: clockwise rotation raises the float setting, which makes the valve shut off earlier, at a lower water level. Think of it as screwing the float “up” the thread, so it doesn’t need to rise as far with the water to trigger shut-off.
Step-by-Step Screw Adjustment Guide
Follow these steps for a safe and accurate adjustment:
- Locate the Screw or Rod: Find the adjustment mechanism. It is usually clearly visible and may be labeled with “+” and “-” or “High/Low” symbols.
- Make a Small Turn: Use your fingers or a screwdriver to turn the screw. Start with a quarter or half turn. You do not need to turn off the water for small screw adjustments on many valves, but it is a good practice to avoid accidental overflows.
- Observe and Test: Flush the tank and watch it refill. See where the water stops relative to your target level (like the overflow pipe).
- Repeat if Necessary: If the level is not correct, make another small turn in the appropriate direction. Remember: Clockwise for Lower, Counter-Clockwise for Higher is a good standard mantra.
Common Valve Types and Their Adjustment
Here is a quick guide for different mechanisms:
| Valve Adjustment Type | How to Adjust | Visual Guide | Typical Direction for Lowering Level |
|---|---|---|---|
| Standard Float Arm | Bend the metal arm gently by hand. | Arm bending near pivot. | Bend arm downward. |
| Plastic Screw (on top) | Turn the screw with a screwdriver. | Screw on valve head. | Turn clockwise. |
| Threaded Float Rod | Rotate the rod or the float cup. | Vertical threaded rod. | Rotate clockwise to raise the float cup. |
| Adjustable Sliding Clip | Squeeze and slide the clip on the rod. | Plastic clip on a thin rod. | Slide the clip down the rod. |
The screw mechanism eliminates guesswork and prevents damage from bending. For critical applications or expensive valves, this is the recommended design.
What is the Proper Water Level to Leave for Expansion and Safety Margin?
Setting the level too high is a common and costly error. I’ve been called to fix water damage from tanks that had no safety margin.
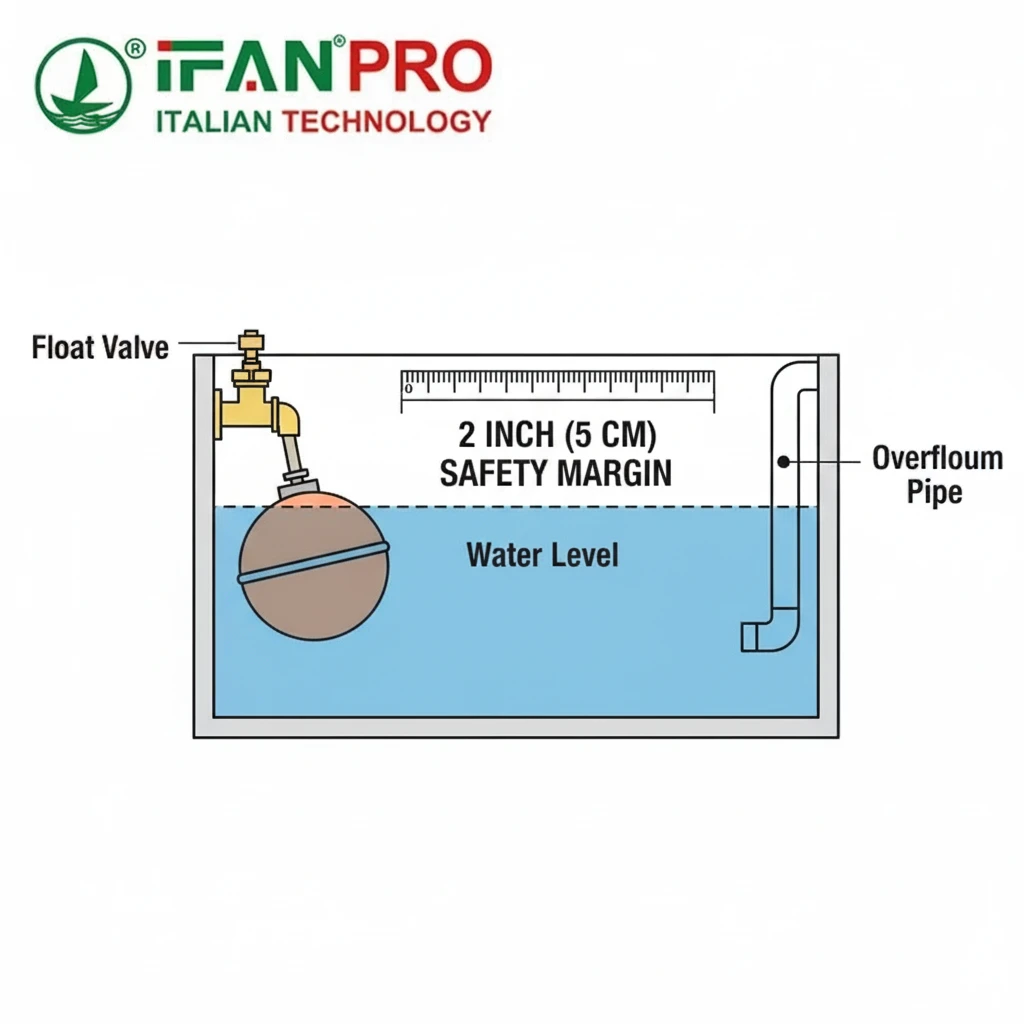
The proper water level should be at least 1 to 2 inches (2.5 to 5 cm) below the top of the overflow tube or the tank’s outlet. This space acts as a critical safety margin to prevent water from spilling over the top if the valve shuts off slightly late, and it allows for water expansion and wave action without causing a leak.
Why the Safety Margin is Non-Negotiable
The empty space at the top of your tank is not wasted. It is a vital buffer zone that protects your property. There are three main reasons for this safety margin:
First, it accounts for system tolerance. No float valve is perfect. A slight delay in shut-off, or a tiny bit of wear on the seal, can mean the water rises a few millimeters higher than intended. Without a safety gap, this turns into an overflow. The overflow tube is the last line of defense, but the water level should never routinely reach it.
Second, it allows for water expansion. Water expands as it heats up. In a storage tank, especially if located in a warm environment or if the incoming water temperature changes, the water volume can increase slightly. This expansion needs space, or it will create pressure and force water out of the nearest opening.
Third, it prevents splash-out. When new water enters the tank, it can cause waves and splashing. If the tank is filled to the absolute brim, this agitation can easily cause water to splash over the sides or into the overflow pipe, leading to constant moisture and potential damage.
How to Find and Set the Correct Level
Follow this practical guide:
- Locate Key Markings: Find the overflow tube (in toilets) or the outlet pipe (in storage tanks). Your target water level must be below the top of this tube.
- Measure the Gap: After adjusting the valve, let the tank fill completely and shut off. Use a ruler to measure the vertical distance from the water surface to the top rim of the overflow tube. Your goal is 1-2 inches (2.5-5 cm).
- The 75-80% Rule: For large storage tanks, a good rule of thumb is to fill the tank to only about 75-80% of its total height. This ensures a consistent and safe air gap at the top.
Recommended Safety Margins for Different Tanks
Use this table as a general guide:
| Tank Type | Recommended Safety Margin Below Overflow | Reason for Margin |
|---|---|---|
| Toilet Tank | 1 inch (2.5 cm) minimum | Prevents water from draining into overflow tube during fill cycle, saving water. |
| Residential Water Storage Tank | 2 inches (5 cm) minimum | Accounts for expansion, wave action, and valve shut-off lag. |
| Industrial/Commercial Tank | 2-4 inches (5-10 cm) or more | Larger volume means greater expansion and wave potential; critical for system safety. |
| Pressure Tank (with diaphragm) | Set to factory pre-charge pressure. | Level is controlled by air pressure, not a float. Do not adjust without specialist knowledge. |
A correct safety margin is a sign of a professionally installed and maintained system. It is a simple step that prevents most common overflow problems.
What Common Mistakes Should You Avoid When Adjusting the Float Arm?
Most valve failures I see are from adjustment errors, not manufacturing defects. Avoiding these mistakes saves time and money.
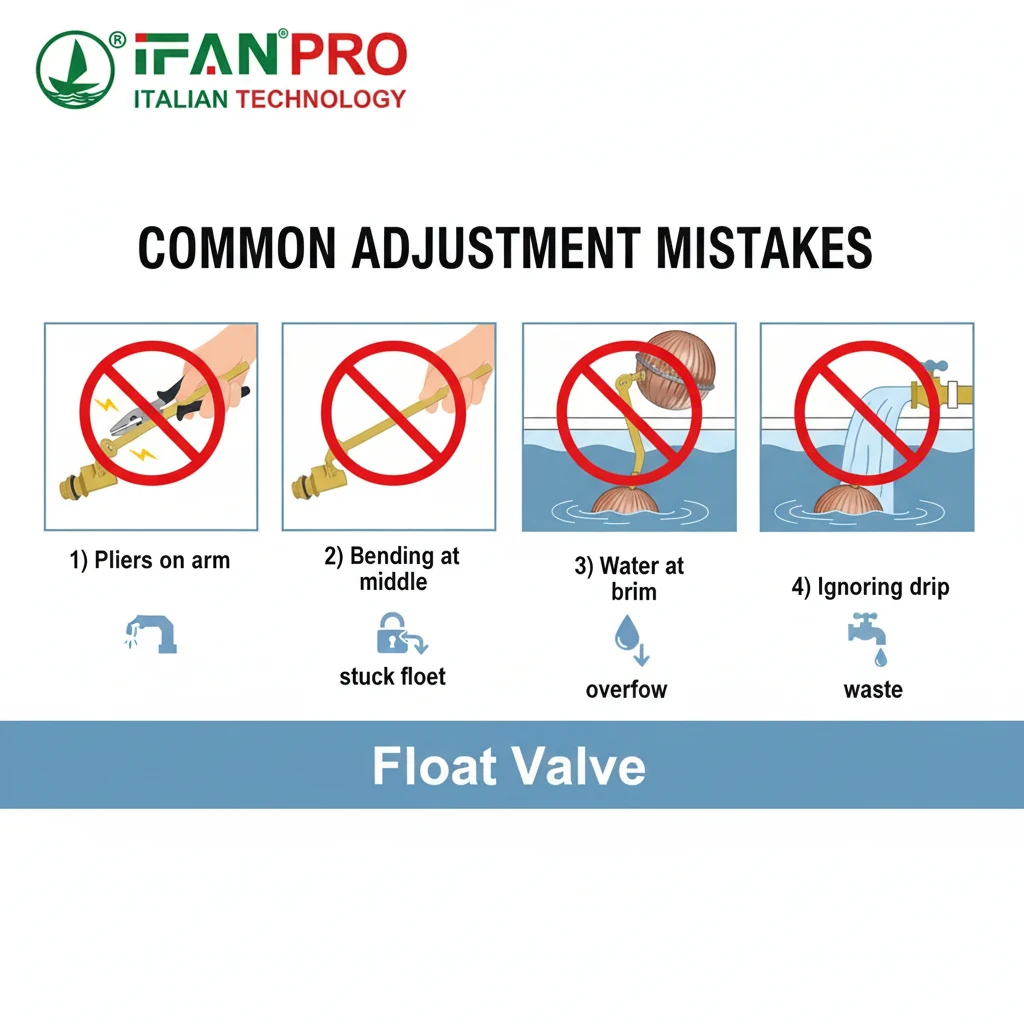
The most common mistakes to avoid are: using excessive force and bending the arm in the wrong place, setting the water level too high with no safety margin, ignoring a worn-out valve seal that causes continuous leaking, and forgetting to check the adjustment after testing. These errors lead to overflows, water waste, and valve failure.
Mistake 1: Using Pliers and Excessive Force
Many people think the arm is too stiff to bend by hand, so they grab pliers. This is the number one cause of broken arms and damaged pivot points. Pliers can crush the metal, create a weak point, and lead to a crack. The metal can also fatigue and snap later.
The Fix: Always use your hands. If the brass arm is too stiff to bend by hand, it may be a sign of age or corrosion. Consider replacing the entire float valve assembly. Forcing it will only cause a bigger problem.
Mistake 2: Bending at the Middle or Near the Float
Bending the arm in the middle changes the geometry of the lever. It can cause the float ball to sit at an odd angle, making it stick or not move smoothly. Bending near the float ball can crack the seal on the ball itself, causing it to fill with water and sink, which makes the valve fail completely.
The Fix: Always focus the bending force right next to the valve body, at the pivot point. This gives you the most control and the least risk of distorting the arm’s function.
Mistake 3: Not Testing and Observing
People often bend the arm, turn the water on, and walk away. They don’t watch the tank fill to see if the new shut-off point is correct and stable. A valve can sometimes stick or close slowly.
The Fix: After every adjustment, watch a full fill cycle. Ensure the water stops at the desired level and stays there. Listen for any hissing or dripping sounds that indicate the valve is not fully sealed. Check back 15 minutes later to confirm no slow leaking is occurring.
Mistake 4: Ignoring a Bad Valve Seal
Sometimes, the problem isn’t the float level—it’s the valve itself. If the rubber or plastic seal (the “plunger” or “washer”) inside the valve is worn, corroded, or clogged with debris, the valve will leak continuously. No amount of bending will fix a faulty seal.
The Fix: Before adjusting the arm, check for a constant trickle of water into the tank even when it’s full. If this is happening, you likely need to clean or replace the valve’s internal seal. This is a cheap and simple repair part.
Summary Table of Mistakes and Solutions
| Common Mistake | Likely Consequence | Practical Solution |
|---|---|---|
| Using tools like pliers | Cracked or broken float arm. | Use hands only. If too stiff, replace the valve. |
| Bending in the wrong spot | Float sticks or doesn’t move right. | Bend only near the pivot point close to the valve. |
| Setting level too high | Water overflows or runs into overflow pipe. | Always leave a 1-2 inch safety gap below the overflow. |
| Not testing after adjustment | Unnoticed slow leak or incorrect level. | Always observe a full fill cycle and double-check. |
| Ignoring a worn seal | Constant water running and waste. | Replace the internal valve seal or the entire valve. |
By being aware of these pitfalls, you can make adjustments confidently and correctly the first time.
Заключение
Adjusting a float valve is simple if you know the right method, set a safe water level, and avoid common errors. For reliable, easy-to-adjust float valves and precision plumbing components, trust ИФАН for your supply needs.


Последние комментарии