

I once got a panicked call from a client whose basement was getting wet from a cracked PEX line. The immediate pressure to stop the water is intense, and knowing the right steps is crucial.
The best way to permanently seal a cracked PEX line is to cut out the damaged section and install a new piece using proper PEX repair couplings or clamps. This method, followed by a pressure test, ensures a reliable, long-term fix. For immediate emergencies, specialized clamps or epoxy putty can provide a temporary seal until a permanent repair is made.
Let’s break down the entire process, from stopping the water right now to ensuring your repair lasts for years.
What Are the Emergency Methods to Temporarily Seal a Cracked PEX Line?
Water spraying from a pipe is an emergency. Your first goal is to stop the flow immediately to prevent water damage.
For a temporary emergency seal on a cracked PEX line, first turn off the main water supply. Then, you can use a stainless-steel hose clamp over a piece of rubber (like an inner tube) wrapped around the crack, or apply a waterproof epoxy putty stick designed for plumbing. These are short-term fixes to control water until you can perform a permanent repair.
Immediate Actions to Take
When you discover a crack, speed is important. But you must act safely and correctly. First, locate your main water shut-off valve and turn it off. This stops the flow of water to the entire house and is the most critical step.
Now, you need a way to seal the crack until you can buy proper parts or get a plumber. Remember, these are temporary solutions only. They might last days or weeks, but they should not be considered a final fix.
Two Common Temporary Repair Kits
Here are two practical methods you can use with common items:
- The Hose Clamp and Rubber Patch Method: This is a classic, mechanical fix.
- Dry the cracked area of the PEX pipe thoroughly.
- Cut a small piece of thick rubber, like from a bicycle inner tube or a rubber glove.
- Wrap the rubber patch tightly over the crack.
- Place a stainless-steel hose clamp over the rubber patch and tighten it with a screwdriver until the leak stops. For larger cracks, you may need two clamps.
- The Epoxy Putty Method: This is a chemical seal that is easy to use.
- Make sure the pipe area is dry.
- Take a two-part epoxy putty stick (found at hardware stores). Knead it with your hands until the color is uniform.
- Press the putty firmly over and around the crack, molding it to cover at least an inch on either side.
- It will harden in a few minutes and block the water. Follow the product’s instructions for full curing time before turning water back on slowly.
Comparing Temporary Fix Options
| Method | How It Works | Best For | How Long It Lasts |
|---|---|---|---|
| Hose Clamp & Rubber | Creates physical pressure to seal the crack. | Small to medium cracks; easy to remove later. | A few days to weeks. |
| Epoxy Putty | Chemically bonds and hardens over the crack. | Pin-hole leaks or awkward spots; very quick. | Several weeks (not for high pressure/hot water). |
| Pipe Repair Tape | Stretchy tape wrapped tightly around pipe. | Very small leaks; temporary only. | A few days at most. |
After you apply a temporary fix, you can turn the main water supply back on very slowly to check if the leak is controlled. Then, plan to make a permanent repair as soon as possible. These temporary seals can fail without warning.
How Do You Use a PEX Repair Clamp or Coupling for a Permanent Fix?
A temporary fix buys you time. For peace of mind, a permanent repair is necessary. Using the right parts is key.
To permanently fix a cracked PEX line with a repair clamp or coupling, first cut out the damaged pipe section. Then, slide a stainless-steel clamp over the pipe end, insert a solid internal sleeve into the pipe, and tighten the clamp over it. For a coupling, insert the pipe ends into a push-fit or crimp coupling until they click or seat fully, creating a new, sealed connection.
Choosing the Right Permanent Repair Part
You have two main choices for a strong, permanent repair. Both are better than any temporary method.
- PEX Repair Clamp (also called a PEX Full-Circle Clamp): This is a two-part system. It has a rigid, internal saddle piece and an external stainless-steel clamp that tightens around it.
- PEX Coupling: This is a short connector. You cut out the bad section of pipe and use the coupling to join two new ends together. There are two types:
- Push-Fit (SharkBite-style) Coupling: No tools needed; just push the pipe in.
- Crimp or Clamp Coupling: Requires a special crimping or clamping tool.
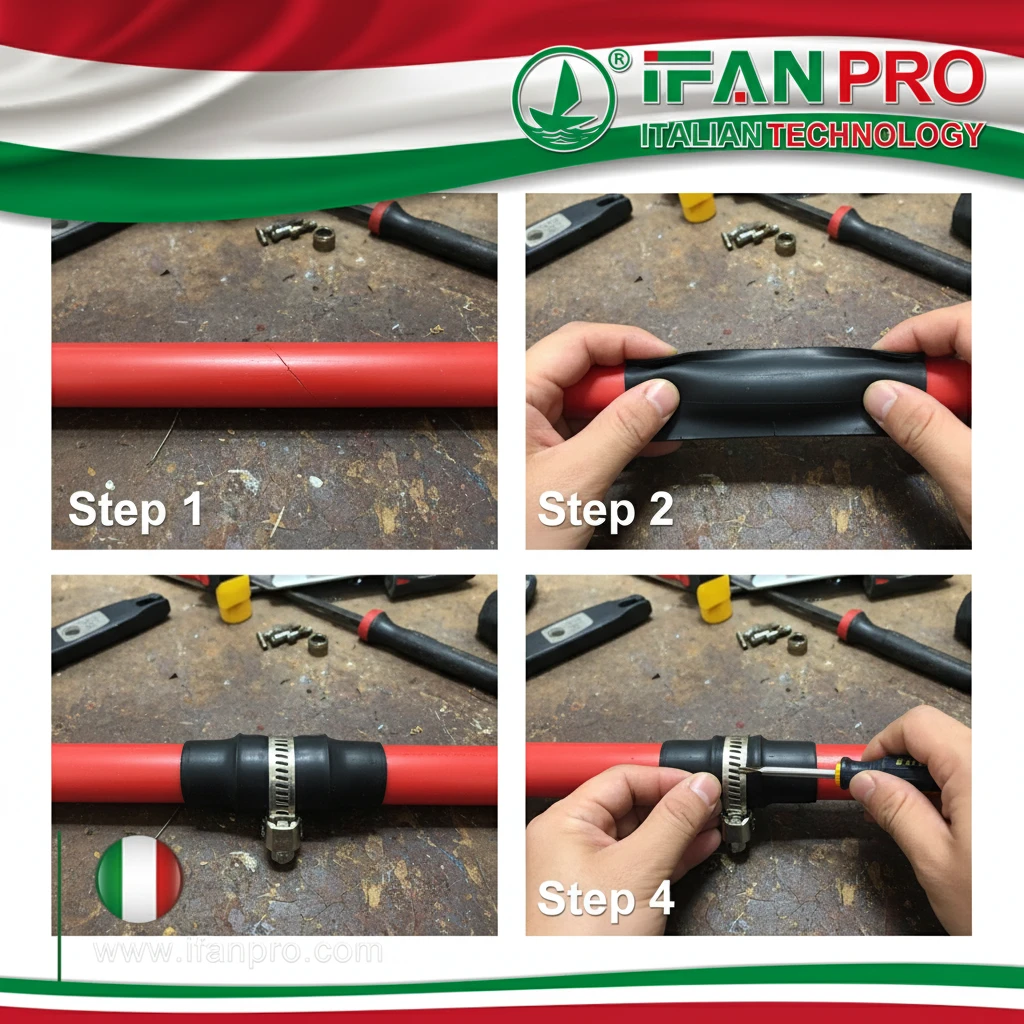
Step-by-Step Guide for a Repair Clamp
The repair clamp is excellent for fixing a single crack without cutting the pipe fully. Here is how to use it:
Step 1: Prepare the Area. Turn off the water and drain the line. Dry the pipe completely around the crack.
Step 2: Position the Sleeve. Take the internal saddle sleeve from the repair clamp kit. Slide it inside the PEX pipe at the location of the crack. You might need to gently open the crack to get it in. This sleeve reinforces the pipe from the inside.
Step 3: Install the Clamp. Place the external stainless-steel clamp over the pipe, centered on the crack and the internal sleeve underneath.
Step 4: Tighten. Using a screwdriver, tighten the clamp’s screw until it is very firm. The clamp squeezes the pipe and sleeve together, creating a watertight seal around the crack.
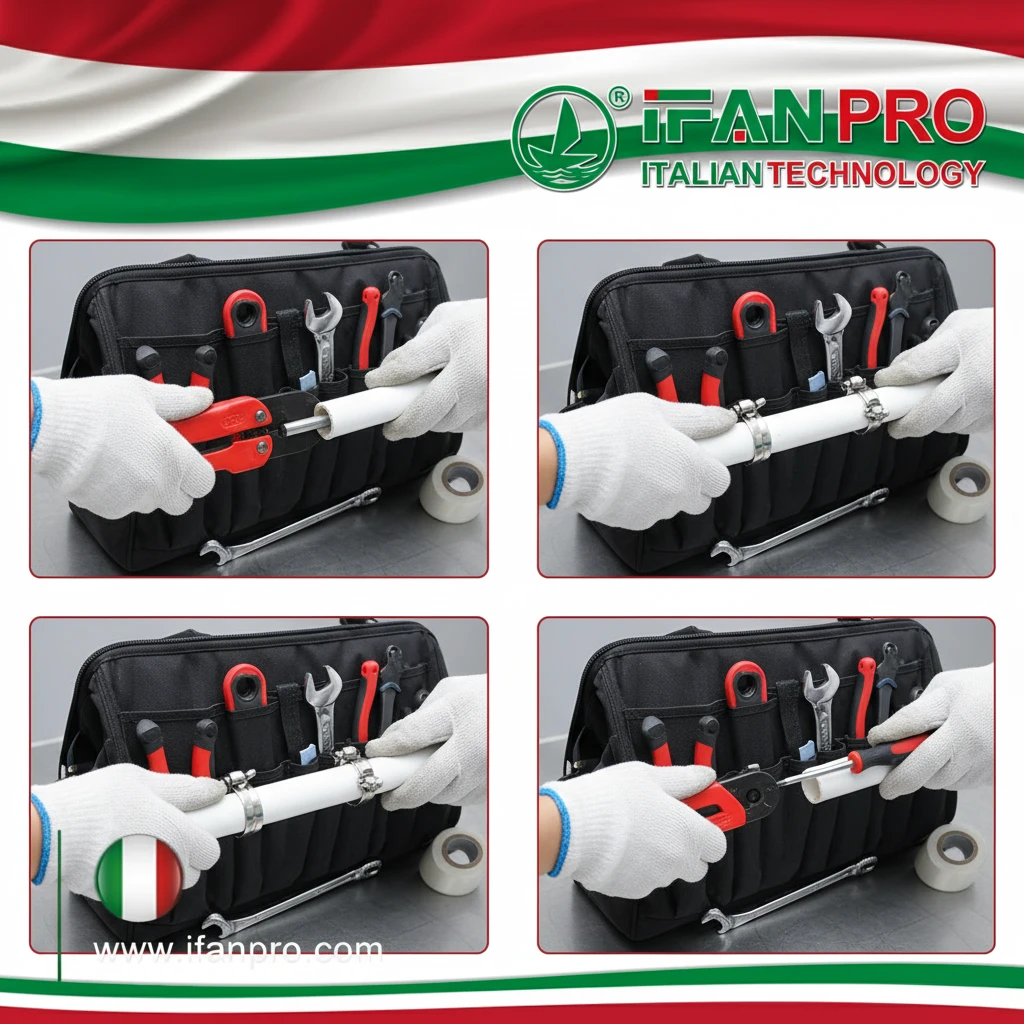
Step-by-Step Guide for a Coupling
This is the most common and reliable method because you remove all the damaged material.
Step 1: Cut Out the Damage. Use a PEX pipe cutter (not a saw) to make two clean, straight cuts. Remove the cracked section completely.
Step 2: Prepare the Pipes. Ensure the pipe ends are clean, straight, and have no burrs. If using a crimp coupling, slide a copper crimp ring onto each pipe end.
Step 3: Install the Coupling.
- For a Push-Fit Coupling: Simply push each prepared pipe end into the coupling until you feel it click and seat fully. Tug gently to confirm it’s locked.
- For a Crimp Coupling: Insert the pipe ends fully into the coupling. Position the crimp ring 1/8-inch from the pipe end. Use your crimping tool to compress the ring over the pipe and coupling. Do this for both sides.
This repair is now as strong as the original piping when done correctly.
What Steps Ensure a Proper Seal When Cutting and Replacing a PEX Section?
Replacing a section is the gold standard for repair. Doing it right prevents future problems.
To ensure a proper seal when cutting and replacing a PEX section, you must use a sharp PEX pipe cutter for clean, square cuts, fully insert the pipe into the fitting until it bottoms out, and use the correct tool to secure the connection—whether crimping rings, clamp rings, or confirming a push-fit insertion. Proper tool use and alignment are non-negotiable for a leak-free seal.
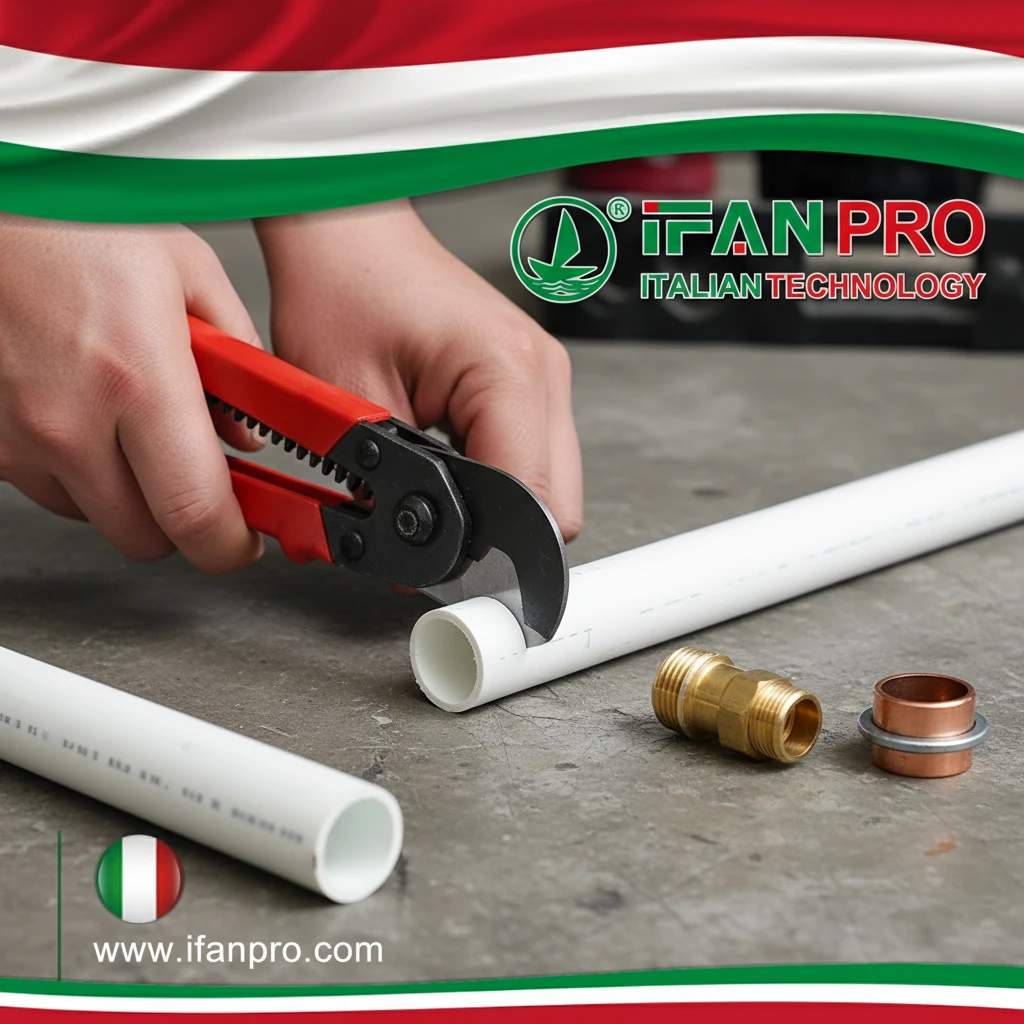
The Critical Importance of Clean Cuts
The first step is the most important for a good seal. You must use a dedicated PEX pipe cutter. This tool looks like a pair of scissors with a small wheel. Do not use a regular saw or utility knife.
A saw can create rough, angled, or uneven ends. When the pipe end is not perfectly square and smooth, it cannot seat properly inside the fitting. This leaves gaps that will leak. The PEX cutter makes a clean, straight cut every time, which is the foundation of a good repair.
Correct Installation Technique
After cutting, follow these steps precisely:
- Deburr (If Needed): Check the inside edge of the cut pipe. If there is a slight ridge, use a deburring tool or a utility knife to gently smooth it. A burr can scratch the sealing O-ring inside a fitting.
- Mark the Insertion Depth: On the pipe, draw a line showing how deep it should go into the coupling. Most fittings have a gauge hole or a marked stop line. This ensures you’ve pushed it in all the way.
- Full Insertion is Key: Push the pipe firmly into the fitting until it will not go any further. You should feel it hit the internal stop. For push-fit fittings, you will hear a click. The pipe should now be at the line you drew.
- Secure the Connection (for Crimp/Clamp Systems): If you are not using push-fit fittings, you must secure the connection with a ring.
- For Crimp Rings: Slide the ring onto the pipe first. After inserting the pipe into the fitting, position the ring 1/8-inch from the pipe end. Squeeze the crimp tool firmly until the jaws close completely.
- For Clamp Rings: Slide the clamp ring on. After insertion, position the ring in the middle of the fitting collar. Use the PEX clamp tool to compress the ear of the ring until it closes.
Tools Needed for a Proper Seal
| Repair Type | Essential Tools | Purpose of the Tool |
|---|---|---|
| Any Repair | PEX Pipe Cutter | Makes a clean, square cut for a perfect seal. |
| Crimp System | PEX Crimp Tool, Crimp Rings | Compresses the ring to create a permanent seal. |
| Clamp System | PEX Clamp Tool, Clamp Rings | Closes the stainless-steel clamp around the joint. |
| Push-Fit System | Pipe Cutter & Deburring Tool | Ensures a clean, smooth pipe end for the O-ring to seal against. |
If every step is done correctly, the joint will be perfectly sealed. The pipe and fitting become a single, pressure-resistant unit.
How Can You Pressure Test the Repaired PEX Line to Ensure No Leaks?
The repair isn’t finished until you test it. Testing gives you confidence that your work is solid.
To pressure test a repaired PEX line, turn the water supply back on slowly and visually inspect the repair area for any drips or spraying. Then, go through the house and turn on multiple faucets to flush air out, which can sound like a leak. Finally, monitor the repair site and check your water meter (if accessible) over several hours to confirm no water is moving, proving the seal is perfect.

The Step-by-Step Testing Process
A pressure test is simple but must be done carefully. Do not rush.
Step 1: The Initial Visual Check. Before turning any valves, make sure all your repair fittings are properly aligned. Then, slowly turn the main water supply back on. Stand by your repair and watch it closely. Look for any immediate droplets, mist, or water seepage. If you see even a small leak, turn the water off immediately and re-check your work.
Step 2: Bleed the Air from the System. After the initial check, air trapped in the pipes can cause loud banging or sputtering sounds that are not leaks. To remove air, go to the highest faucet in your house (like an upstairs bathroom) and turn on both the hot and cold water. Let them run for a minute. Then, turn on a few other faucets. This purges the air from the system.
Step 3: The Detailed Inspection. Once the air is bled out, the system will be quiet. Now, perform a thorough inspection:
- Feel around the repair coupling or clamp with a dry paper towel. Even a tiny leak will dampen the towel.
- Look for any moisture on the floor below the repair.
- Listen for any hissing sounds.
Advanced Test: Using the Water Meter
For absolute certainty, especially for repairs behind walls, you can use your water meter for a “static test.”
- Ensure no water is being used anywhere in the house. No toilets, faucets, ice makers, or washing machines.
- Find your water meter, usually outside near the street or in a basement.
- Locate the small leak indicator dial (often a triangle or star). Watch it for 5-10 minutes. If it moves at all, you have a leak.
- You can also note the numbers on the meter, wait 2 hours without using any water, and check again. If the numbers have changed, there is a leak.
Post-Repair Checklist
| Time After Repair | Action to Take | What It Confirms |
|---|---|---|
| Immediately | Visual inspection while water is turned on. | No major, immediate leaks. |
| After 15 mins | Feel joints with dry paper towel; listen for hissing. | No slow seepage or small drips. |
| After 2-24 hours | Check area for pooled water; consider water meter test. | The seal holds under constant pressure over time. |
A successful pressure test means your repair is complete and reliable. You have successfully sealed the cracked PEX line.
Заключение
The best seal comes from using the right parts and careful pressure testing. For reliable, high-quality PEX pipes, fittings, and professional repair kits, trust ИФАН to supply the components you need for a lasting fix.


Последние комментарии