

I once arrived at a job site to find a flooded ceiling. The cause? A poorly cut PVC pipe that didn’t seat properly in its fitting. That moment proved to me that the right cut is everything.
A pipe cutter ensures precision for PVC by mechanically guiding a sharp, dedicated blade to create a perfectly square and burr-free end in one controlled action. This precision is critical because only a perfectly square cut allows the pipe to seat fully and evenly inside a fitting, forming the reliable, leak-proof seal that PVC systems are known for.
Let’s break down exactly how the right tool and technique make this precision not just possible, but simple.
Why is Precision Cutting Critical for Leak-proof PVC Pipe Connections?
A leak often starts not with the glue, but with the cut. I’ve seen many DIY failures trace back to this first, crucial step.
Precision cutting is critical because PVC connections rely on a uniform interference fit and solvent welding. An uneven or angled cut creates gaps between the pipe and fitting, prevents proper glue coverage, and leads to weak spots. These weak spots will eventually fail under pressure, causing leaks.
The Science Behind the Seal
To understand why precision matters, you need to know how a PVC joint works. It’s not just glue holding things together. The process, called solvent welding, chemically melts the plastic of both the pipe and fitting. When they fuse together, they become a single, monolithic piece of plastic at the joint. For this fusion to be perfect, the surfaces must meet perfectly.
If your cut is not square (90 degrees to the pipe’s length), you create a problem. Imagine trying to glue two pieces of wood together, but one has a slanted end. They will only make contact along a thin edge, not the full surface. The same happens with PVC. An angled cut means part of the pipe wall won’t touch the fitting socket, leaving a gap.
Consequences of an Imperfect Cut
These gaps cause two major issues:
- Incomplete Solvent Bond: The solvent cement cannot properly weld the surfaces that aren’t touching. This creates a physically weak section in the joint.
- Stress Concentration: When water pressure surges through the pipe (water hammer), stress concentrates on the small area that is actually bonded. Over time, this stress can crack the joint, starting a small leak that grows.
Furthermore, a ragged cut from a saw often leaves plastic burrs or “fuzz” on the inside and outside edges. An internal burr restricts water flow and creates turbulence, which can lead to noise and pressure loss. An external burr prevents the pipe from inserting fully into the fitting socket, making the problem of an uneven gap even worse.
Comparison: Good Cut vs. Bad Cut
| Cut Quality | Joint Contact | Solvent Weld Effectiveness | Long-Term Result |
|---|---|---|---|
| Perfectly Square, Clean Cut | Full 360-degree contact between pipe and fitting socket. | Cement can weld the entire surface area evenly. | Strong, reliable, leak-proof joint. |
| Angled or Ragged Cut | Partial contact, with gaps on one side. | Weak, incomplete weld in the gapped areas. | High risk of failure and leakage under stress. |
In short, the precision of your cut directly dictates the integrity of every connection in your system. It is the absolute foundation of a reliable plumbing job.
How Does a Ratcheting Pipe Cutter Mechanism Ensure Clean, Square Cuts on PVC?
The ratcheting mechanism is what turns a simple blade into a precision tool. It gives you control that a saw simply cannot match.
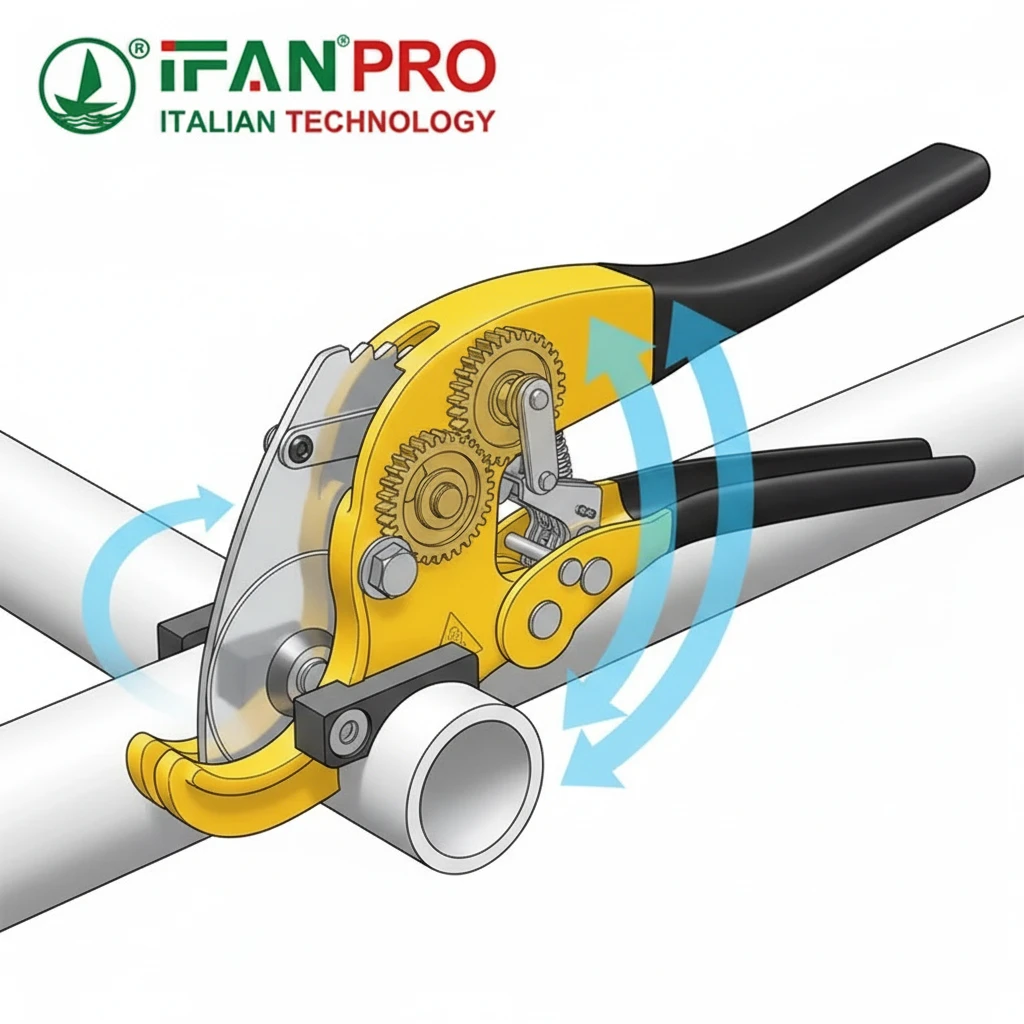
A ratcheting pipe cutter ensures clean, square cuts by using a guided cutting wheel and a pivot that keeps the tool perfectly perpendicular to the pipe. The ratcheting handle allows you to apply increasing, controlled pressure with multiple short strokes, smoothly shearing the plastic without crushing or deforming it, resulting in a ready-to-use end.
The Mechanics of Control
A standard ratcheting PVC cutter isn’t a chopper; it’s a precision shear. Here’s how its design guarantees a good cut:
1. The Guided Blade Path: The cutting wheel is mounted on a precise pivot. When you close the handles, the wheel travels on a fixed arc that is engineered to be perpendicular to the pipe’s axis. This built-in guidance system physically prevents you from making an angled cut. The tool itself enforces squareness.
2. The Ratcheting Advantage: This is the key feature. You don’t need the hand strength to cut through the pipe in one squeeze. Instead, you squeeze the handles partway until the ratchet engages. You then release, open the handles slightly, and squeeze again. Each ratcheting action drives the sharp wheel deeper into the PVC with controlled force.
- Benefit: This prevents you from using too much force and distorting or flattening the pipe. It allows the sharp wheel to cleanly shear through the plastic, rather than crush it.
3. The Clean Shear Action: A sharp cutting wheel creates a clean fracture line. As it rolls and presses into the PVC, it concentrates immense pressure on a tiny point, creating a clean break in the material structure. This is different from a saw, which tears away material grain by grain, leaving a rough, frayed surface.
Step-by-Step Action of the Ratchet
| Step | What Happens | Why It Ensures Precision |
|---|---|---|
| 1. Initial Placement | The cutter is positioned around the pipe, guided by its own jaw. | The tool self-aligns to a square starting position. |
| 2. First Squeeze | The cutting wheel scores a clean, continuous groove around the pipe. | It establishes a perfect, perpendicular cutting line. |
| 3. Ratcheting Cycles | Each handle squeeze deepens the groove evenly around the entire circumference. | Controlled pressure avoids deformation and keeps the cut square. |
| 4. Final Separation | The pipe separates with a clean snap along the scored line. | The result is a perfectly square end with a slight inward bevel and no burrs. |
This mechanical process removes guesswork and variables like hand steadiness or saw blade wobble. The tool does the work of ensuring precision, not the user’s skill alone.
What Advantages Do Professional PVC Pipe Cutters Have Over Saws for Accuracy?
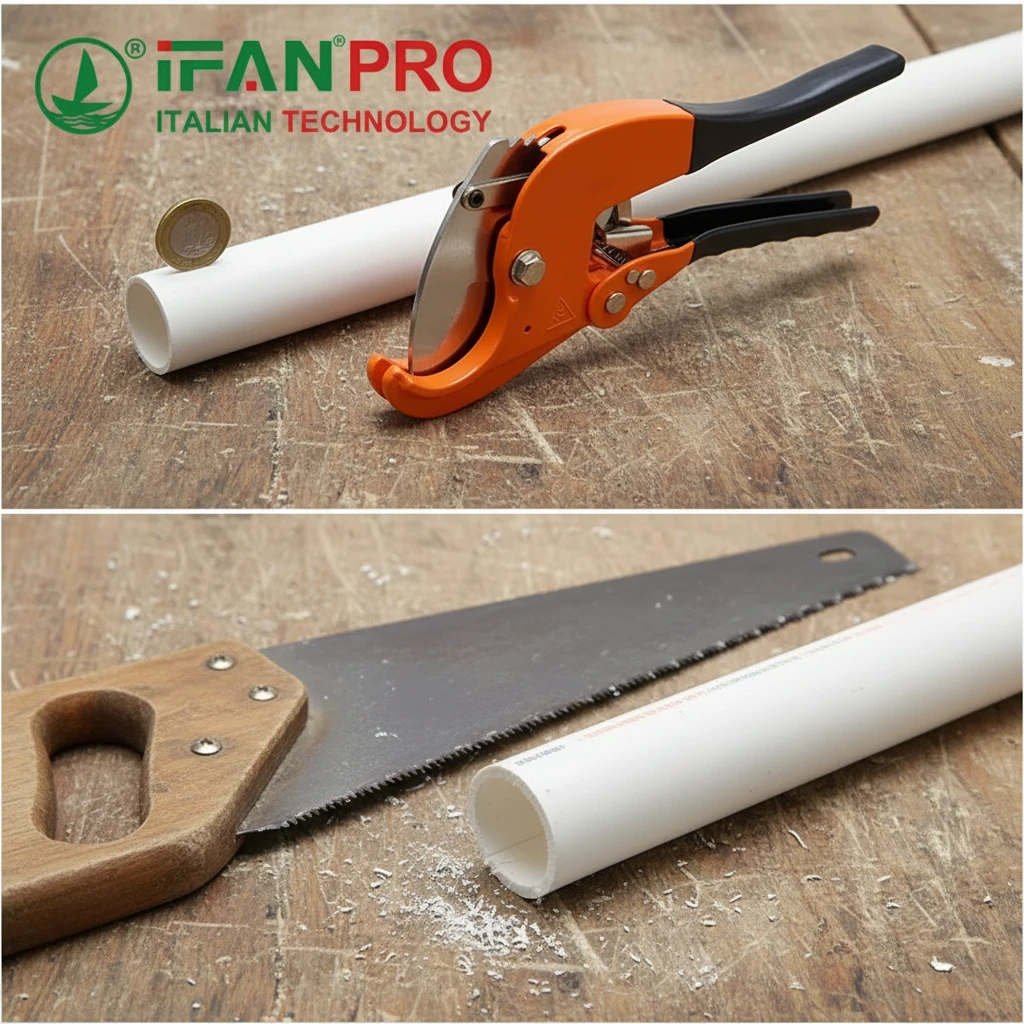
While a saw can cut PVC, a dedicated pipe cutter is designed to precision-cut it. The difference in results is night and day.
Professional PVC pipe cutters offer superior accuracy over saws because they are purpose-built to guarantee a square cut, eliminate burrs, and produce a ready-to-glue end in one action. Saws rely heavily on user skill, are prone to blade wander and angled cuts, and always require a second step (deburring) to prepare the pipe for joining.
The Problem with Saws: Too Many Variables
A saw is a general-purpose tool. For cutting PVC, this generality introduces multiple points of failure for accuracy:
1. Maintaining a Perfect 90-Degree Angle is Hard: Whether using a handsaw or a power saw, keeping the blade perfectly perpendicular throughout the entire cut requires a very steady hand and a good guide. It’s easy to start square but end up angling the blade, especially on smaller pipes. A miter box helps but is often cumbersome and doesn’t fully prevent blade flex.
2. Blade Wobble and Tear-Out: Saw blades, especially those for wood, have set teeth designed to rip through grain. On plastic, these teeth can grab and tear, causing the blade to wobble or “walk.” This creates a rough, chipped, and uneven cut surface. Fine-tooth blades are better but still produce plastic fuzz and burrs.
3. The Mandatory Second Step: Deburring. No saw cut leaves a pipe ready for assembly. You must deburr both the inside and outside edges with a utility knife or sandpaper. If you skip this step (and many beginners do), you severely compromise the joint. This adds time, effort, and another chance to make a mistake.
The Advantages of a Professional Pipe Cutter
Now, let’s contrast this with a professional ratcheting pipe cutter:
| Accuracy Factor | Handsaw / Power Saw | Professional Ratcheting Pipe Cutter |
|---|---|---|
| Squareness | Depends entirely on user skill and guides. High risk of error. | Built-in. The tool’s pivot mechanism enforces a square cut. |
| Cut Surface Finish | Rough, frayed, with plastic burrs and fuzz. | Smooth and clean. Sheared finish, often with a slight bevel. |
| Post-Cut Prep Required | Always. Must deburr inside and outside. | None. The pipe is ready for priming and gluing immediately. |
| Speed for Multiple Cuts | Slower. Measure, secure, cut, deburr for each piece. | Much faster. Measure, cut, done. Highly efficient. |
| Ease of Use in Tight Spaces | Difficult. Needs room for sawing motion. | Excellent. Often only needs a few inches of clearance to ratchet. |
For a professional plumber or a serious DIYer, the pipe cutter isn’t just a convenience; it’s a quality-control tool. It ensures every single cut meets the standard required for a pressure-tight system. It turns a critical variable into a guaranteed constant.
What Steps Guarantee a Precise Cut When Using a Pipe Cutter on PVC?
Even the best tool needs to be used correctly. Following a simple, consistent process is the final key to perfect results every time.
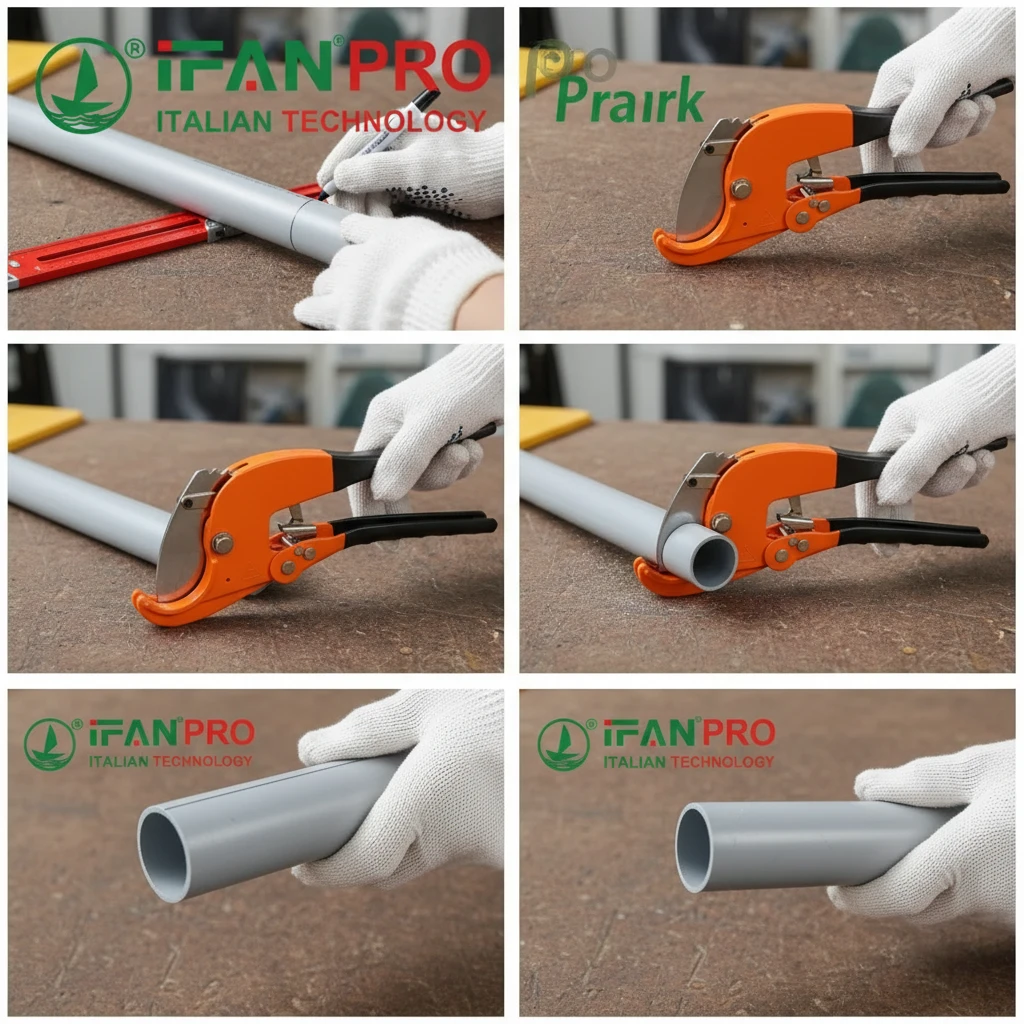
To guarantee a precise cut, follow these steps: 1) Measure and mark the pipe clearly all around. 2) Position the cutter wheel exactly on your mark. 3) Apply steady, ratcheting pressure without twisting the tool. 4) Inspect the cut end for a clean, square edge before proceeding. This methodical approach removes error and ensures repeatable accuracy.
A Detailed Step-by-Step Guide
Here is the foolproof process we recommend and use at IFAN for achieving perfect cuts consistently:
Step 1: Measure and Mark (Don’t Just “Eye-ball It”)
Use a tape measure and a permanent marker or a utility knife to scribe a line. The key is to mark the entire circumference of the pipe. Don’t just make a single dash on top. Roll the pipe to draw a full ring, or use a wrapping paper trick with a square piece of paper. This ring is your visual guide to ensure the cutter is aligned all the way around.
Step 2: Position the Cutter Correctly
Open the cutter’s jaws and place the pipe inside. Look directly from above. Align the cutting wheel’s groove directly on your marked line. Ensure the body of the cutter is sitting straight along the pipe, not cocked to one side. The guiding rollers or lower jaw should be snug against the pipe.
Step 3: Apply Smooth, Controlled Pressure
Squeeze the handles to engage the cutting wheel. Begin ratcheting.
- Do: Use full, firm ratcheting motions. Let the tool do the work.
- Don’t: Try to force it in one go or twist the cutter while ratcheting. Twisting can cause a slight spiral angle on the cut.
Keep ratcheting until the pipe separates cleanly. You will feel and hear a distinct “snap.”
Critical Checks and Common Mistakes
Step 4: Inspect Your Work
Before you even think about glue, examine the cut end.
- Check for Square: Place the cut end on a flat, known-square surface (like a table saw table or a factory-cut end of another pipe). There should be no light gap. Or, visually inspect it—it should look perfectly even.
- Check for Burrs: Run your finger lightly around the inside and outside edges. It should feel smooth. A proper cutter leaves little to no burr.
Common Pitfalls to Avoid
| Mistake | Consequence | How to Avoid It |
|---|---|---|
| Misaligning the wheel with the mark. | The cut will be at the wrong length, wasting material. | Take an extra second to look from above and align precisely. |
| Twisting the cutter during the cut. | Can create a non-square, slightly spiraled end. | Keep the cutter’s body steady and straight; only move the handles. |
| Using a dull cutting wheel. | The cutter will crush the pipe instead of shearing it, creating a deformed end and requiring excessive force. | Replace the cutting wheel when it starts to feel sluggish or crushes the pipe. |
| Not supporting the pipe section being cut off. | The weight of the falling piece can tear the plastic at the end of the cut, leaving a small lip or burr. | Support the cutoff piece with your free hand as it nears separation. |
By following these steps and being mindful of the pitfalls, you transform the cutting process from a chore into a quick, reliable, and precise step that sets the stage for a perfect installation.
Conclusion
Precise cutting is the non-negotiable first step to a leak-free PVC system. For reliable, professional-grade cuts every time, equip yourself with the right tool. Explore the range of durable, precision-engineered pipe cutters and PVC fittings from IFAN for your next project.


Recent Comments