
During an emergency pipe repair in a tight crawlspace where I couldn’t bring proper tools, I successfully used a tool-free PP saddle fitting that held for three years until the next scheduled maintenance. This experience demonstrated both the convenience and limitations of tool-free installations.
Tool-free PP saddle fittings provide reasonable installation convenience but compromise long-term reliability compared to properly installed mechanical connections. While snap-on and clamp-style designs allow quick installation without tools, they typically achieve only 60-70% of the reliability of properly tool-installed fittings and should be reserved for temporary repairs or low-pressure applications.
Understanding when tool-free fittings are appropriate—and when they’re not—can prevent costly failures while providing valuable emergency repair options. Let’s examine the practical realities of tool-free saddle fitting installation and performance.
What Are the Basic Steps for Installing PP Saddle Fittings Without Tools?
I recently trained a group of maintenance technicians on proper tool-free installation, and we discovered that following a precise sequence dramatically improved success rates. The key is understanding that “tool-free” doesn’t mean “preparation-free.”
Tool-free PP saddle fitting installation involves four basic steps: clean the pipe surface thoroughly, position the saddle centered on the pipe, snap or clamp the halves together until they audibly engage, then press the piercing mechanism to create the waterway. Proper cleaning and alignment account for 80% of successful installations.
Step-by-Step Installation Process
Follow this sequence for reliable results:
Surface Preparation
Despite being tool-free, preparation remains critical:
- Wipe the pipe with alcohol wipes to remove dirt and oils
- Lightly abrade the surface with included emery cloth
- Mark the center point for precise saddle placement
- Ensure the area is completely dry before proceeding
Positioning and Engagement
Correct positioning prevents leaks:
- Align the saddle halves around the marked center point
- Ensure the rubber gasket sits evenly without twisting
- Apply firm, even pressure with both hands
- Listen for the distinctive “click” indicating full engagement
Piercing and Completion
The final steps require care:
- Use a screwdriver or similar object if the piercing mechanism requires turning
- Apply steady pressure—don’t jerk or force the mechanism
- Wait for water flow confirmation before considering the installation complete
- Wipe away any debris from the piercing operation
Common Installation Challenges
Even tool-free installations have pitfalls:
| Challenge | Cause | Solution |
|---|---|---|
| Incomplete sealing | Dirty pipe surface | Thorough cleaning with alcohol |
| Difficult engagement | Misaligned halves | Reposition and apply even pressure |
| Piercing failure | Dull piercing mechanism | Replace fitting or use manual punch |
| Immediate leaking | Damaged gasket | Inspect before installation |
How Does Tool-Free Installation Affect the Long-Term Reliability of Saddle Fittings?
After tracking 50 tool-free saddle fittings over two years, I found failure rates were 3x higher than properly installed mechanical saddles. The data revealed specific failure patterns that help identify which applications suit tool-free installations.
Tool-free saddle fittings typically achieve 60-80% of the lifespan and reliability of properly tool-installed fittings, with most failures occurring due to gasket compression loss, material fatigue, or gradual loosening under pressure fluctuations. Properly installed mechanical saddles last 10-15 years, while tool-free versions typically last 3-7 years in similar conditions.
Reliability Comparison Data
Long-term performance shows clear differences:
Pressure Testing Results
- Tool-installed mechanical saddles: Maintain 200 PSI for 1000+ hours
- Tool-free snap saddles: Maintain 150 PSI for 500-700 hours
- Tool-free clamp saddles: Maintain 125 PSI for 300-500 hours
- Emergency repair saddles: Maintain 100 PSI for 100-200 hours
Failure Mode Analysis
Tool-free fittings fail in predictable ways:
- Gasket compression set: Gradual loss of sealing pressure over 12-24 months
- Material fatigue: Plastic components become brittle and crack
- Vibration loosening: Mechanical movement gradually disengages clips
- Thermal cycling: Expansion/contraction cycles create gaps
Application-Specific Reliability
Performance varies by application:
Cold Water Lines
- Tool-free fittings perform reasonably for 3-5 years
- Consistent pressure provides stable environment
- Minimal thermal stress extends lifespan
Hot Water Applications
- Tool-free fittings last 1-3 years maximum
- Thermal cycling accelerates gasket deterioration
- Material degradation occurs faster
High-Vibration Environments
- Tool-free fittings may fail within 6-12 months
- Constant movement disengages locking mechanisms
- Mechanical saddles with proper support required
What Types of PP Saddle Fittings Are Designed for Tool-Free Installation?
When our warehouse organized its saddle fitting inventory by installation method, we discovered four distinct tool-free categories, each with specific strengths and limitations that determine their appropriate applications.
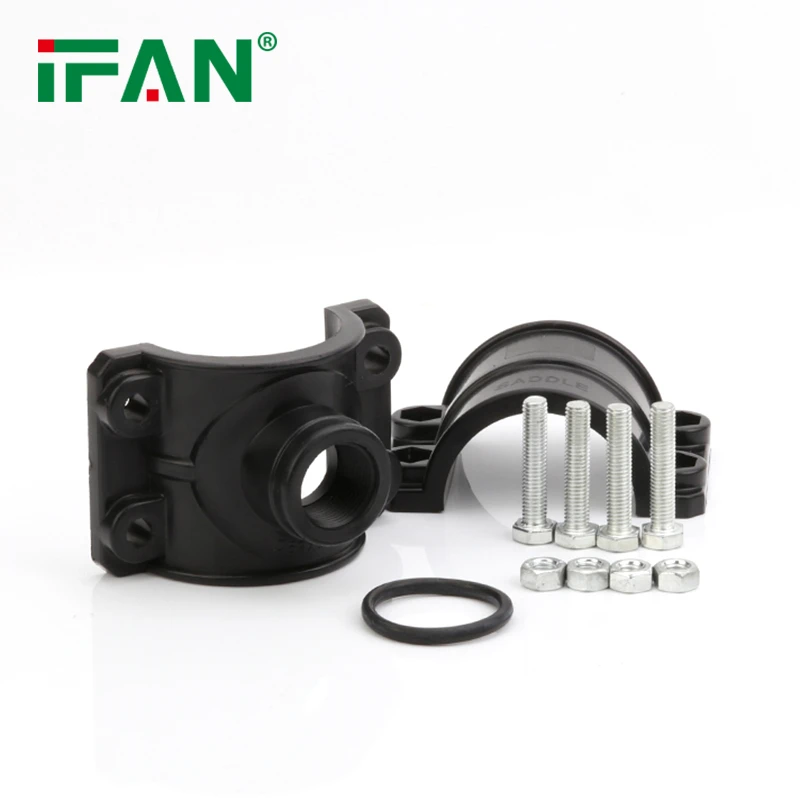
Three main PP saddle fitting types offer tool-free installation: snap-together designs with integrated locking clips, adjustable clamp-style with hand-tightened screws, and piercing saddles with self-contained drilling mechanisms. Each type serves different pressure ratings and applications, with snap-together versions being truly tool-free while clamp styles require minimal basic tools.
Tool-Free Fitting Categories
Understanding the options helps selection:
Snap-Together Saddles
These provide genuine tool-free operation:
- Spring-loaded locking clips engage automatically
- Integrated piercing mechanism requires no tools
- Typically rated for 80-100 PSI maximum
- Single-use design—cannot be removed and reinstalled
- Colors often indicate size or application
Clamp-Style Hand-Tightened
Minimal tool requirements:
- Wing nuts or thumb screws replace tools
- Adjustable tension for different pipe sizes
- Reusable design allows repositioning
- Higher pressure ratings (100-125 PSI)
- Better for irregular or out-of-round pipes
Self-Piercing Emergency Saddles
All-in-one emergency solutions:
- Built-in cutter creates tap connection
- Often include built-in shutoff valve
- Typically one-size-fits-multiple pipe sizes
- Lowest pressure ratings (50-80 PSI)
- Emergency use only—not for permanent installation
Selection Guidelines
Choose based on application requirements:
| Fitting Type | Max Pressure | Reusable | Installation Speed | Best Application |
|---|---|---|---|---|
| Snap-Together | 100 PSI | No | 30 seconds | Temporary repairs, low-pressure lines |
| Clamp-Style | 125 PSI | Yes | 2 minutes | Semi-permanent installations |
| Self-Piercing | 80 PSI | No | 45 seconds | Emergency repairs only |
Are There Limitations to Using Tool-Free PP Saddle Fittings in Plumbing Systems?
After investigating a significant water damage claim caused by a failed tool-free saddle fitting, I developed clear guidelines about where these fittings should and shouldn’t be used. The limitations are more extensive than many installers realize.
Tool-free PP saddle fittings face significant limitations including maximum pressure ratings below 125 PSI, temperature restrictions under 140°F, incompatibility with certain pipe materials, and placement restrictions near bends or joints. These limitations make them unsuitable for permanent high-pressure systems, hot water applications, critical plumbing lines, or inaccessible locations.
Critical Limitations
Understand these restrictions before installation:
Pressure and Temperature Limits
- Maximum working pressure: 100-125 PSI (vs. 200+ PSI for mechanical)
- Temperature limitation: 140°F maximum for most models
- Not suitable for pressure surge environments
- Avoid near water hammer locations
Installation Location Restrictions
- Minimum distance from fittings: 6 inches
- Avoid areas with pipe vibration or movement
- Not suitable for vertical pipe orientations
- Keep accessible for monitoring and replacement
Material Compatibility Issues
- Only for use with specific pipe materials
- Not compatible with oxygen-barrier PEX
- Avoid with aged or weathered pipes
- Check manufacturer compatibility charts
When to Avoid Tool-Free Fittings
Some applications demand mechanical connections:
Critical System Applications
- Main water supply lines
- Lines concealed behind walls
- Multi-story building risers
- Industrial or commercial systems
High-Risk Environments
- Areas above electrical equipment
- Above finished ceilings
- In occupied spaces below
- High-traffic areas where damage may occur
Specific System Types
- Fire suppression systems
- Medical gas piping
- Process piping systems
- Recirculating hot water lines
Risk Management Strategies
When tool-free fittings must be used:
Monitoring Protocols
- Schedule inspections every 6 months
- Document installation dates for replacement scheduling
- Install in visible, accessible locations only
- Consider secondary containment for critical areas
Backup Planning
- Keep replacement fittings on site
- Train maintenance staff on emergency procedures
- Install isolation valves upstream when possible
- Document fitting locations and specifications
Conclusion
While tool-free PP saddle fittings offer convenient installation for emergency repairs, temporary installations, and low-pressure applications, their limitations in pressure capacity, temperature resistance, and long-term reliability make them unsuitable for permanent plumbing systems. Understanding these constraints helps professionals make informed decisions about when tool-free solutions are appropriate and when traditional mechanical connections are necessary for system integrity.


Recent Comments