

I once watched a newly soldered joint fail under pressure, flooding a client’s wall. That moment taught me that successful soldering relies on precision, not guesswork.
To solder a brass elbow fitting for water lines, you must clean the pipe and fitting meticulously, apply flux properly, heat the joint evenly until it reaches the correct temperature, and then apply solder so it flows into the gap by capillary action. The goal is to create a smooth, concave fillet of solder around the entire joint for a strong, leak-free seal.
While the process is straightforward, each step is critical. Let’s walk through the essential tools and the detailed technique to ensure a professional, lasting result.
What Tools and Materials Are Essential for Soldering Brass Elbow Fittings?
Trying to solder with the wrong tools leads to weak joints and frustration. Having the right gear setup makes the job smooth and reliable.
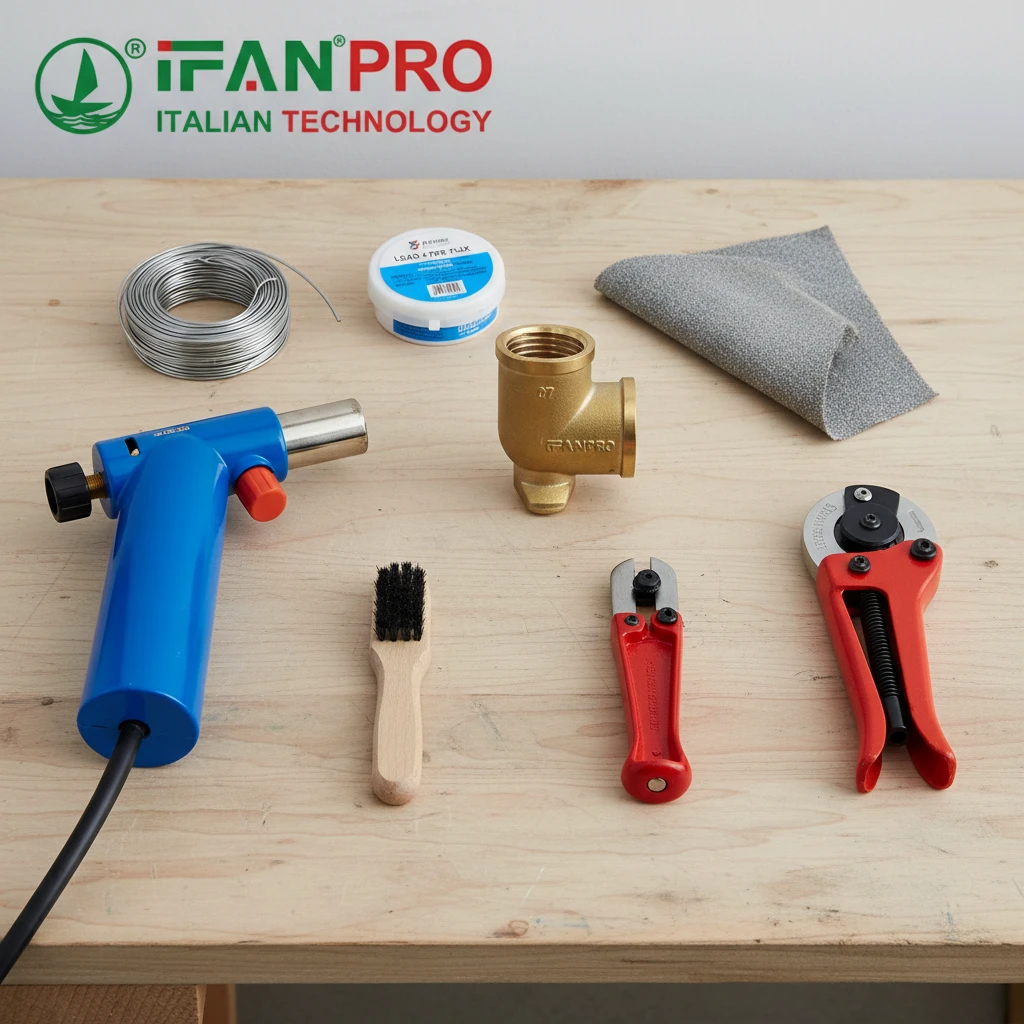
The essential tools and materials are: a propane or MAP-gas torch, lead-free solder, appropriate flux, a wire brush and emery cloth for cleaning, a pipe cutter, safety gear (glasses, gloves), a damp cloth, and a fire-resistant cloth for protection. Using the correct type of flux and solder formulated for potable water lines on brass is non-negotiable.
The Heating System: Torch and Fuel
The torch is your heat source. A standard propane torch works for most residential jobs on pipes up to 1 inch. For larger diameters or faster heating, a MAP-gas (MAPP) torch provides a hotter flame. The key is a torch with a precise, adjustable flame. You need to direct heat accurately, not just blast the joint with fire.
Safety Note: Always keep a fire extinguisher nearby and use a fire-resistant cloth to shield nearby flammable materials like wood studs or insulation.
The Cleaning Arsenal
Proper cleaning is 80% of a good solder joint. You will need:
- Tubing Cutter: For making a perfectly square, clean cut on the copper pipe. A hacksaw creates a ragged edge that is difficult to clean and fit properly.
- Deburring Tool or File: To remove the sharp inside ridge (burr) left by the cutter, which restricts water flow.
- Emery Cloth or Sanding Pad: Abrasive material to scrub the outside of the pipe end to bright, shiny copper.
- Small Wire Brush: To scrub the inside of the brass fitting socket to remove oxidation and dirt. A dedicated brush for brass is best.
The Joining Materials: Solder and Flux
This is where quality matters most.
- Solder: You must use lead-free solder marked for potable water, typically a tin-copper or tin-silver-copper alloy. It usually comes in a thin wire spool.
- Flux: This is a chemical paste that cleans the metal surface during heating and prevents oxidation. More importantly, it enables the molten solder to flow (or “wet”) into the joint. Use a flux specifically labeled for copper and brass water lines. Do not use acid-core solder or plumbing flux meant for waste lines.
Safety and Auxiliary Items
- Safety Glasses: To protect your eyes from flux spatter and bright solder.
- Heat-Resistant Gloves: Leather or heavy-duty fabric gloves.
- Damp Cloth/Rag: For quickly cooling the joint after soldering and wiping away excess flux.
Having all these items ready before you start is the first step to a successful project.
How Do You Properly Clean and Apply Flux to Brass Pipe Ends?
A dirty joint is a leaking joint. I’ve seen more failures from skipped cleaning than from any other mistake.
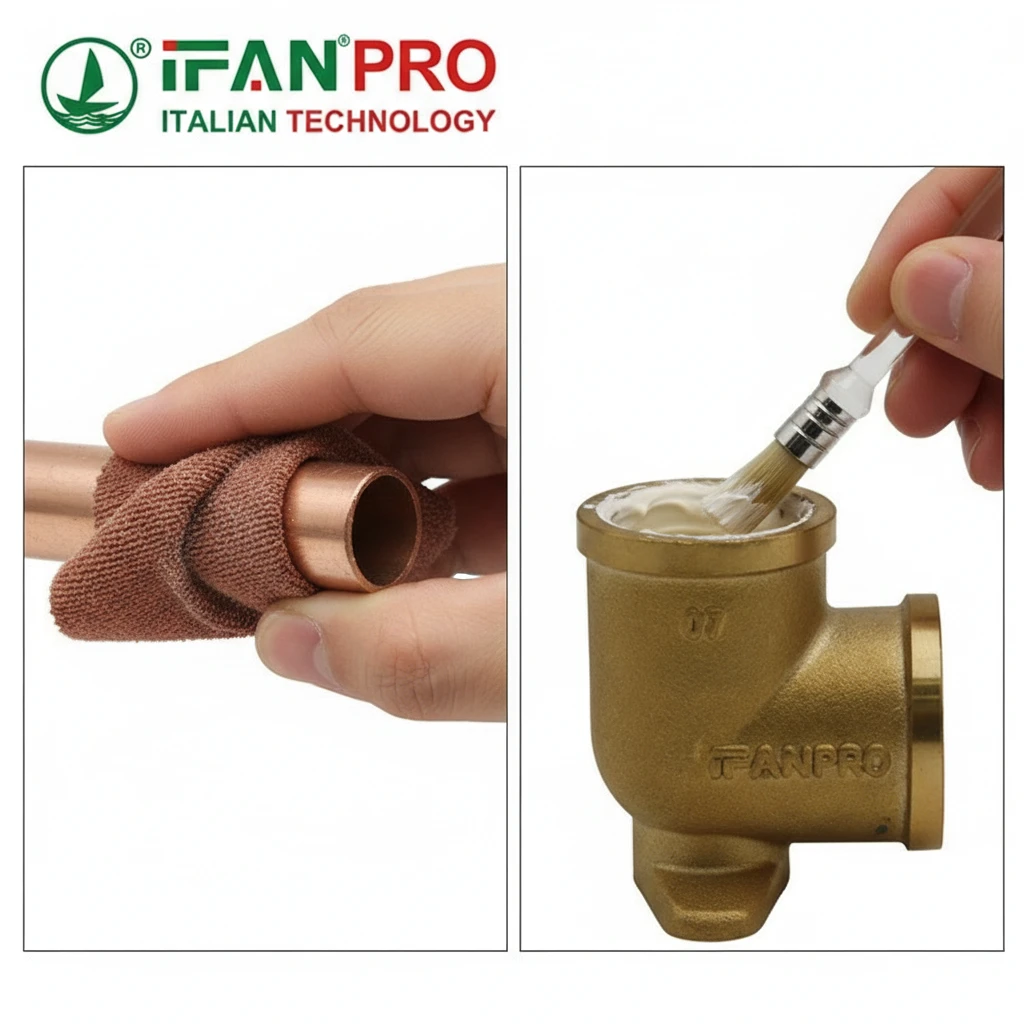
You properly clean by using emery cloth to sand the outside of the copper pipe end until it is uniformly bright and shiny, and a small wire brush to scour the inside of the brass fitting socket until it looks new. You then apply a thin, even layer of flux to both the cleaned pipe end and the inside of the fitting socket immediately before assembly to prevent re-oxidation.
Step-by-Step Cleaning: No Shortcuts
Cleaning is a physical process that removes all oxidation, dirt, and oils to expose pure, active metal. Solder will only bond to perfectly clean surfaces.
1. Cut and Deburr the Pipe:
Use your tubing cutter to make a clean, square cut. After cutting, spin the deburring tool inside the pipe end to remove the internal burr. A smooth interior is crucial for water flow.
2. Sand the Pipe End:
Take a piece of emery cloth or a specialized plumbing sanding pad. Vigorously sand the last inch of the pipe’s outside diameter. Sand around the circumference, not just back and forth. You are done when the entire surface is uniformly bright like a new penny, with no dark spots or scratches in only one direction.
3. Scrub the Fitting Socket:
Take your small wire brush (the right size for the fitting) and twist it inside the elbow’s sockets. Scrub thoroughly until you see bare, yellow brass. Pay special attention to the bottom of the socket. Brass often has a factory coating that must be removed.
The Critical Role of Flux
Flux is not a glue; it’s a chemical assistant. Its primary jobs are:
- To dissolve any microscopic oxides that form after cleaning.
- To protect the clean metal from oxidizing when heated.
- To lower the surface tension of the molten solder, allowing it to flow.
How to Apply Flux Correctly:
- Use a small brush (often in the flux can lid) or your finger.
- Apply a thin, even coat to the entire sanded area of the pipe.
- Apply a thin coat to the inside of the cleaned fitting socket.
- Immediately push the pipe into the fitting, giving it a slight twist to spread the flux evenly.
- Wipe away any excess flux that squeezes out with a rag.
The joint is now “fluxed” and ready for heating. Do not wait long after applying flux, as it can start to react with the air.
What Is the Correct Technique for Heating and Applying Solder to the Joint?
Applying heat in the wrong way creates a “cold joint” that looks good but fails inside. The right technique ensures the solder gets sucked deep into the fitting.
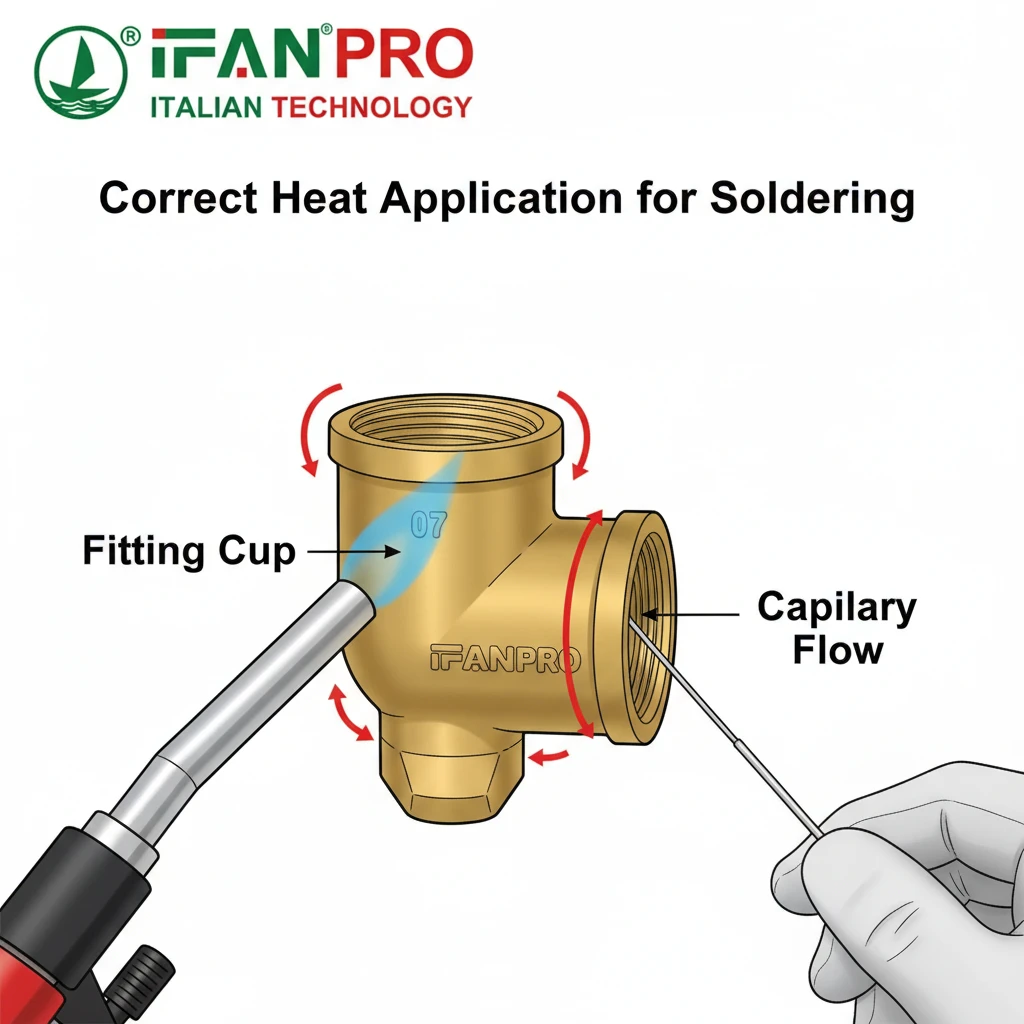
The correct technique is to heat the base of the brass fitting evenly with a sweeping torch flame, not the copper pipe or the solder. Touch the solder wire to the joint opposite the flame. When the fitting is hot enough, the solder will instantly melt and be drawn into the gap by capillary action. Apply just enough solder to form a neat, concave ring around the joint.
The Heating Phase: Patience is Key
Your goal is to heat the entire brass fitting assembly evenly to a temperature that melts the solder on contact (typically around 400°F / 204°C for lead-free solder).
1. Position the Torch:
Open the torch valve and light it. Adjust the flame to a sharp, blue cone. Start by playing the flame over the thickest part of the brass fitting, sweeping it back and forth. The brass needs to absorb and conduct the heat to the joint interface. Avoid directly heating the copper pipe for too long, as it heats up faster and can draw heat away from the joint.
2. Watch for the Right Temperature:
Periodically touch the tip of the solder wire to the joint seam, away from the direct flame. Do not melt the solder with the torch flame. When the metal is hot enough, the solder will instantly melt on contact and flow into the seam. A common sign is the flux beginning to bubble and then turning clear, like a liquid.
The Soldering Phase: Let Capillarity Do the Work
Once the joint is at the correct temperature, the actual soldering is quick.
1. Apply the Solder:
Remove the flame and immediately touch the solder wire to the seam where the pipe enters the fitting. If the metal is hot enough, the solder will be drawn into the gap around the entire circumference. Feed solder steadily until a smooth, shiny ring appears all the way around.
2. Know When to Stop:
You only need enough solder to form a concave fillet (a shallow “dish” shape). An oversized, globby joint is not stronger and can actually break or obstruct flow. A good joint uses about 1/2 to 3/4 inch of solder wire for a 1/2-inch fitting.
3. Cool and Clean:
Let the joint cool naturally for a few seconds, then wipe around it with a damp cloth to remove residual flux. Flux is corrosive and will slowly attack the metal if left on.
Common Pitfalls and How to Avoid Them
The table below lists common heating and soldering errors:
| Problem | Cause | How to Avoid It |
|---|---|---|
| Cold Joint (Dull, grainy, lumpy solder) | Joint wasn’t hot enough; solder was melted by flame. | Heat the fitting more evenly and test with solder until it flows freely. |
| Solder Doesn’t Draw In | Under-heating, or joint gap is too wide/too tight. | Ensure proper fit (pipe should slide in snugly) and heat thoroughly. |
| Solder Runs Down Pipe | Over-heating the pipe, not the fitting. | Direct heat at the fitting. The pipe should be hot from conduction, not direct flame. |
| Burnt Flux (Black, crusty residue) | Extreme over-heating. | Use a lower flame setting and keep it moving. |
How Can You Visually Inspect a Soldered Brass Elbow for a Reliable Seal?
A visual inspection catches most flaws before pressure testing. Learning to “read” the solder joint is a vital skill.
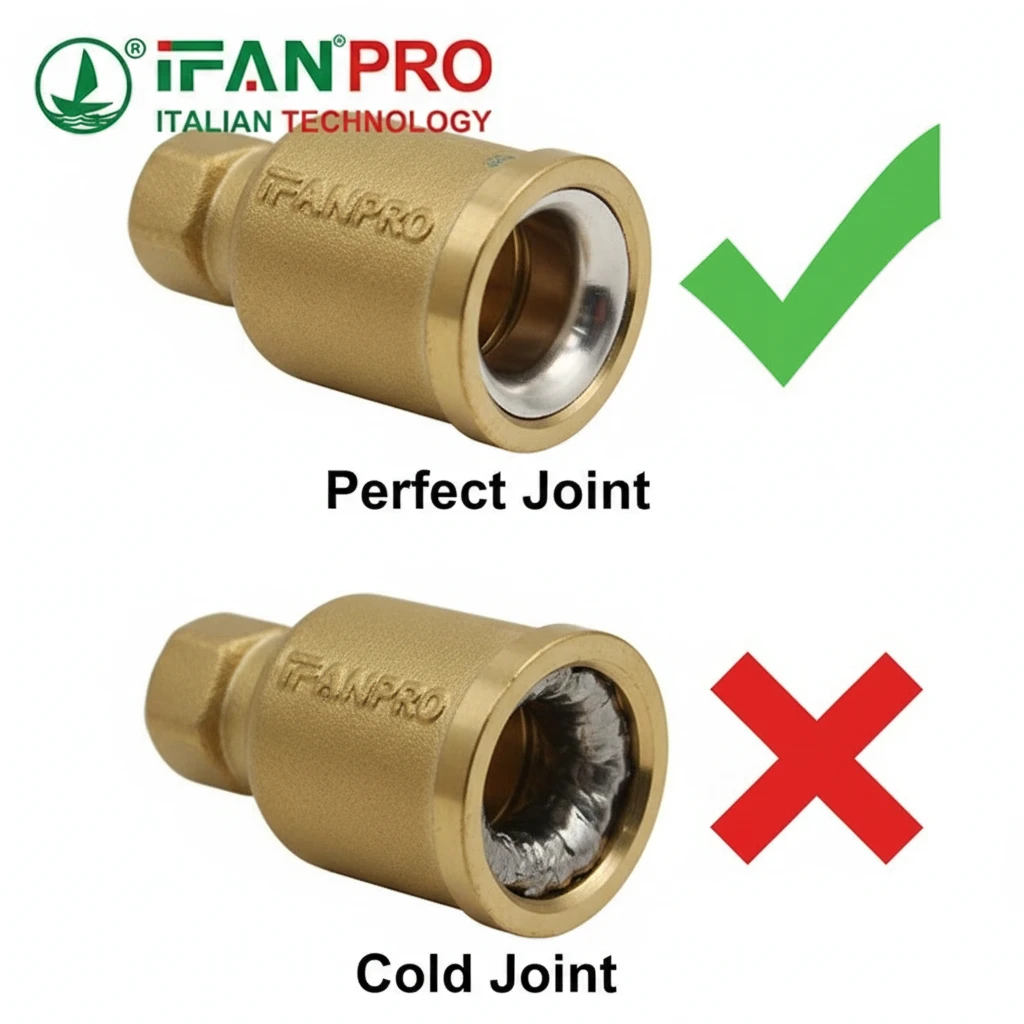
You can visually inspect a soldered brass elbow by looking for a consistent, smooth, concave ring of shiny solder around the entire joint circumference. The solder should appear to have been “sucked in.” You must also check for gaps, dull spots, solder balls, or excessive solder inside the fitting, all of which indicate a poor seal.
The Hallmarks of a Perfect Joint
After the joint cools and you wipe off the flux, examine it closely under good light. A reliable solder seal has clear visual characteristics:
1. Complete 360-Degree Coverage:
Walk around the fitting. You should see a continuous band of solder where the pipe meets the elbow. Any break in this ring is a potential leak path. This is the most critical check.
2. The Correct Shape: Concave Fillet:
The solder should form a small, smooth “valley” or dish shape where it meets the pipe and fitting. This shape indicates proper capillary action and adequate solder volume.
- Too little solder: The fillet is very thin or invisible. The joint may be weak.
- Too much solder: A large, convex blob or drip. This can hide a void and is prone to cracking.
3. The Right Appearance: Shiny and Smooth:
The solder should have a bright, silvery, shiny finish. A good joint looks smooth and liquid, like it froze instantly.
Identifying Common Defects Visually
Learn to spot these warning signs:
- Dull, Crystalline, or Grainy Texture: This is a classic “cold joint.” The solder cooled too slowly or was applied to metal that wasn’t hot enough. It has poor strength and will leak. You must reheat it (add a little flux first) until the solder reflows and becomes shiny.
- Gaps or Voids: A visible space in the solder ring. This is an open leak path. Requires re-soldering.
- Solder Icicles or Balls Inside the Fitting: If you can see (with a flashlight) a drip of solder hanging inside the pipe, it will restrict water flow. This happens from over-applying solder or overheating. Often, you must cut out and redo the fitting.
- Excessive Solder on the Outside: Large globs can indicate the solder was melted by the flame and piled on, rather than drawn in. It may hide a poor internal seal.
The Final Verification: The Pressure Test
A perfect visual inspection is highly encouraging, but it is not the final proof. You must always perform a pressure test on the entire system, as described in our previous article. The pressure test will reveal micro-leaks that are invisible to the eye. Never skip this step.
Conclusion
Proper soldering requires the right tools, meticulous cleaning, even heating, and a careful visual check. For connections that eliminate soldering entirely, consider IFAN’s push-fit or threaded brass fittings for a faster, just-as-reliable alternative.


Recent Comments