

I once saw a poorly installed 8-inch PVC valve fail during a pressure test, causing a costly delay and rework. That moment cemented the need for a strict, step-by-step approach.
To install and operate a large PVC ball valve correctly, you must follow a meticulous process focused on safety, precise solvent welding, proper support, and thorough testing. Correct installation prevents leaks and mechanical stress, while proper operation and maintenance ensure decades of reliable service in industrial and municipal systems.
A large PVC valve failure is a major event. Let’s walk through the critical stages to ensure your installation is a success from start to finish.
What are the Safety Preparations Needed Before Installing a Large PVC Ball Valve?
Rushing into an installation without preparation is the biggest risk. I emphasize safety first in every project plan.
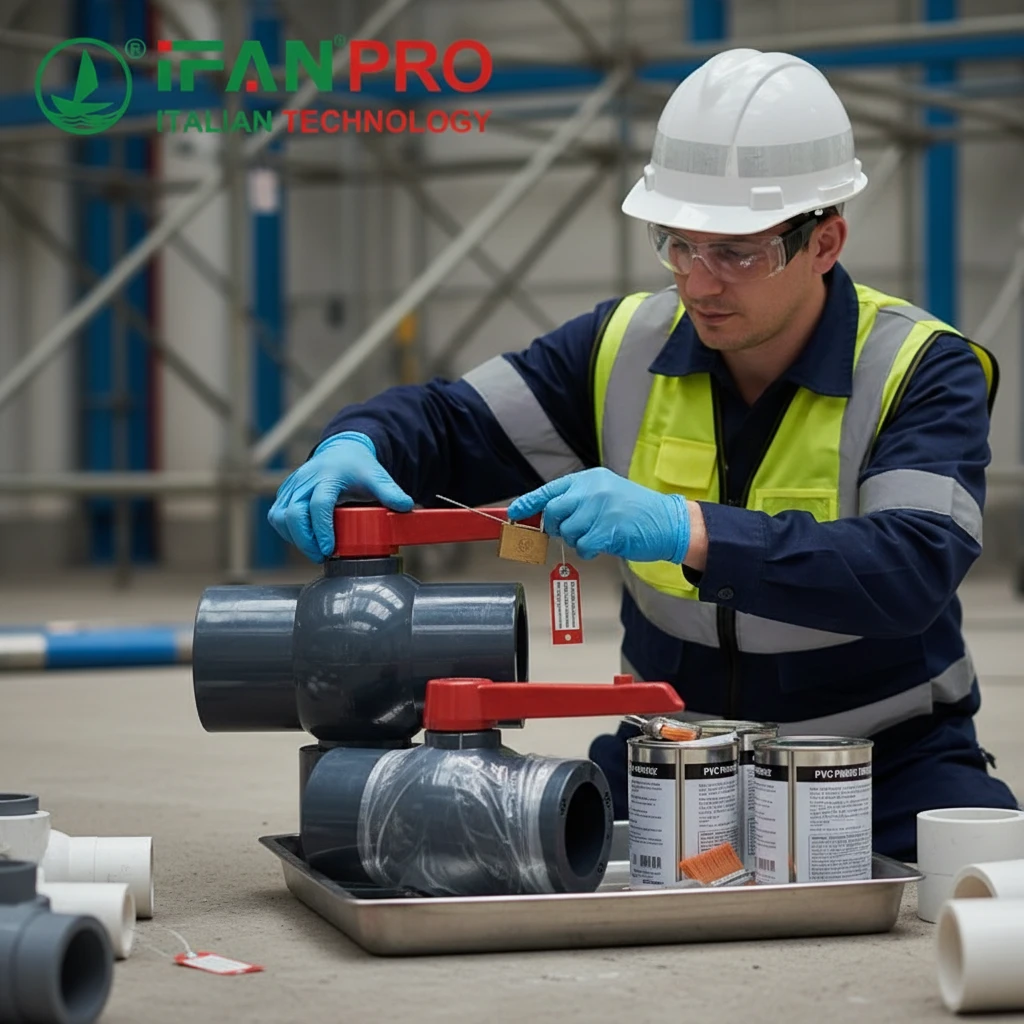
Before installing a large PVC ball valve, essential safety preparations include wearing full PPE, completely depressurizing and draining the pipeline system, securing the work area, and verifying the valve and pipe specifications match the design pressure and chemical service. This foundational step prevents personal injury and ensures a stable base for the installation.
The Non-Negotiable Personal Safety Protocol
Your personal safety and the safety of your team are the top priority. Large PVC valves are heavy, and you are working with chemical cleaners and adhesives.
First, you must wear the right Personal Protective Equipment (PPE). This is not optional. Safety glasses will protect your eyes from primer and cement splashes. Chemical-resistant gloves (like nitrile) protect your skin. Steel-toed boots are crucial because a large valve can cause serious foot injury if dropped. Also, wear long sleeves and pants to protect your skin.
Second, ensure the work area is safe. The space must be clean, dry, and well-ventilated. Solvent cement fumes are strong and flammable. There should be no open flames, sparks, or smoking anywhere nearby. Use warning signs and barriers to keep unauthorized personnel away from the work zone.
System Preparation: Lock Out and Drain
This is where many field mistakes happen. You must ensure the pipeline section is completely isolated and safe to work on.
- Depressurize: Identify the correct isolation points and close the upstream and downstream valves. Then, open drain ports or vents to release all pressure from the section where you will work. You must verify there is zero pressure.
- Drain: Fully drain the pipeline. Water or fluid left in the line will ruin the solvent welding process and prevent a good seal.
- Lock Out/Tag Out (LOTO): If connected to a larger active system, follow formal LOTO procedures. Use locks and tags on all energy isolation devices (valves, switches) so the system cannot be accidentally re-pressurized while you are working.
Material and Tool Readiness
Finally, gather and check everything before you start cutting or gluing.
- Check Specifications: Confirm the valve’s pressure rating (e.g., Class 150, SCH 80) exceeds the system’s maximum operating pressure. Verify the PVC type (PVC Type I, CPVC) matches the pipe material.
- Inspect Components: Visually inspect the new valve and the existing pipe ends for any cracks, deep scratches, or dirt. The ball should turn smoothly.
- Prepare Tools: Have all tools ready: a fine-tooth saw or PVC cutter, deburring tool, measuring tape, level, primer, cement appropriate for the pipe size, and support materials like riser clamps or hangers.
A rushed start leads to problems. Taking 30 minutes for proper preparation can save hours of repairs later.
Which Installation Steps Ensure a Proper Large PVC Ball Valve Connection?
The connection is the heart of the installation. A weak joint here guarantees future failure.
To ensure a proper connection, follow these key steps: dry-fit and mark the alignment, bevel and clean the pipe end, apply primer and cement evenly, make the final connection with a firm quarter-turn, and immediately hold it steady. Crucially, you must install permanent, independent supports before the solvent cement sets to prevent stress on the new joints.
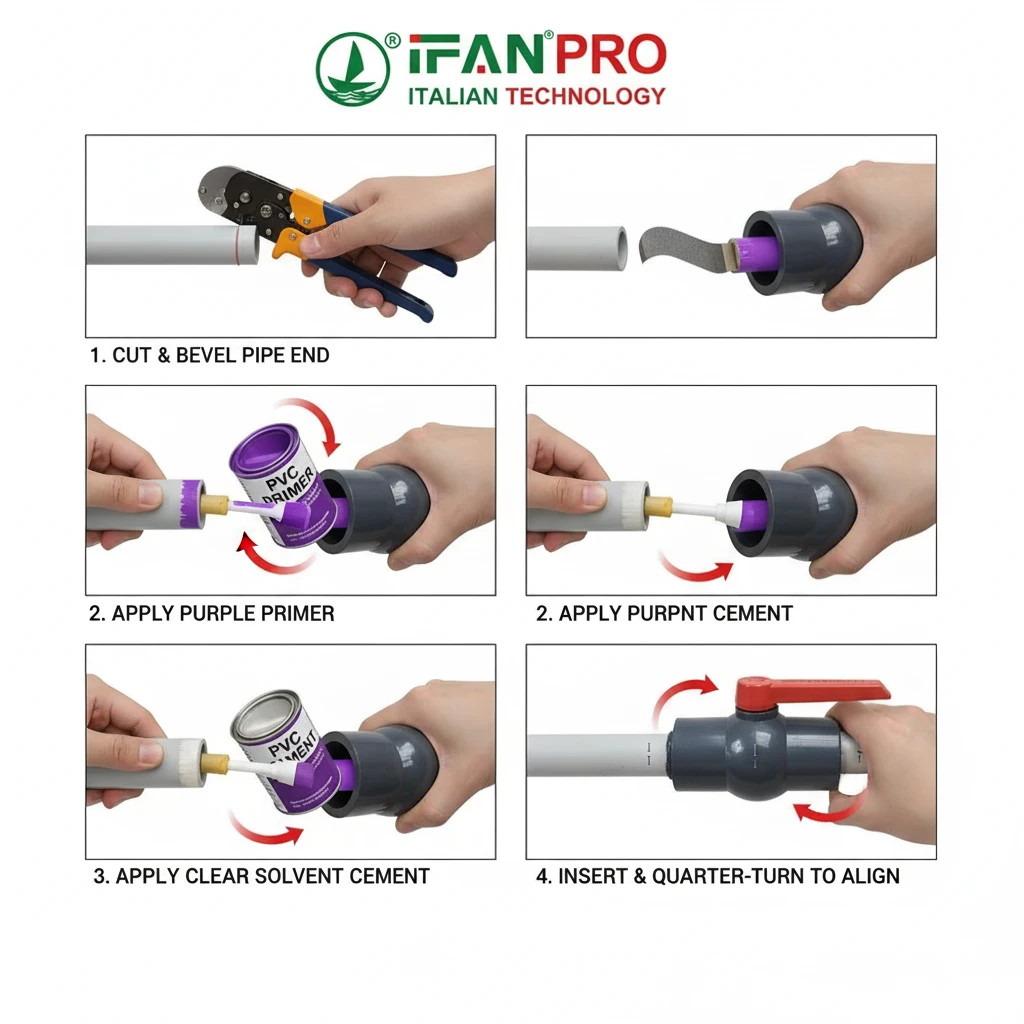
Step 1: Dry-Fitting and Alignment
Never apply cement on the first try. First, dry-fit the valve onto the pipes. This checks the fit and, most importantly, lets you mark the correct alignment. The valve handle must be in an accessible position for operation. Use a marker to draw alignment lines across the valve socket and the pipe. This is your guide for the final glued position.
Step 2: Pipe End Preparation
A clean, properly prepared pipe is essential for a strong weld.
- Cut Square: Cut the pipe perfectly square using a miter box or a dedicated PVC cutter. A crooked cut leaves gaps.
- Deburr: Use a deburring tool or file to remove all the inside and outside sharp edges (burrs). Burrs can create turbulence and catch debris.
- Bevel: Use a file to create a slight bevel (about 15 degrees) on the outside edge of the pipe. This helps the pipe slide smoothly into the valve socket during the final glue-up and ensures an even cement layer.
- Clean: Wipe the outside of the pipe and the inside of the valve socket with a clean, dry cloth to remove all dust and moisture.
Step 3: The Solvent Welding Process
This is a chemical weld, not a glue. Work quickly and methodically.
- Apply Primer: Use a natural bristle brush (the right size for the pipe) to apply purple primer to the outside of the pipe end and the inside of the valve socket. The primer cleans and softens the PVC surface. Apply it evenly.
- Apply Cement: Immediately after the primer, apply a thick, even layer of solvent cement to the primed areas on the pipe. Apply a medium layer to the inside of the valve socket.
- Final Assembly: Quickly push the pipe into the valve socket all the way to the bottom, aligning your marks. Give the pipe a quarter-turn (about 90 degrees) as you push to spread the cement evenly. Hold the joint firmly together without moving for 15-30 seconds to prevent it from pushing back out.
Step 4: Immediate Support Installation
This is the most missed step with large valves. DO NOT wait. A large valve is heavy. Before the cement sets (within a minute or two), you must install permanent, independent supports.
- Place a riser clamp or a hanger on the pipe on both sides of the valve, close to the joints.
- The supports must carry the weight of the valve and the pipe. The new solvent-welded joints must not bear any mechanical load. This prevents joint stress and sagging, which leads to leaks.
Common Installation Mistakes Table
Avoid these frequent errors to guarantee a good installation.
| Mistake | Consequence | Correct Practice |
|---|---|---|
| Not dry-fitting and marking | Valve ends up in an unoperable position. | Always dry-fit and mark alignment lines. |
| Skipping the bevel | Pipe can scrape cement off, creating a weak, uneven joint. | Always bevel the pipe end before cementing. |
| Applying too little cement | Results in a dry, starved joint that is not strong. | Apply a thick, even coat on the pipe. |
| Not supporting the valve | Joints bear weight, leading to long-term stress and failure. | Install supports on both sides before cement cures. |
How Do You Correctly Operate and Maintain a Large PVC Ball Valve System?
Even a perfectly installed valve can fail if operated poorly. Proper use is simple but critical.
Correctly operate a large PVC ball valve by using the handle or gear operator fully—open to a complete 90-degree stop, closed to the opposite stop. Never use excessive force or pipe wrenches on the handle. Basic maintenance involves visual inspections for leaks or cracks, keeping the stem area clean, and occasionally exercising (opening/closing) the valve to prevent it from seizing.

Principles of Correct Operation
A ball valve is simple: it’s either fully open or fully closed. It is not designed for throttling or fine flow control.
- Open Fully: Turn the handle or gear operator until it stops firmly. This aligns the ball’s bore completely with the pipe, minimizing flow resistance and turbulence.
- Close Fully: Turn it back until it stops firmly again. This seals the system.
- Use Appropriate Force: If the valve is hard to turn, do not force it. Forcing can break the handle, strip gears, or twist the valve stem. The problem is often debris or pressure differential. Ensure pressure is equalized across the valve and investigate the cause of the resistance.
For large valves with gear operators, follow the manufacturer’s instructions. Some have a handwheel that you turn many times. Understand the open/close position indicators.
Routine Maintenance Schedule
Maintenance is minimal but vital for long life. Create a simple schedule.
- Monthly/Quarterly Visual Inspection: Walk the line. Look at the valve and its supports. Check for any signs of weeping, drips, or cracks, especially at the joints. Ensure the supports are still tight and the valve hasn’t sagged.
- Annual Exercise: At least once a year, cycle every large valve from fully open to fully closed and back a few times. This is the most important maintenance task. It prevents the ball from sticking to the seats and keeps the stem turning freely. It also confirms the valve is still operational for emergencies.
- Stem and Area Cleanliness: Keep the area around the stem clear of dirt and debris. If the valve has a stem seal or packing nut (some larger models do), check for leaks here. A slight tightening of the packing nut may be needed if a leak develops, but do not over-tighten.
Troubleshooting Common Operational Issues
| Problem | Possible Cause | Action |
|---|---|---|
| Valve is very hard to turn | Pressure locked, debris in seats, stem corrosion (if metal internals). | Equalize pressure across valve. Cycle slowly. Do not force. |
| Leakage when closed | Damaged seat seals, debris caught on ball seat, valve not fully closed. | Cycle valve to try to dislodge debris. If leak continues, repair/replace. |
| Leakage around stem | Loose or worn stem seal/packing. | Gently tighten packing nut (if applicable). Replace seals if needed. |
| Valve handle is loose | Loose handle set screw or worn parts. | Tighten set screw. If play remains, inspect internal linkage. |
Remember, a valve you can’t operate in an emergency is useless. Regular exercise is your best insurance policy.
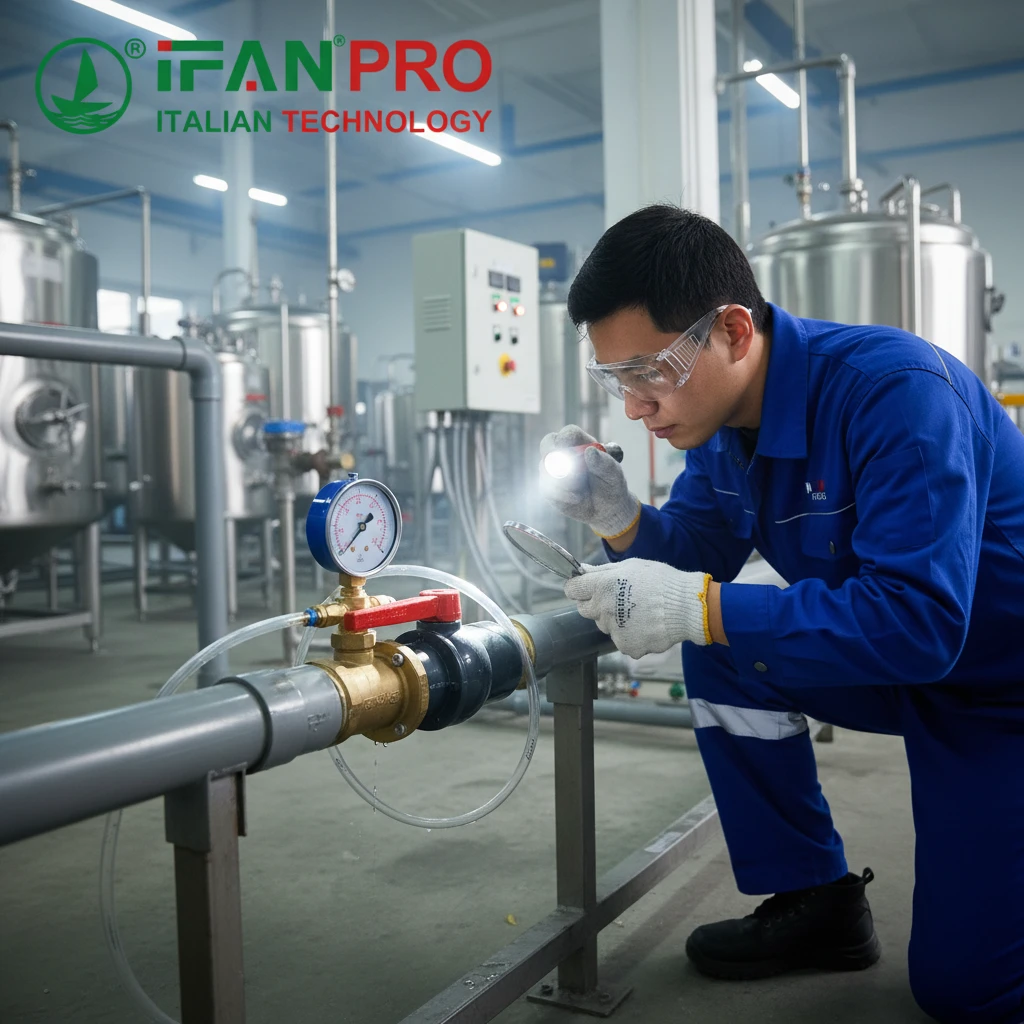
What Pressure Testing Method Verifies a Large PVC Ball Valve Installation?
Testing is the proof of your work. Never skip it.
The best method to verify installation is a hydrostatic pressure test. This involves filling the isolated pipeline section containing the new valve with water, pressurizing it to 1.5 times the system’s maximum operating pressure (but not exceeding the valve/pipe rating), holding the pressure for a set time, and inspecting all joints for leaks or pressure drop. This test proves the integrity of the entire assembly under stress.
Why Hydrostatic Testing is Essential
Air or gas testing is dangerous for large-volume PVC systems due to the explosive energy stored if a joint fails. Water is incompressible and safe for testing. A hydrostatic test simulates real operating conditions and reveals any installation flaws.
Step-by-Step Test Procedure
Follow this sequence for a reliable test.
- Isolate the Test Section: Close valves or use test plugs to isolate the section of pipe that includes the newly installed ball valve. All joints in this section must be accessible for visual inspection.
- Install Test Equipment: Install a pressure gauge you trust at the highest point in the section. At a low point, connect a water fill line and a pump (often a hand-operated pressure pump). Install a bleed valve at the highest point to remove air.
- Fill and Bleed: Slowly fill the section with water. As it fills, open the high-point bleed valve to let all air escape. Continue until only water comes out of the bleed, then close it. Air pockets give false pressure readings and are dangerous.
- Pressurize: Using the pump, slowly increase the pressure to the test pressure. The standard test pressure is 1.5 x the design operating pressure. For example, if the system runs at 100 PSI, test at 150 PSI. CRITICAL: Do NOT exceed the pressure rating of the valve or the pipe (e.g., Class 150 PVC is rated for 150 PSI at room temperature).
- Hold and Observe: Once at test pressure, close the pump valve and shut off the pump. Start a timer. The standard hold time is often 2 hours. During this time:
- Visual Inspection: Carefully check every single joint around the new valve, the valve stem, and all other connections in the section for any weeping, drips, or bulges.
- Pressure Monitoring: Watch the pressure gauge. A small initial drop is normal as the PVC may slightly expand. However, the pressure should stabilize. A continuous, significant drop indicates a leak.
Interpreting Test Results and Next Steps
What your test results mean:
- Pass: Pressure holds stable (allow for minor thermal variation), and no visual leaks are observed after the hold period. The installation is verified. You can safely depressurize, drain the test water, and put the system into service.
- Fail (Pressure Drop or Visible Leak): Immediately and safely depressurize the system. Do not stand over the leaking joint. Once pressure is zero, drain the section and thoroughly dry the area of the leak. You must now repair the faulty joint. This usually means cutting out the failed section (including the new valve if the leak is at its joint) and repeating the installation process. Then, you must perform the pressure test again until it passes.
Pressure Test Log
Keep a simple record for quality control.
| Test Section: | Line A-10, including new 10″ ball valve V-101 |
|---|---|
| Design Operating Pressure: | 80 PSI |
| Test Pressure (1.5x Design): | 120 PSI |
| Test Medium: | Water |
| Test Duration: | 2 hours |
| Initial Pressure: | 120 PSI |
| Final Pressure: | 119 PSI |
| Visual Leaks? | No |
| Result: | PASS |
| Tester Signature: | _____ |
Conclusion
Proper installation, careful operation, and routine testing are key to a reliable large PVC ball valve system. For valves that meet strict quality and performance standards, consider IFAN’s range of industrial PVC ball valves for your next project.


Recent Comments