
I once saw a project delayed for weeks because a poorly matched HDPE elbow created a weak point, leading to a costly leak. This experience cemented my belief that seamless integration is not a luxury, but a necessity for pipeline integrity.
Yes, a custom elbow can integrate seamlessly into existing HDPE lines, but only if it is engineered and installed with precision. Success depends on four critical factors: using the correct fusion technique to create a monolithic joint, perfectly matching the pipe’s SDR and material grade, designing for field alignment adjustments, and conducting thorough pre-installation checks of the existing network.
Achieving this invisible join is a step-by-step process. Let’s break down exactly how it’s done to ensure your retrofit or repair is as strong as the original line.
What Fusion Techniques Ensure a Seamless, Monolithic Joint with Existing HDPE Pipe?
The joint is the most critical point. A weak joint will fail, no matter how good the elbow is.
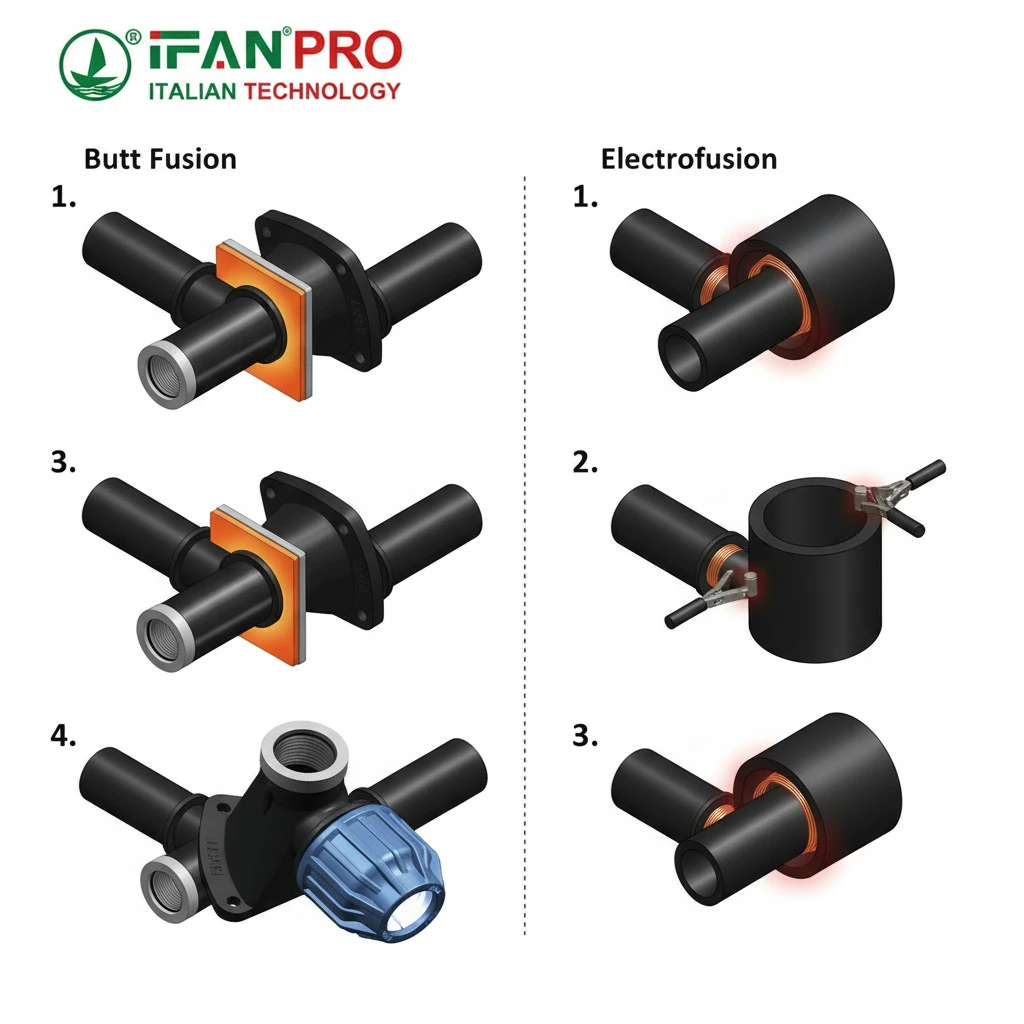
The two primary fusion techniques that ensure a seamless joint are Butt Fusion and Electrofusion. Butt Fusion melts and joins the ends of the pipe and elbow together under pressure, creating a single, homogeneous piece. Electrofusion uses a heating element inside a specialty coupling to melt and fuse the parts, which is ideal for tight spaces or repairs.
Understanding the Fusion Process
To create a joint as strong as the pipe itself, you must melt and merge the HDPE materials. Think of it like welding metal, but for plastic. The goal is to make the elbow and the pipe one continuous piece. The right technique depends on your site conditions and pipe size.
Butt Fusion is the most common method for direct, in-line joints like adding an elbow. Here’s how it works step-by-step:
- Alignment: The pipe end and the elbow are clamped in a machine to ensure they are perfectly aligned.
- Facing: A hot plate trims the ends to make them perfectly flat and clean.
- Heating: The hot plate is inserted between the two ends. They are pushed against it until a bead of molten plastic forms.
- Joining: The hot plate is removed, and the two molten ends are quickly pressed together under controlled pressure.
- Cooling: The joint is held under pressure as it cools, forming a solid, monolithic connection.
Electrofusion is another excellent method, often used for taps, repairs, or when using restraint couplings. In this process, you use a special fusion coupling or saddle that has embedded heating wires. The pipe and elbow are inserted into the coupling, and an electric current is passed through the wires. This melts the inner surface of the coupling and the outer surface of the HDPE, fusing everything together as it cools.
Choosing the Right Fusion Method
The table below helps you decide which technique to use for your custom elbow installation.
| Fusion Method | Best For | Key Advantage | Important Consideration |
|---|---|---|---|
| Butt Fusion | Pipe sizes 2 inches and larger, straight runs, new installations. | Creates the strongest, most reliable monolithic joint. | Requires a large, powered fusion machine and more workspace. |
| Electrofusion | Smaller pipes (under 2″), repairs, tight spaces, branch connections. | Very portable and requires less equipment; ideal for confined areas. | The quality depends entirely on proper surface scraping and cleaning before fusion. |
| Socket Fusion | Small diameter pipes (typically under 2 inches). | Simple and fast for small-scale plumbing. | Not typically used for large-diameter, high-pressure mainline elbows. |
The Golden Rule of Fusion
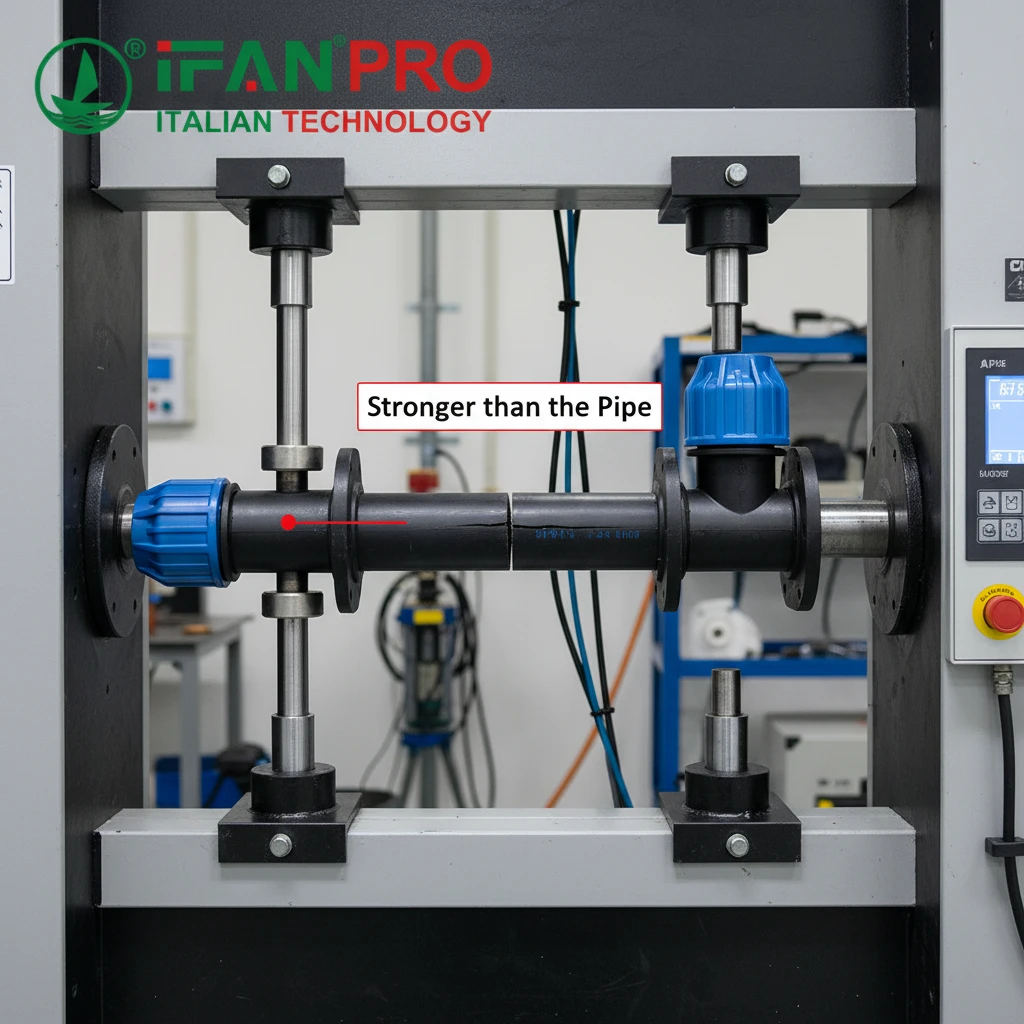
No matter the technique, cleanliness and proper procedure are non-negotiable. Dirt, moisture, or grease will ruin the fusion bond. Always follow the manufacturer’s instructions for temperature, pressure, and heating time precisely. A well-executed fusion joint will be impossible to distinguish from the original pipe.
How Do You Match the SDR and Material Grade of the Existing HDPE Pipeline?
Using the wrong SDR or grade is like trying to mix oil and water—they will not perform as one system.
You match the SDR and material grade by first identifying the specifications of the existing pipeline. This information is often printed on the pipe wall. The custom elbow must be manufactured from the same PE grade (e.g., PE100 or PE4710) and have the identical Standard Dimension Ratio (SDR) to ensure matching pressure ratings, wall thickness, and fusion characteristics.
Why Exact Matching is Critical
HDPE pipes are classified by two main properties: Material Grade and SDR. If your custom elbow does not match both, you will create a weak link.
Material Grade (like PE100, PE4710) tells you about the strength and quality of the raw HDPE resin. Different grades have different minimum required strength (MRS) values. Fusing a PE100 elbow to a PE80 pipe can lead to stress concentrations because the two materials have slightly different melt flows and long-term strength.
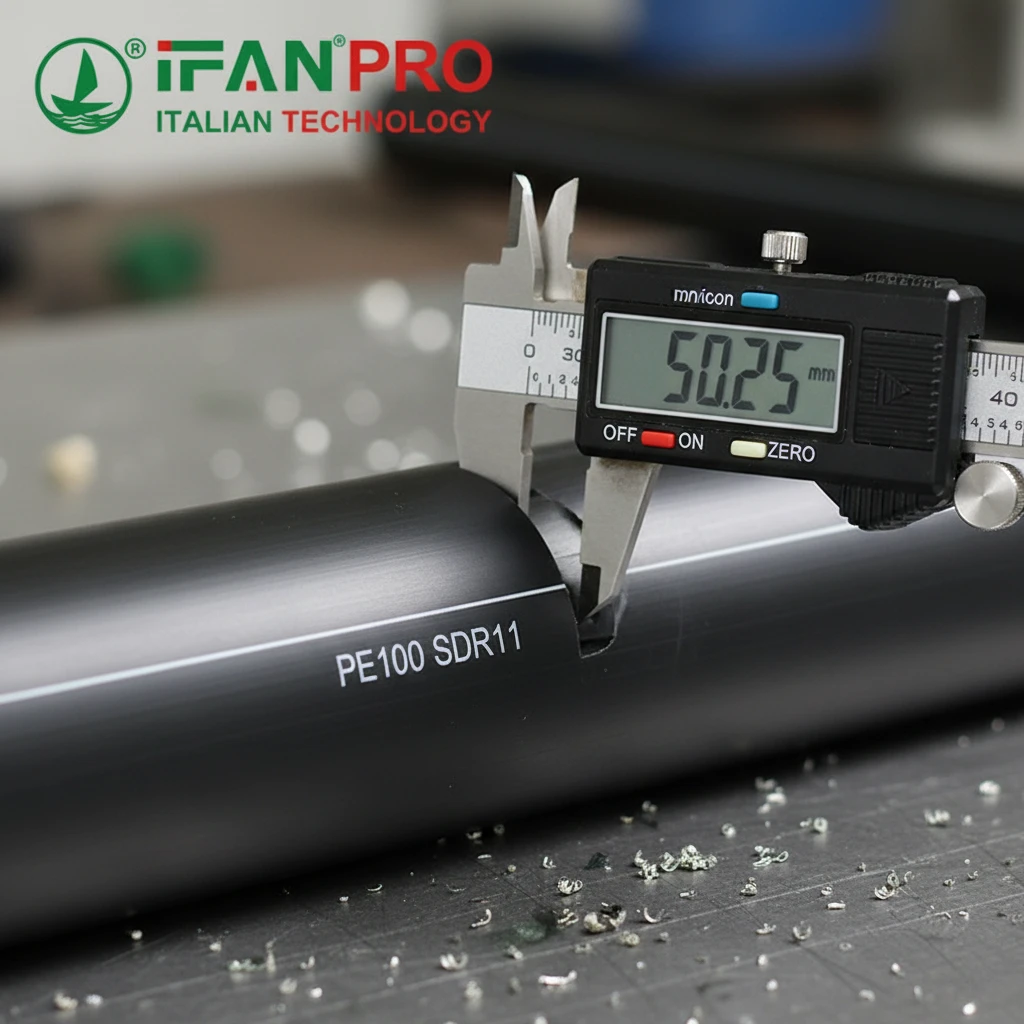
Standard Dimension Ratio (SDR) is the most important number to match. It is a simple calculation: SDR = Outside Diameter / Wall Thickness. A common SDR is 11. This number determines the pipe’s pressure rating. An SDR 11 pipe has a certain wall thickness for its diameter. If you install an SDR 17 elbow (which has a thinner wall) into an SDR 11 line, the elbow will be the weak point and could fail under the system’s operating pressure.
Step-by-Step Guide to Identification and Matching
Here is a practical guide to get the match right:
- Locate the Pipe Markings: Find the printed line on the existing HDPE pipe. It usually contains the manufacturer’s name, material grade (e.g., “PE100”), SDR (e.g., “SDR11”), diameter, and pressure rating.
- Verify with Calipers: If the markings are faded, use calipers to measure the outside diameter (OD) and the wall thickness. Calculate the SDR (OD / Wall Thickness) to confirm.
- Order the Exact Match: Provide these exact specifications—Material Grade and SDR—to your supplier when ordering the custom elbow. Do not accept “equivalent” or “compatible” products; insist on an exact match.
- Request Documentation: A reliable supplier like IFAN will provide material certifications and test reports confirming the grade and dimensions of the custom fitting.
Common Client Pain Points and Solutions
| Pain Point | Consequence | IFAN’s Practical Solution |
|---|---|---|
| Faded or missing pipe markings. | Inability to identify the correct specs, leading to guesswork and potential mismatch. | Use ultrasonic thickness gauges to accurately measure wall thickness and calculate SDR. Provide pipe samples for material analysis. |
| Believing diameter alone is enough. | Ordering the right diameter but wrong SDR, resulting in a pressure mismatch. | Educate clients that SDR is more critical than diameter alone for pressure integrity. Always ask for both values. |
| Supplier offers a “similar” grade. | The fusion joint may be weak or may develop cracks over time due to material incompatibility. | Manufacture the elbow from the identical, certified PE100 or PE4710 resin batch to ensure perfect fusion compatibility. |
Can the Custom Elbow Be Designed to Accommodate System Alignment Adjustments?
Field conditions are never perfect. A rigid elbow can force pipes into misalignment, creating dangerous stress.
Yes, custom elbows can be specifically designed to accommodate alignment adjustments. This is achieved by manufacturing elbows with a slightly wider deflection angle (e.g., a 45.5° elbow instead of 45°) or by using a fabricated segment with multiple minor bends. These designs allow installers to make small angular corrections during fusion without straining the pipeline.
The Problem of Field Misalignment
In a perfect world, pipes are laid in perfectly straight lines. In reality, existing pipes can settle, shift, or may not have been installed perfectly straight. When you cut out a section to install a standard 45° or 90° elbow, you might find the two pipe ends are not aligned correctly. Forcing them to fit puts enormous stress on the new joints, guaranteeing a future failure.
Design Solutions for Real-World Installation
To solve this, engineers design fittings with built-in adjustment capability. Here are the most common methods:
- Deflection Angle Elbows: Instead of a standard 45° elbow, you order a 45.5° or 46° elbow. This extra half-degree gives the installer just enough flexibility to rotate the elbow during fusion to compensate for minor misalignment in the trench. The system ends up stress-free.
- Fabricated Bends or “Sweeps”: For more severe alignment issues, a custom-fabricated segment is the answer. Instead of one sharp elbow, this is a pipe section that incorporates a gentle, smooth bend over a longer length. A fabricator can create a bend to any specific angle (e.g., 47 degrees) to perfectly fit the misaligned existing pipes.
- The “Dog Leg” Design: In some cases, two small bends in different planes can correct for both horizontal and vertical misalignment. This is a custom-designed solution that looks like a very slight, continuous “S” shape.
How to Communicate Your Alignment Needs
To get the right custom design, you must provide clear information to your fitting supplier. This table outlines the process:
| Step | Action | Information to Provide to Supplier (like IFAN) |
|---|---|---|
| 1. Assessment | Measure the misalignment at the installation point. | The distance the pipe ends are offset (in mm/inches) and the required direction of correction. |
| 2. Solution Design | Determine the type of adjustment needed. | Specify if you need a simple deflection angle elbow or a custom-fabricated bend/sweep. |
| 3. Ordering | Provide precise technical details. | Give the exact deflection angle needed, the center-to-face dimensions, and the rotation required. |
| 4. Validation | Review the design before manufacturing. | Approve shop drawings from the supplier that show the custom geometry. |
Using these design strategies transforms the custom elbow from a simple directional change into a problem-solving component. It ensures the installed system is free from harmful stress, making it as reliable as a perfectly aligned new installation.
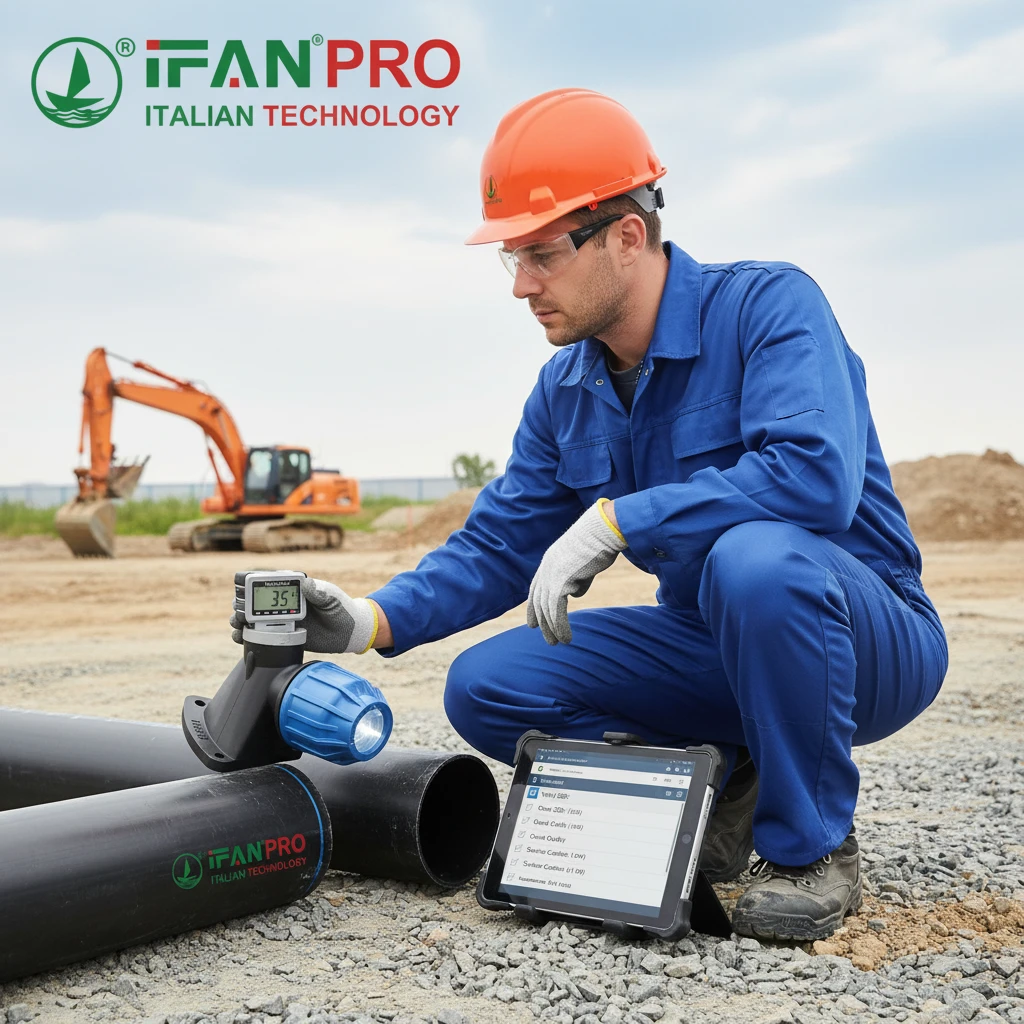
What Pre-Installation Checks Guarantee Compatibility with the Current HDPE Network?
Skipping pre-checks is the biggest cause of retrofit failure. You must verify, not assume.
Pre-installation checks guarantee compatibility by physically and visually inspecting the existing pipeline. Key checks include: confirming the pipe material grade and SDR, measuring the exact outside diameter, inspecting the pipe ovality and surface condition, and ensuring the pipe is clean, dry, and free of defects before fusion. This checklist prevents costly mismatches and failed joints.
The Essential Pre-Installation Checklist
Think of this as a pilot’s pre-flight checklist. Each item is crucial for a safe “journey.” Here is a detailed breakdown of what to do before you even order the custom elbow.
1. Material and Dimensional Verification:
This is the most critical step. Do not rely on old drawings.
- Action: Find and record the print line on the pipe. If absent, use calipers and an ultrasonic thickness gauge.
- What to Record: Write down the Brand, PE Grade (PE100/PE4710), SDR, and OD. Take photos.
2. Pipe Condition Assessment:
You cannot fuse to a damaged pipe.
- Check for Ovality: A pipe that is not round (oval) cannot be properly clamped or fused. Measure the diameter at multiple points.
- Inspect the Surface: Look for deep scratches, gouges, or weathering. Surface damage must be trimmed off before fusion.
- Check for Contaminants: Is the pipe covered in dirt, grease, or moisture? All must be thoroughly cleaned.
3. Site and System Readiness:
- Access: Is there enough space to bring in the fusion machine and safely perform the work?
- Pressure Drainage: Can the line be fully drained and isolated? Trapped water will steam during fusion and create a weak joint.
- Environmental Conditions: Is it too windy, rainy, or dusty? These conditions can contaminate the fusion surface.
Creating a Compatibility Report
Documenting your checks is vital. Use a simple report like the one below to ensure nothing is missed.
| Check Item | Method/Tool | Acceptable Standard | Action if Failed |
|---|---|---|---|
| Material Grade | Read pipe marking or lab test. | Must match exactly (PE100 to PE100). | Do not proceed. Source the correct grade. |
| SDR & OD | Calipers, ultrasonic gauge. | Must match exactly within manufacturer tolerance. | Order the custom elbow to the measured specs, not the assumed ones. |
| Pipe Ovality | Caliper at 12, 3, 6, 9 o’clock positions. | Less than 3% deviation from nominal OD. | Re-round the pipe with a proper tool or cut out the deformed section. |
| Surface Condition | Visual and tactile inspection. | Smooth, no cracks, gouges >10% of wall thickness. | Trim the pipe end back to pristine material. |
| Cleanliness | Visual inspection, clean wipes. | Free of dirt, moisture, grease, oxidation. | Clean with approved HDPE cleaner and scrape with a dedicated scraping tool. |
By meticulously following this pre-installation protocol, you turn uncertainty into confidence. You move from hoping the elbow will fit to knowing it will integrate seamlessly. This process saves immense time and money by preventing errors before they happen on site.
Conclusion
A custom HDPE elbow can integrate seamlessly, but it requires precise matching, expert fusion, smart design, and thorough checks. For guaranteed compatibility, trust IFAN’s custom HDPE fittings, manufactured to your exact pipe specifications.


Commentaires récents