
I once watched a rookie contractor ruin an entire plumbing rough-in because he used the wrong crimping tool. That expensive lesson taught me that proper installation techniques matter more than the parts themselves.
PEX-AL-PEX crimp valves provide reliable, long-lasting connections when you install and maintain them correctly. Success depends on using the right tools, achieving perfect pipe alignment, performing thorough pressure tests, and following a simple maintenance routine. This guide covers the essential practices every contractor needs for trouble-free installations.
Let’s walk through the professional methods that separate quality work from callbacks.
Essential Professional Tools for Installing the IFANPRO Mold U Valve
Nothing frustrates me more than watching a contractor struggle with cheap tools. I’ve seen it lead to bad crimps, leaks, and wasted time.
Professional installation of the IFANPRO Mold U Valve requires a calibrated crimping tool with the correct jaw size, a proven go/no-go gauge, a reliable pipe cutter, a deburring tool, and a depth gauge. Using these tools correctly ensures consistent, code-compliant connections every time.
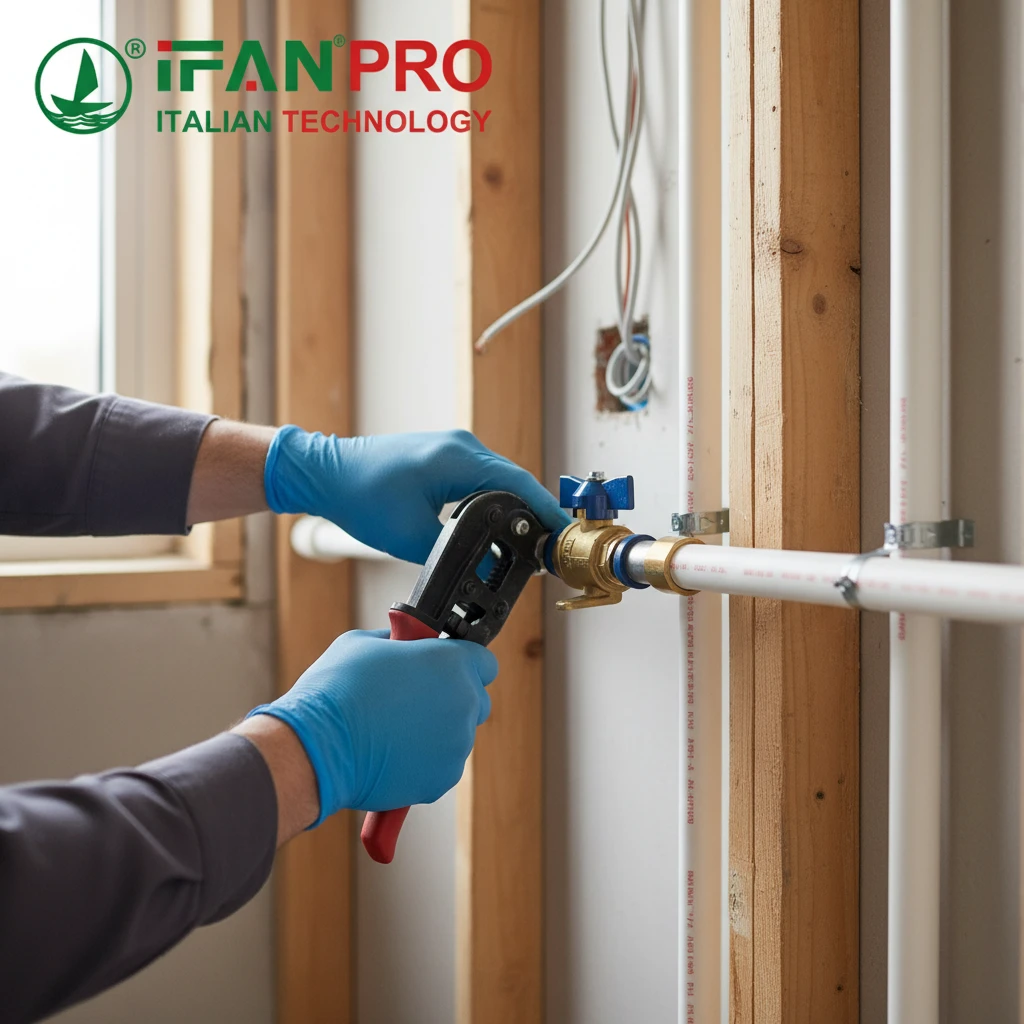
The Crimping Tool: Your Most Important Investment
The crimping tool creates the permanent mechanical connection between the pipe and the valve. Not all tools perform equally.
Manual vs. Automatic Crimpers: Manual tools work well for smaller jobs and occasional use. They require physical force and careful technique. Automatic or battery-powered tools provide consistent pressure every time. They reduce installer fatigue and deliver more uniform results on large projects.
Calibration Matters: A crimping tool must stay within manufacturer specifications. Tools lose calibration over time with regular use. We recommend annual calibration checks. Some contractors send their tools out every 6 months for high-volume work. An out-of-calibration tool produces loose or over-compressed crimps, both of which lead to leaks.
The Go/No-Go Gauge: Your Quality Assurance
This simple tool prevents one of the most common installation errors. After you make a crimp, you must check it with the appropriate gauge.
The “go” side should slide easily over the crimped ring. The “no-go” side must not fit. If the no-go side fits, the crimp is too loose. If the go side won’t slide on, the crimp is too tight. Both situations require cutting out the fitting and starting fresh.
Supporting Tools for Professional Results
The table below lists essential tools and why each matters:
| Tool | Function | Why It’s Critical |
|---|---|---|
| Pipe Cutter | Makes clean, square cuts on PEX-AL-PEX pipe. | Angled cuts prevent full pipe insertion into the fitting. |
| Deburring/Calibrating Tool | Removes inner burrs and restores pipe roundness. | Burrs can damage the O-ring during insertion; out-of-round pipe won’t seal. |
| Depth Gauge or Marking Tool | Marks the correct insertion depth on the pipe. | Shallow insertion leaves the O-ring exposed; deep insertion can block flow. |
| Crimping Tool (Correct Jaw Size) | Compresses the crimp ring onto the pipe and fitting. | Wrong jaw size or poor calibration creates unreliable connections. |
| Go/No-Go Gauge | Verifies crimp ring is compressed to the correct diameter. | This is the only way to confirm a proper crimp visually. |
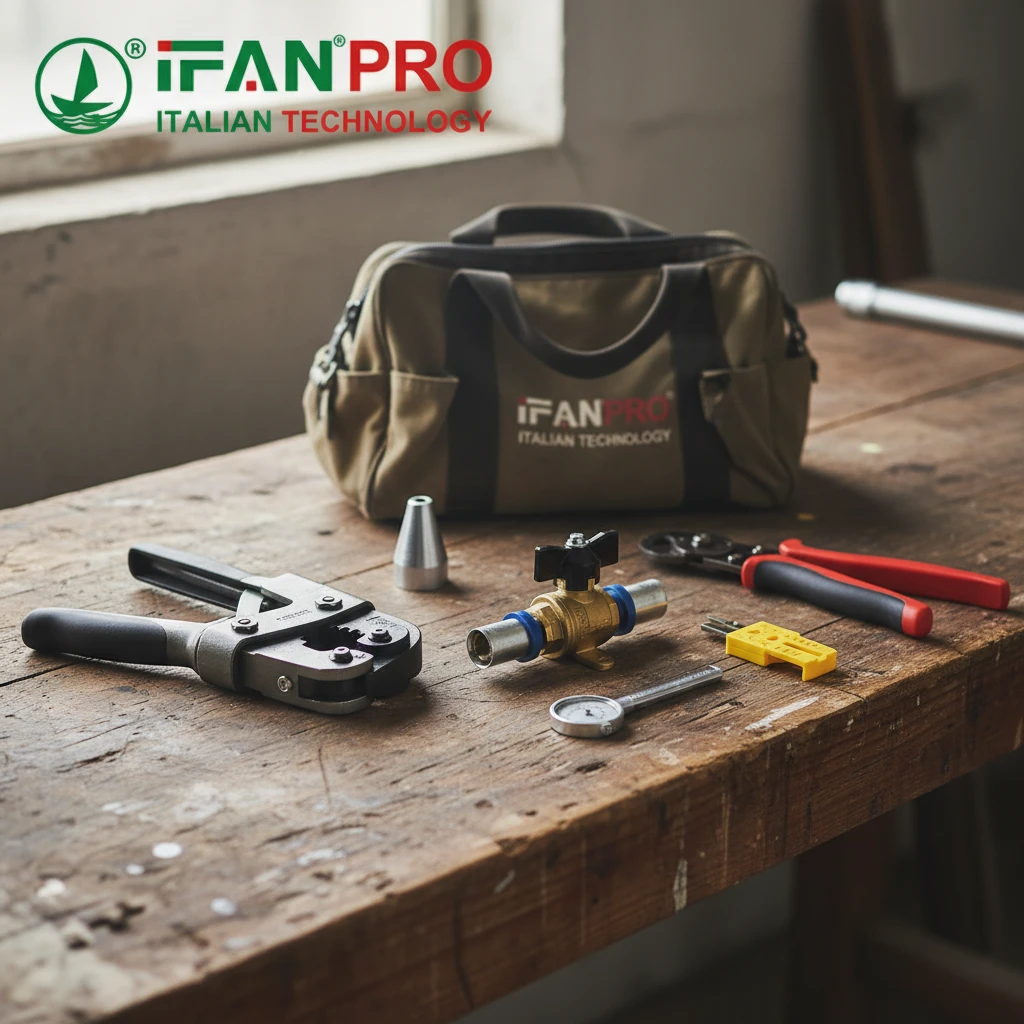
Contractor’s Tip: Tool Organization
Keep all your PEX tools in a dedicated bag or box. Nothing wastes time like searching for a deburring tool on a job site. Stock spare batteries for power tools and extra gauges. A small investment in organization pays back in productivity.
4 Critical Steps to Ensure Perfect Pipe-to-Valve Alignment
Poor alignment causes more leaks than any other factor. I’ve pulled apart hundreds of bad connections, and misalignment was the culprit in most cases.
Perfect pipe-to-valve alignment requires four critical steps: 1) Cut the pipe perfectly square, 2) Deburr and calibrate the pipe end, 3) Mark the correct insertion depth, and 4) Insert the pipe straight without twisting. Skipping any step risks immediate failure or long-term seal degradation.
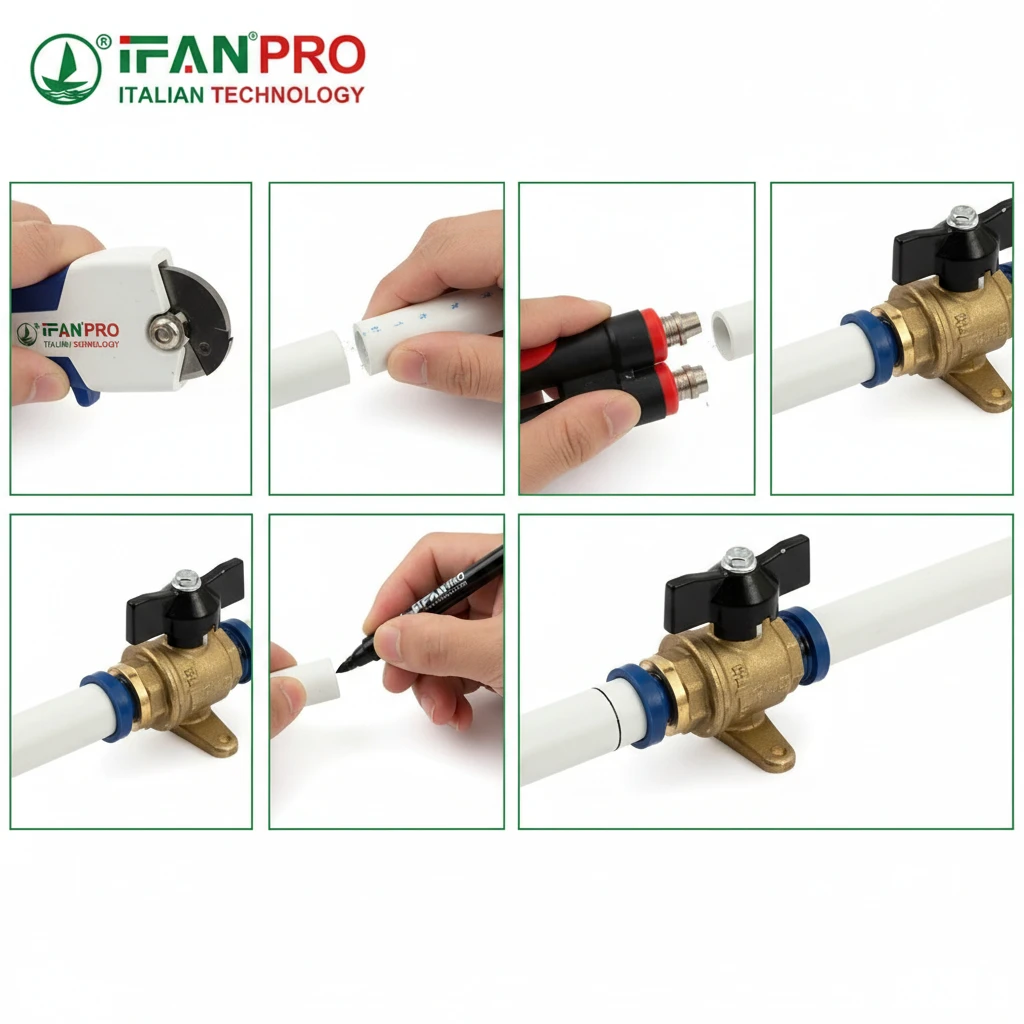
Step 1: Making the Perfect Cut
Start with a clean, square cut. A ratcheting pipe cutter designed for PEX-AL-PEX works best. Position the cutter perpendicular to the pipe. Apply even pressure and rotate around the pipe. Do not force the cut or use a saw, which creates burrs and an uneven edge.
A square cut matters because the pipe must seat fully against the fitting’s internal stop. An angled cut leaves a gap. That gap exposes the O-ring to debris and pressure fluctuations. Over time, this causes failure.
Step 2: Deburring and Calibrating
This step separates amateurs from professionals. The inner aluminum layer can leave sharp edges after cutting. Use the deburring tool to ream the inside edge. Rotate the tool several times until you feel no resistance.
Next, insert the calibrating end of the tool. PEX-AL-PEX pipe can ovalize during shipping or cutting. The calibrating tool restores the perfect round shape. An oval pipe will not seal properly against the O-ring. It creates gaps that lead to leaks under pressure.
Step 3: Marking the Correct Insertion Depth
Take a fitting and measure how deep the pipe must go. Most fittings have a shoulder or stop inside. Use a depth gauge or simply mark the pipe with a permanent marker at the correct depth.
Why mark the pipe? Because you need visual confirmation that the pipe seats fully. When you insert the pipe, you should see the mark align with the fitting’s edge. If the mark disappears inside the fitting, you have inserted too far, which can block flow. If the mark remains visible, you haven’t inserted enough, leaving the seal exposed.
Step 4: Straight Insertion Without Twisting
Now insert the pipe. Push straight in with a slight rotating motion. Do not twist aggressively. Twisting can roll the O-ring out of its groove. Push until the pipe stops against the internal shoulder. Check your depth mark to confirm full insertion.
The table below shows common alignment mistakes and their consequences:
| Mistake | What Happens | Result |
|---|---|---|
| Angled cut | Pipe doesn’t seat fully against stop. | O-ring exposed; eventual failure. |
| No deburring | Sharp edges damage O-ring during insertion. | Immediate leak or slow degradation. |
| No depth mark | Uncertain insertion depth. | Either shallow insertion (leak) or deep insertion (flow restriction). |
| Twisting during insertion | O-ring rolls or moves out of position. | Immediate leak at pressure test. |
| Out-of-round pipe | Gaps between pipe and O-ring. | Leak at low pressure or temperature change. |
Contractor’s Tip: Practice Makes Permanent
Before installing valves on a paying job, practice on scrap pieces. Cut, deburr, mark, insert, and crimp ten connections. Then cut them apart and inspect. Look for even crimp marks and proper O-ring positioning. This ten-minute practice session prevents costly mistakes.
On-Site Pressure Testing and Leak Inspection Guidelines
Testing reveals what installation hides. I always say a tested system is a trusted system.
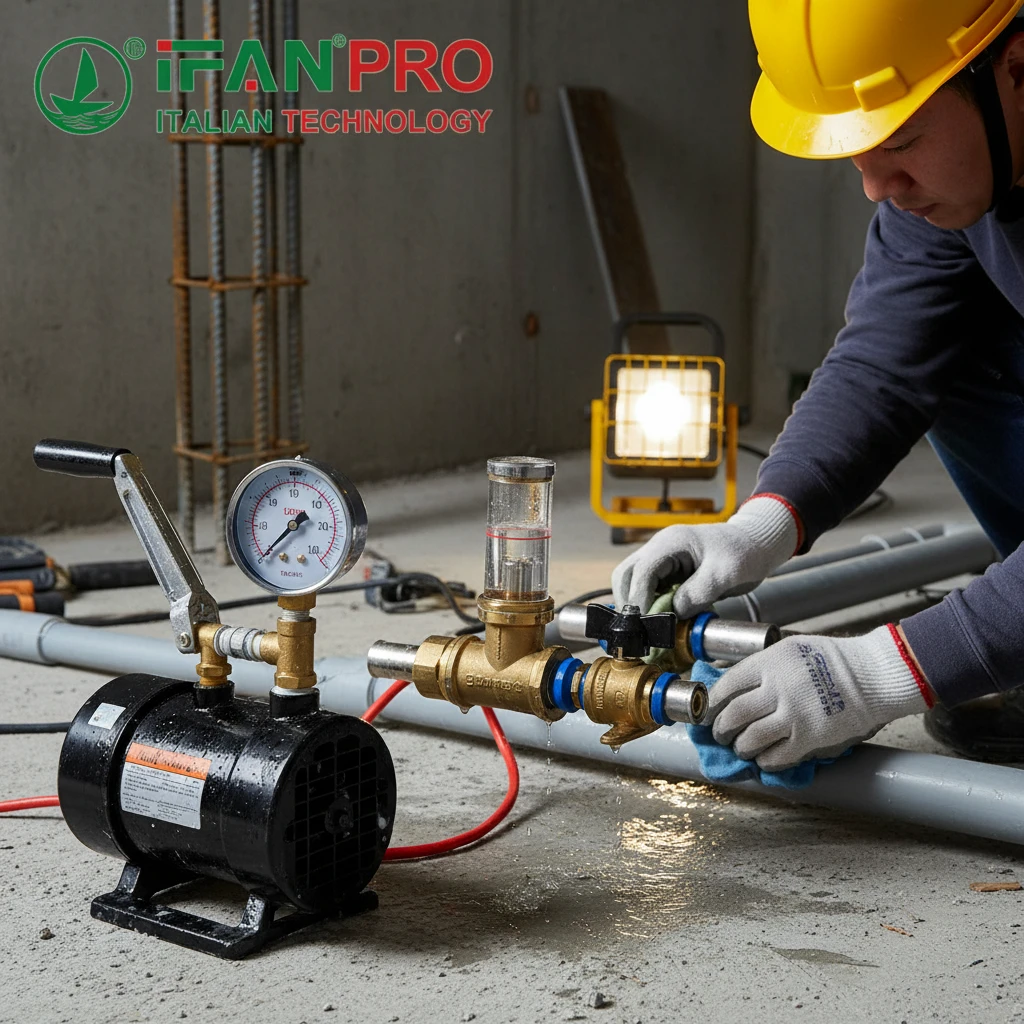
On-site pressure testing requires pressurizing the installed system to 1.5 times the maximum working pressure, holding for a minimum of 60 minutes, and verifying no pressure drop occurs. During the test, inspect every connection visually for any sign of weeping or moisture, paying special attention to recently installed crimp valves.
Preparing for the Pressure Test
Before applying pressure, ensure all connections are complete and secure. Close all outlets and leave at least one valve open temporarily. Fill the system slowly with water. This allows air to escape. Once water flows steadily from the open valve, close it. The system should now be full with minimal trapped air.
Trapped air causes problems during testing. Air compresses, while water does not. If air remains in the lines, pressure readings become unreliable. You might see pressure drops that come from air dissolving into water rather than actual leaks.
Conducting the Test
Attach a reliable pressure gauge and pump. A hand pump works well for residential systems. For larger commercial jobs, consider a powered test pump. Raise the pressure gradually to the test level.
Standard Test Pressure: Most codes require testing at 1.5 times the system’s maximum operating pressure. For a typical residential system operating at 80 PSI, test at 120 PSI.
Once you reach test pressure, close the valve on the pump. Record the starting pressure and time. Walk the entire system and inspect each connection.
What to Look For During Inspection
Use your eyes and a dry hand. Look for:
- Visible moisture: Even a single drop forming at a fitting indicates failure.
- Changes in fitting appearance: Some fittings may darken slightly when wet.
- Sounds: Listen for hissing, though this is rare with water testing.
For hard-to-see areas, use a small mirror or a phone camera. Check behind walls if access allows. Pay extra attention to adjustable fittings and recently crimped connections.
Duration and Pass/Fail Criteria
Hold test pressure for a minimum of 60 minutes. Some specifications require longer, up to 2 hours for commercial work. During this time, pressure should remain stable.
What qualifies as a pass? No visible leaks and no measurable pressure drop after temperature stabilization. Temperature changes can cause slight pressure fluctuations. Allow the system to reach ambient temperature before starting the clock.
The table below summarizes test pressure guidelines:
| System Type | Operating Pressure | Test Pressure | Hold Time |
|---|---|---|---|
| Residential Cold Water | 40-60 PSI | 90 PSI | 60 minutes |
| Residential Hot Water | 50-80 PSI | 120 PSI | 60 minutes |
| Commercial Systems | 60-100 PSI | 150 PSI | 120 minutes |
| High-Rise Buildings | 100-150 PSI | 225 PSI | 120-180 minutes |
If the Test Fails
A pressure drop means you have a leak. Do not guess where. Methodically check each connection. Start with the most recent work. Use a dry paper towel to wipe suspicious joints. The leak will wet the paper.
Once you locate the leak, drain the system and repair it. For crimp connections, this usually means cutting out the bad fitting and installing a new one. Do not attempt to re-crimp a failed connection. Cut it out and start fresh.
Routine Maintenance Tips to Extend the Lifespan of Your Valves
Maintenance prevents problems. I’ve seen well-maintained systems last decades beyond their expected service life.
Routine maintenance for PEX-AL-PEX crimp valves includes annual visual inspections, checking for signs of corrosion on metal components, verifying valve operation through full cycles, and monitoring for any changes in water pressure or quality. Simple preventive care catches small issues before they become expensive failures.

Annual Visual Inspection
Once per year, inspect all accessible valves. Look for:
- Corrosion on brass components: While the pipe won’t corrode, brass valve bodies can develop patina or, in aggressive water, dezincification.
- Cracks or stress marks: Check around the crimp ring and valve body for any hairline cracks.
- Moisture stains: Old water marks around a fitting suggest a past leak that may recur.
- Support and strapping: Ensure pipes remain properly supported. Sagging pipes stress valves.
Operational Checks
Valves need exercise. A valve that sits unused for years may seize or fail when needed.
Once every six months, operate each valve through its full range. Open and close ball valves completely. Turn stops off and on. This movement redistributes lubricant inside the valve and prevents mineral buildup on sealing surfaces.
After operating the valve, check for leaks around the stem. A small weep here indicates a packing nut that needs tightening or a seal that requires replacement.
Monitoring System Performance
Your plumbing system gives warning signs before major failures. Pay attention to:
| Warning Sign | What It Means | Action Required |
|---|---|---|
| Gradual pressure drop | Possible scale buildup or partial valve closure. | Check all valves for full-open position; inspect for restrictions. |
| Water hammer noise | Loose pipes or failed hammer arrestors. | Secure loose pipes; check air chambers or mechanical arrestors. |
| Temperature fluctuations | Mixing valve issues or crossover between hot and cold. | Verify check valves function; inspect for cross connections. |
| Discolored water | Corrosion elsewhere in system or incoming water change. | Test water quality; inspect sacrificial anodes in water heater. |
Seasonal Considerations
In regions with freezing temperatures, take extra precautions before winter. Drain any outdoor lines connected to PEX-AL-PEX systems. Even though the pipe resists bursting better than metal, ice can still damage valves and fittings.
For seasonal properties, consider a full system drain before winter shutdown. In spring, pressurize gradually and inspect all connections before full use.
Long-Term Protection Strategies
For maximum lifespan, consider these advanced practices:
Water Treatment: If your water is aggressive (low pH, high chloramines, or high mineral content), consider whole-house treatment. While PEX-AL-PEX resists chemical attack better than metal, valve components benefit from balanced water chemistry.
Thermal Expansion Control: Install expansion tanks on closed systems with check valves or pressure-reducing valves. Thermal expansion stresses all system components, including valves.
Pressure Regulation: Never exceed the valve’s rated pressure. Install pressure-reducing valves if street pressure exceeds 80 PSI. High pressure accelerates wear on all system components.
Contractor’s Tip: Document Everything
Keep records of installations, test results, and maintenance visits. For commercial clients, provide log sheets they can use to track their own inspections. Good documentation protects you from liability and helps clients understand the value you provide.
Conclusion
Proper installation and simple maintenance keep PEX-AL-PEX crimp valves working reliably for decades. For professional-grade valves backed by comprehensive technical support, choose IFAN’s complete line of PEX-AL-PEX fittings and valves.


Commentaires récents