
A client once called me in a panic because their tank overflowed. The cause? A neglected float valve jammed by hard water deposits. This common problem is completely avoidable with simple care.
To ensure float valve longevity, regularly inspect and clean it, promptly replace worn seals and washers, and lubricate moving parts. This proactive maintenance prevents leaks, sticking, and failure, saving you from costly water damage and replacements.
Stick with me, and I’ll share a straightforward, step-by-step guide based on years of field experience to keep your float valve working like new for years.
What is the Recommended Frequency for Inspecting and Cleaning a Float Valve?
Waiting for a valve to fail before checking it is a costly mistake. I advise a schedule based on your water conditions.
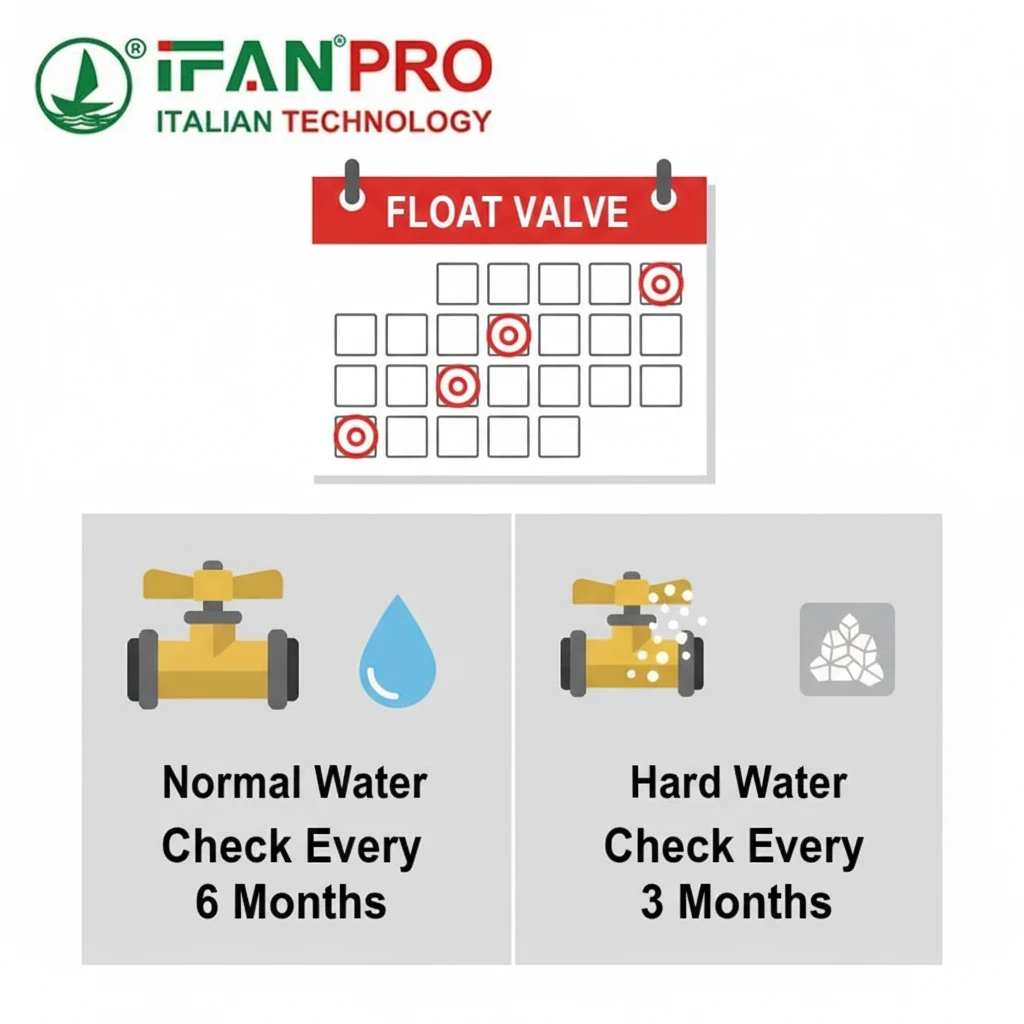
For most systems, inspect and clean your float valve at least every 6 to 12 months. However, if you have hard water with high mineral content, inspect it every 3 to 4 months. Also, check it immediately if you notice slow filling, constant running water, or visible leaks.
Why Regular Inspection is Non-Negotiable
A float valve is a mechanical device that is constantly exposed to water and pressure. Over time, things like minerals, sediment, and small debris will affect its performance. Regular inspection helps you find small issues before they become big, expensive problems.
Think of it like changing the oil in your car. You do it regularly to prevent engine damage. Checking your float valve regularly prevents tank overflows and water waste.
Creating Your Inspection Schedule
The right schedule depends mostly on your water quality. The level of minerals (like calcium and magnesium) in your water is the biggest factor.
Here is a simple guide to decide how often to check your valve:
| Water Condition | Signs to Look For | Recommended Inspection Frequency |
|---|---|---|
| Hard Water | White, chalky scale buildup on faucets. | Every 3-4 months |
| Normal/Municipal Water | No obvious scaling. | Every 6 months |
| Soft or Filtered Water | Very low mineral content. | Every 12 months |
| Any Water (After New Install) | Checking for initial wear or adjustment. | After first 30 days |
What to Do During an Inspection
A basic inspection is quick and doesn’t require tools. First, listen to the valve. Do you hear a constant hissing or trickling sound even when the tank is full? This means water is leaking past the valve seat.
Next, look at the valve and the surrounding area. Are there any drips, mineral stains, or signs of corrosion? Finally, watch the float arm as the tank fills. It should move smoothly and shut off the water completely when it reaches the correct level.
If you see or hear any of these warning signs, it’s time for a cleaning or repair. Setting a calendar reminder for these checks is the easiest way to prevent unexpected failures.
How Do You Clean Mineral Deposates from the Valve Seat and Plunger?
Hard water deposits are the number one enemy of float valves. I’ve seen valves so clogged they were completely stuck shut.
To clean mineral deposits, first shut off the water supply and drain the tank. Then, disassemble the valve to remove the plunger. Soak these parts in white vinegar or a dedicated descaling solution to dissolve the scale, then gently scrub any remaining residue with a soft brush before rinsing and reassembling.
Step-by-Step Cleaning Guide
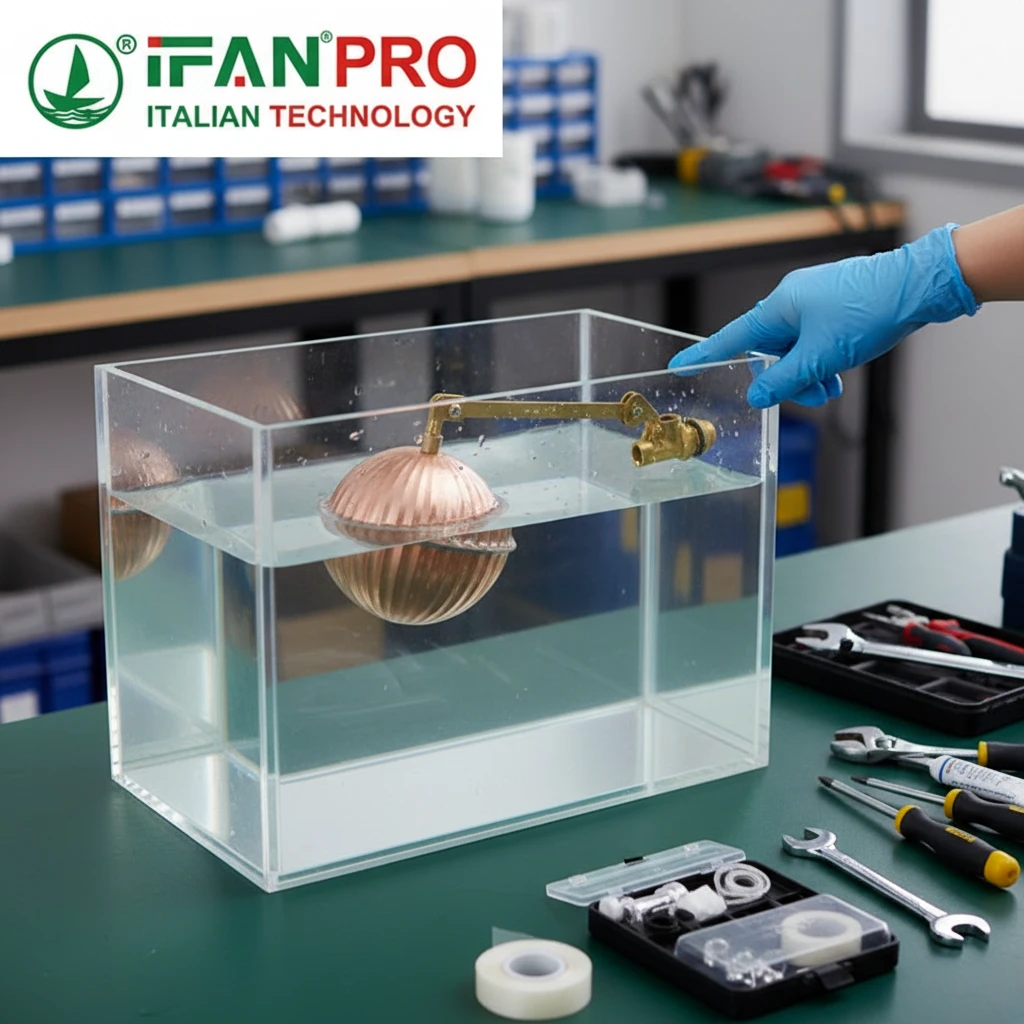
Cleaning a scaled-up valve is a simple process. You only need a few common tools: a wrench, a screwdriver, white vinegar, a small brush (an old toothbrush is perfect), and a container.
Step 1: Safety and Preparation
First, locate and turn off the main water supply to the tank. Then, flush the toilet or open a downstream tap to drain the water pressure from the line. This prevents a big splash when you disconnect the valve.
Step 2: Disassembly
Use a wrench to disconnect the water supply line from the valve. Then, remove the valve from the tank. Usually, there is a large plastic or metal nut underneath the tank that holds it in place. Unscrew this nut, and you can lift the entire valve out.
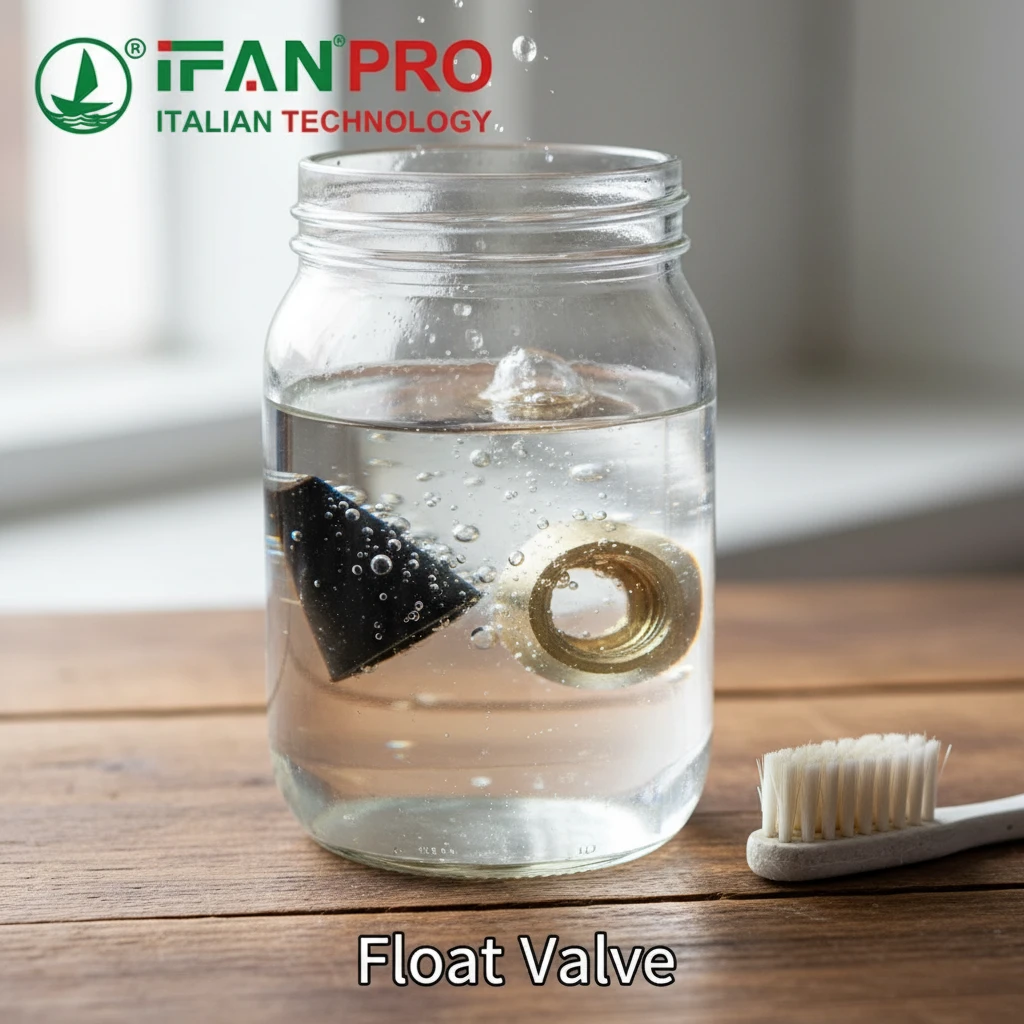
Now, take apart the valve itself. Remove the float arm, and then unscrew or unclip the main body to get to the plunger and the valve seat inside. The plunger is the rubber or silicone tip that moves up and down to stop the water flow.
Step 3: Descaling and Scrubbing
Place the plunger and any other plastic or metal parts covered in scale into your container. Pour enough white vinegar to completely cover them. Let them soak for at least one hour. For very heavy deposits, leave them overnight.
The acetic acid in the vinegar will dissolve the mineral scale without damaging the rubber or plastic parts. After soaking, use your soft brush to gently scrub away any loose material. Do not use metal scrapers or wire brushes, as they will scratch the surfaces and cause future leaks.
Step 4: Rinse and Reassemble
Rinse all the parts thoroughly with clean water. This step is important to wash away any vinegar and dissolved minerals. Then, carefully put the valve back together in the reverse order of disassembly. Make sure all seals and washers are correctly positioned.
Finally, reinstall the valve in the tank, reconnect the water supply, and turn the water back on. Check carefully for leaks and ensure the valve shuts off properly.
Which Internal Parts, Like Washers or Seals, Typically Need Periodic Replacement?
Even with perfect cleaning, rubber parts wear out. Keeping spares on hand is a hallmark of good maintenance.
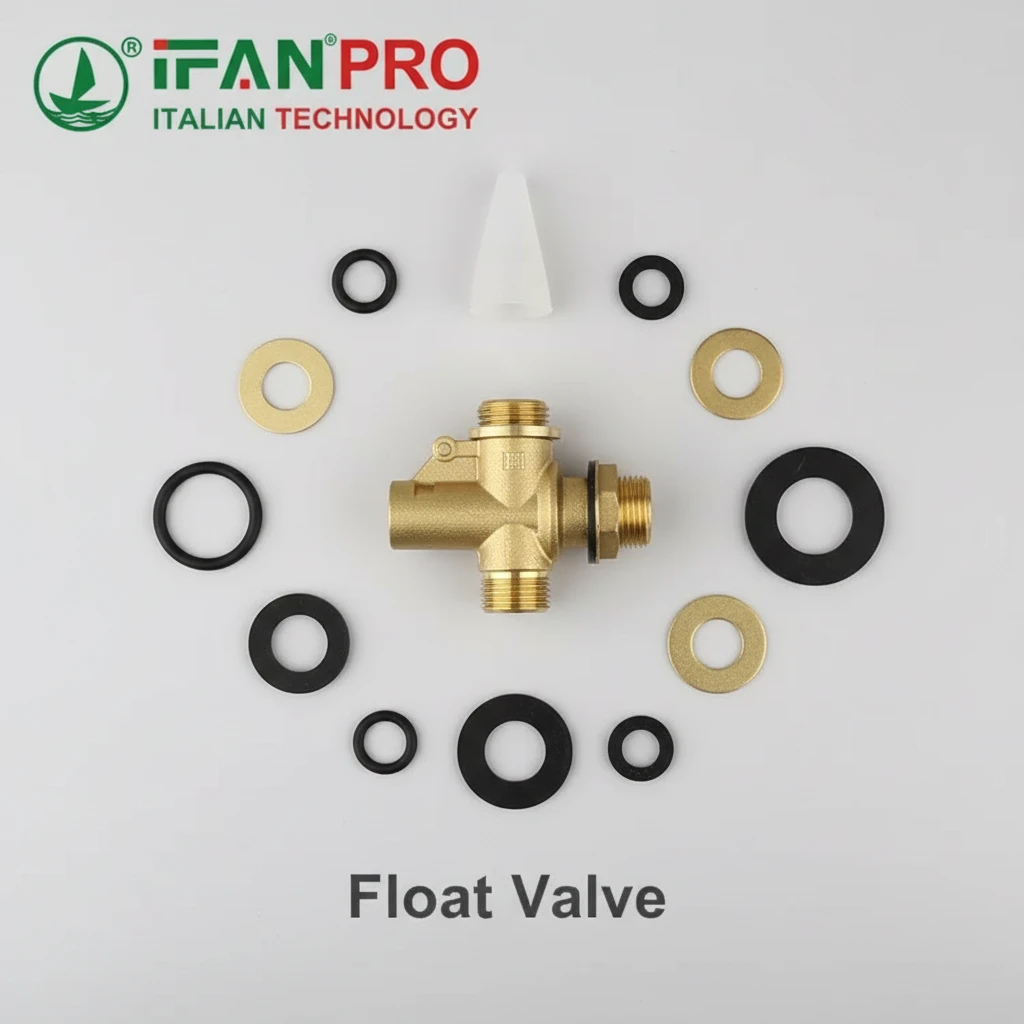
The parts that most often need replacement are the plunger (the rubber tip that seals the valve), the O-rings and washers that seal connections, and the diaphragm in certain valve models. These rubber and silicone components degrade over time due to friction, pressure, and mineral exposure, leading to leaks.
Understanding Wear and Tear on Key Components
A float valve has only a few moving parts, but they work hard. Every time the valve opens and closes, the plunger presses against the valve seat. This constant friction, combined with water pressure and chemical exposure, slowly wears down the soft rubber or silicone.
Think of it like the sole of your shoe. Even if you avoid mud, it will eventually wear thin from walking. Similarly, these valve parts wear out from normal use.
Common Replacement Parts Checklist
You don’t usually need to replace the entire valve. Just swapping out a few inexpensive parts can restore it to full function. Here are the parts you should check and likely replace during a maintenance service:
| Part Name | Function | Signs of Wear | Material |
|---|---|---|---|
| Plunger / Seal Tip | Creates the watertight seal to stop flow. | Cracks, flat spots, grooves, or hardness. | Rubber, Silicone |
| O-Rings | Seal connections between valve body parts. | Flattened, cracked, or stretched. | Nitrile Rubber |
| Diaphragm | In diaphragm valves, it flexes to control water. | Stiffness, pinholes, or tears. | Rubber, Polymer |
| Float Arm Seal | Seals where the arm enters the valve body. | Leaking around the arm’s pivot point. | Rubber |
| Fibre Washers | Seal the connection to the water supply line. | Compressed, cracked, or brittle. | Fibre, Rubber |
How to Choose the Right Replacement Parts
When buying replacements, quality matters. A cheap, low-quality plunger might wear out in a year, while a high-quality silicone one can last many years. Look for parts that are resistant to minerals and chlorine.
Also, make sure you get the correct size and model for your valve. The best way is to take your old parts to a supplier for a direct match. At IFAN, we provide detailed parts diagrams and maintenance kits for our valves, making this process very easy for our clients.
Replacing these parts is simple. After cleaning the valve as described in the previous section, just remove the old, worn part and press the new one into place. Regular replacement of these consumable parts is the most cost-effective way to extend the life of the entire valve assembly.
What Simple Maintenance Prevents Sticking and Ensures Smooth Operation?
Prevention is always easier than repair. A few simple habits keep your valve working perfectly.
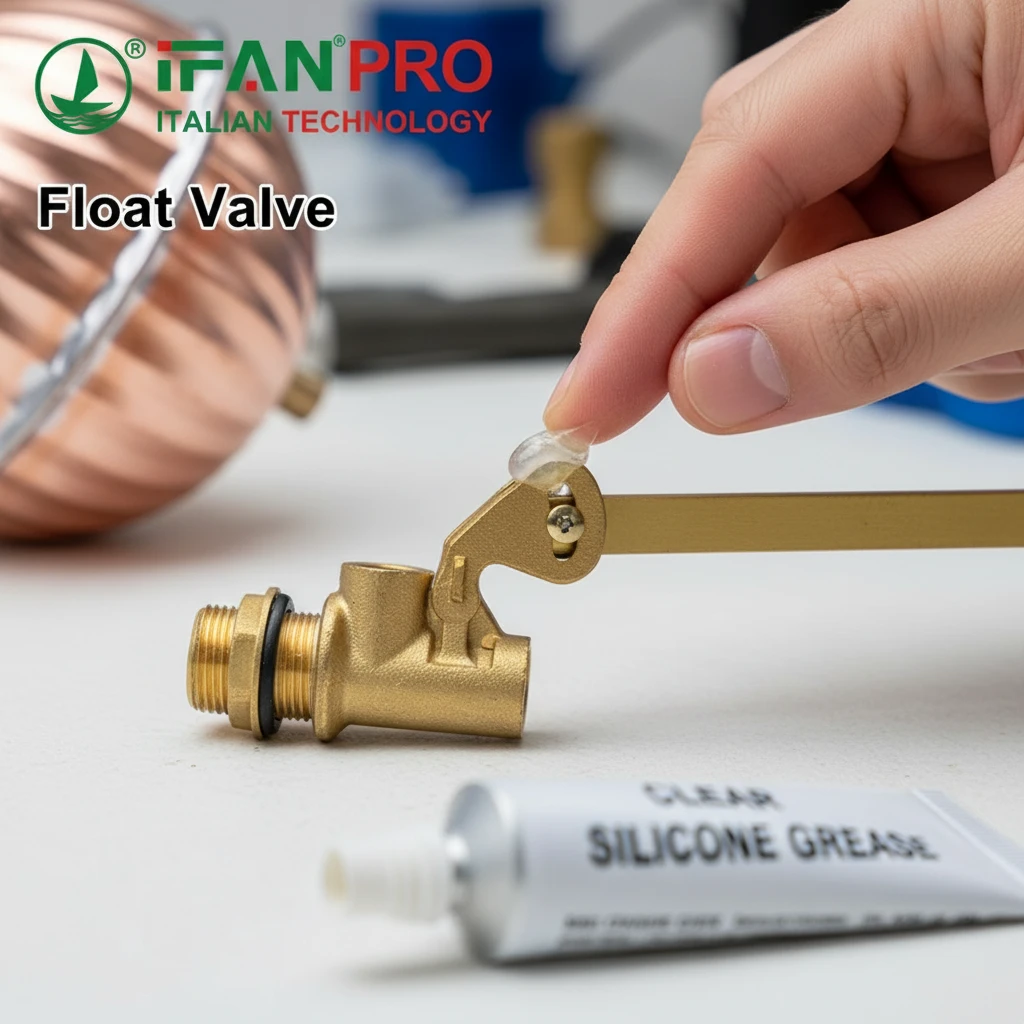
To prevent sticking and ensure smooth operation, regularly lubricate the moving pivot points of the float arm with silicone grease, clean the valve seat as described, and occasionally manually move the float arm through its full range of motion to keep it free. Also, ensure the float ball is not leaking and filled with water.
The Importance of Lubrication and Movement
Sticking usually happens for two reasons: mineral buildup or dry, stiff pivot points. We already covered cleaning to remove minerals. But the metal or plastic pins where the float arm bends need attention too.
Without lubrication, these joints can become stiff. This causes the arm to move in a jerky way or not move at all. When this happens, the valve cannot open or close properly.
Easy Preventative Maintenance Routine
You can add these three quick tasks to your inspection routine. They take less than five minutes but make a huge difference.
1. Lubricate Pivot Points: Once a year, apply a small amount of silicone-based grease to the pins and hinges of the float arm. Do not use petroleum-based grease (like Vaseline) as it can damage plastic and rubber parts. Silicone grease is safe for all materials and won’t wash away easily. This keeps the arm moving freely.
2. Exercise the Valve: Every couple of months, during your visual check, simply use your hand to gently lift the float arm to its highest position and then let it fall back down. Do this a few times. This simple action helps break up any early, soft mineral deposits and keeps the mechanism loose.
3. Check the Float Ball: Sometimes, the plastic float ball itself can develop a small crack and fill with water. A water-logged float won’t rise properly, causing the tank to overfill. During inspection, gently shake the float ball. If you hear water sloshing inside, you need to replace the float ball or the entire arm.
Monthly and Yearly Maintenance Tasks
Here is a simple table to summarize a proactive maintenance plan:
| Task | How to Do It | How Often |
|---|---|---|
| Visual & Audio Check | Listen for hissing, look for leaks. | Monthly |
| Exercise the Float Arm | Manually move it up and down fully. | Every 2-3 Months |
| Clean Valve Seat & Plunger | Soak in vinegar and scrub (see above). | As needed (per inspection) |
| Lubricate Pivot Points | Apply silicone grease to arm hinges. | Yearly |
| Replace Seals & Plunger | Swap out worn rubber components. | Every 2-3 years or as needed |
Following this plan ensures smooth operation. A valve that moves freely will close crisply and seal completely, preventing water waste and protecting your tank from overflow.
Conclusion
Regular cleaning, timely replacement of worn parts, and simple lubrication are the keys to a long-lasting float valve. For durable, easy-to-maintain float valves backed by clear parts diagrams, choose IFAN’s premium plumbing components.


Commentaires récents