
I’ve seen too many projects delayed because a simple brass adapter was installed wrong, leading to leaks and frustration. Getting it right from the start saves time, money, and stress.
To install a brass conversion adapter correctly, you need the right tools for each side, perfectly prepared pipe ends, a specific connection sequence for different materials, and a thorough leak test. Following a precise method prevents leaks, thread damage, and system failure, ensuring a reliable and long-lasting connection between different pipe systems.
Let me guide you through the exact steps I recommend, based on years of field experience and solving common customer issues.
What Are the Correct Tools for Installing Each Side of the Fitting?
Using the wrong tool is the fastest way to ruin a fitting. I once saw a technician use pipe pliers on the hex of a brass adapter and strip the edges completely.
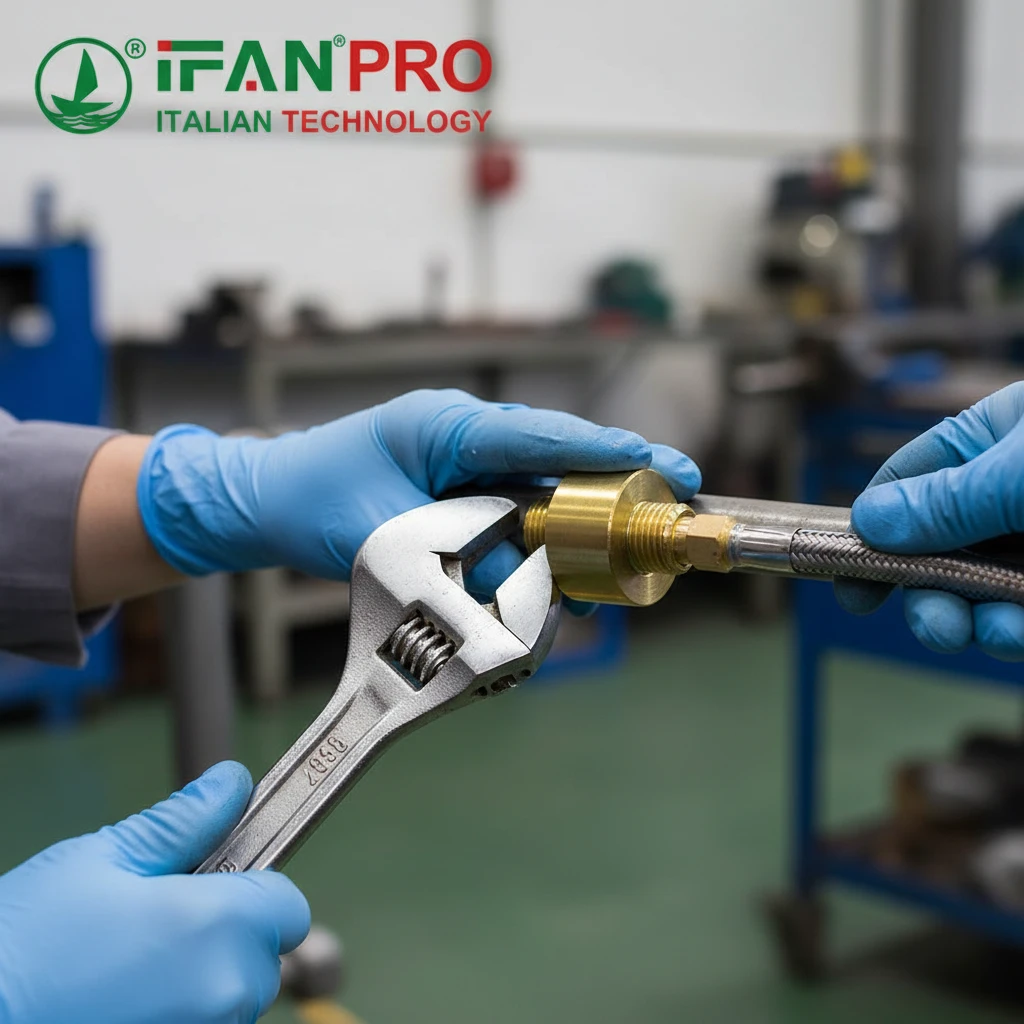
The correct tools depend on the adapter sides. For the metric (BSPP) parallel thread side, use an adjustable wrench or a strap wrench to hold the adapter body. For the imperial (NPT) tapered thread side, use a second adjustable wrench or an open-ended wrench on the adapter’s hex. Never use pipe wrenches (pliers) on the fitting’s body, as they will crush and damage the brass.

Why Tool Choice Matters
Using the proper tools is not just a suggestion; it is critical for a successful installation. Brass is a relatively soft metal. The wrong tool can easily deform the hexagonal flats, making future disassembly impossible or damaging the internal threads.
The goal is to apply pure rotational force (torque) without applying crushing force to the body of the fitting. Pipe wrenches are designed to grip and turn pipe, not the precision-machined hex on a fitting. Their serrated jaws will bite into and mar the brass.
Tool Breakdown by Adapter Side
You must treat the two sides of a conversion adapter independently. Here is a simple breakdown:
| Adapter Side (Typical) | Correct Tool | Purpose | Incorrect Tool (To Avoid) |
|---|---|---|---|
| Metric Side (e.g., BSPP) | Adjustable Wrench / Strap Wrench | To hold the adapter body steady while tightening the pipe or hose on its thread. | Pipe Wrench (Pliers) |
| Imperial Side (e.g., NPT) | Adjustable Wrench / Open-Ended Wrench | To apply final tightening torque when screwing the adapter into a tapered port. | Pipe Wrench, Vise-Grips |
The Two-Wrench Rule
A fundamental rule is to always use two wrenches when making a connection. One wrench holds the adapter body securely to prevent it from twisting. The second wrench applies torque to the connecting component (like a nut or the adapter itself if it’s being screwed into a port).
For example:
- When connecting a hose to the BSPP side, one wrench holds the adapter’s hex. The other wrench tightens the hose nut onto the adapter’s thread.
- When screwing the NPT side into an American pump, one wrench holds the BSPP-side hex. The other wrench turns the adapter’s NPT-side hex into the port.
This “counter-holding” technique prevents stress and misalignment across the entire fitting. It ensures you are only tightening the joint you intend to tighten, not twisting the adapter and potentially weakening another connection point.
How Do You Prepare the Pipe Ends Before Installing the Adapter?
A clean connection is a strong connection. Most leaks I trace back are due to poor preparation—dirt, burrs, or old sealant causing an imperfect seal.
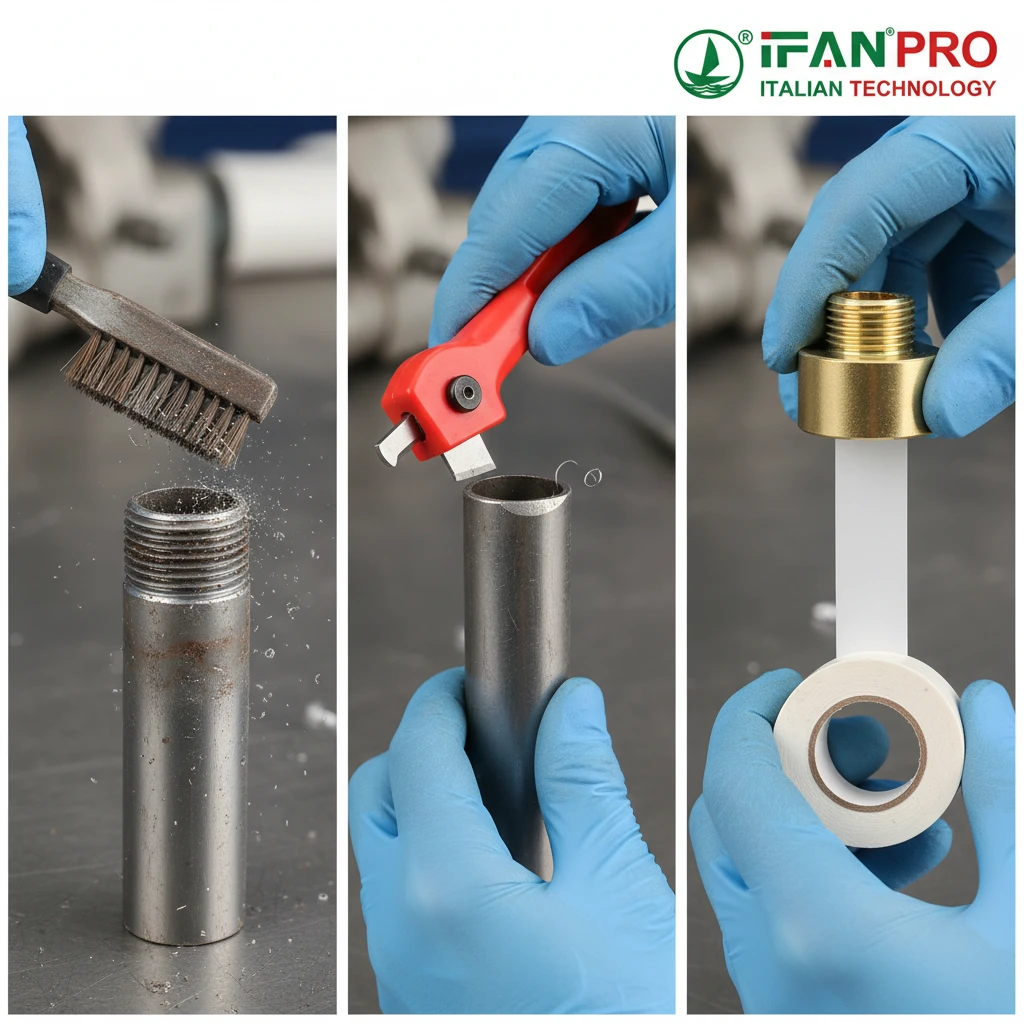
Proper preparation involves three key steps: cleaning, deburring, and applying the right sealant. First, clean all male and female threads with a wire brush to remove dirt and old tape. Second, deburr the end of any cut pipe to ensure a smooth surface. Third, correctly apply thread sealant (Teflon tape or pipe dope) to the male threads only, following the thread direction.
Step 1: Thorough Cleaning
Never assume new threads are clean. They often contain manufacturing oils or metal fragments. Old ports are worse, filled with old, hardened sealant. Use a stiff-bristled brush (brass is best to avoid scratching steel threads) to scrub both the internal female threads and the external male threads. Follow this with a clean, dry cloth. Any grit left behind will act as an abrasive, wearing down the threads and preventing a tight seal.
Step 2: Deburring Cut Pipes
If you are connecting the adapter to a freshly cut pipe (like copper or steel), the cut end will have a sharp burr, both inside and out. This burr can shred Teflon tape, create turbulence in the flow, and even cause leaks.
- External Deburring: Use a file or a deburring tool to gently remove the sharp outer edge around the pipe’s circumference.
- Internal Deburring: Use a blade-type deburring tool or a round file to remove the inner burr. A clean, smooth inner edge is crucial.
Step 3: Applying Thread Sealant Correctly
This is where most mistakes happen. The sealant’s job is to lubricate the threads for proper engagement and fill microscopic gaps.
For Teflon Tape (PTFE):
- Direction: Wrap the tape clockwise when looking at the end of the male thread. This ensures the tape doesn’t unravel when you screw the fitting in.
- Amount: 3-4 wraps is usually sufficient. Too little won’t seal; too much can prevent the threads from fully engaging or cause tape fragments to break off and clog the system.
- Coverage: Start 1-2 threads back from the end and cover all threads, but do not let tape overhang the first thread. An overhang can tear off and contaminate the system.
For Pipe Dope (Thread Sealant Paste):
- Apply a thin, even coat over all the male threads. Avoid globs, especially at the end, as excess paste can squeeze into the pipe and cause blockages.
Crucial Rule: Never apply sealant to the female threads. Applying it inside the port or nut makes it impossible to control how much gets pushed into your fluid system, posing a major contamination risk. Always apply sealant only to the male threads.
What Is the Proper Sequence for Connecting Different Materials?
Tightening things in the wrong order creates stress. I recall a system where a stainless steel hose was connected first, and tightening the brass adapter afterwards twisted the hose and caused a hairline crack at the ferrule.
The proper sequence is to first connect the side of the adapter that goes to the more flexible or pre-assembled component (like a hose). Then, connect the adapter to the more rigid, fixed component (like a pump or tank). This method allows you to finalize the alignment without putting twisting stress on hoses or other sensitive parts.
Understanding Material Behavior
Different materials have different thermal expansion rates and flexibilities. A rigid brass adapter, a flexible rubber hose, and a solid iron pump all react to force differently. The sequence aims to minimize permanent stress in the entire assembly.
The core principle is: Make your final wrench turn on the connection that is closest to the rigid support. This locks everything into its natural, stress-free position.
Step-by-Step Connection Guide
Let’s walk through a common scenario: Connecting a European-made machine (with BSPP ports) to an American pipe system (with NPT threads).
Scenario: Installing a Brass BSPP Female to NPT Male adapter.
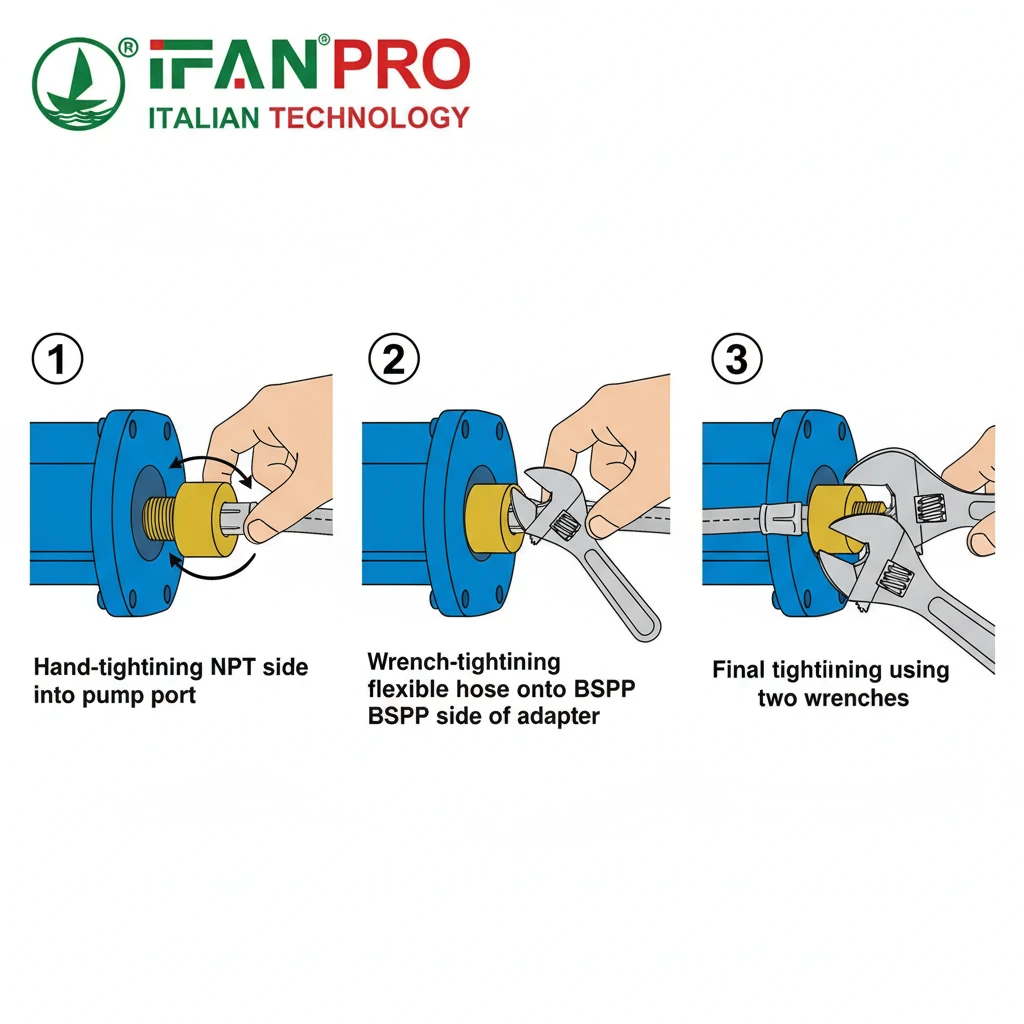
- Hand-Tighten First: Screw the NPT (male) side of the adapter into the American port (female) by hand. Get it finger-tight. Do not use a wrench yet.
- Connect the Flexible Side: Now, take your pre-assembled hose (with a BSPP female swivel nut) and screw it onto the BSPP (male) side of the adapter. Hold the adapter hex with one wrench and tighten the hose nut with another wrench to the proper torque. This connection is now complete.
- Finalize the Rigid Side: Finally, go back to the adapter’s NPT side. Hold the adapter body (the BSPP hex) firmly with one wrench to prevent it from moving and stressing the now-tightened hose connection. With your other wrench on the NPT-side hex, turn the adapter the final 1-2 turns into the American port to achieve a proper seal on the tapered threads.
Why This Sequence Works
By doing it in this order, the final tightening force is absorbed by the rigid connection between the brass adapter and the iron pump. The hose is not twisted or strained. If you reversed the order and tightened the adapter into the pump first, you would then have to twist the entire hose assembly to connect it, potentially kinking the hose or misaligning it.
Material Compatibility Table
This sequence also helps manage different material strengths.
| Connection Point | Material Consideration | Recommended Action |
|---|---|---|
| Adapter to Rigid Port | Brass to Iron/Steel | Final tightening step. Brass is softer, so overtightening can strip the adapter threads. |
| Hose to Adapter | Brass to Brass/Stainless | Tighten fully first. This is often a parallel thread seal that relies on a washer/oring, not taper force. |
| Pre-Assembled Component | e.g., Pressure Gauge | Always connect this to the adapter before finalizing the adapter’s install into the main system. |
How Do You Test the Installation for Leaks and Reliability?
A visual check is never enough. I’ve learned that a proper test is the only way to guarantee a job is done right and avoid costly call-backs.
Test the installation by first doing a visual and tactile check for proper engagement. Then, perform a low-pressure air test (if possible) to listen for leaks. Finally, conduct a staged hydraulic pressure test: pressurize the system with water, check all joints thoroughly with a paper towel, hold the pressure for 15-30 minutes, and re-check for any drips or pressure drop.
The Importance of a Methodical Test
Testing is not a single action; it’s a process designed to catch different types of failures. A leak might be immediate, or it might be a slow weep that develops under sustained pressure. Your test should cover both.
Stage 1: Initial Inspection
Before introducing any pressure, do this:
- Visual Check: Ensure all connections look aligned. Threads should not be visible on tapered connections (they should be fully engaged).
- Tactile Check: Gently try to move the adapter or hose. There should be no looseness or “play.” Everything should feel solid.
Stage 2: Low-Pressure Air Test (Recommended for Complex Systems)
This is a safe, dry way to find major leaks before adding water.
- Cap all open ends in the system.
- Introduce low-pressure air (e.g., 1-2 bar / 15-30 PSI) from a compressor with a regulator.
- Listen carefully for the distinct hissing sound of air escaping.
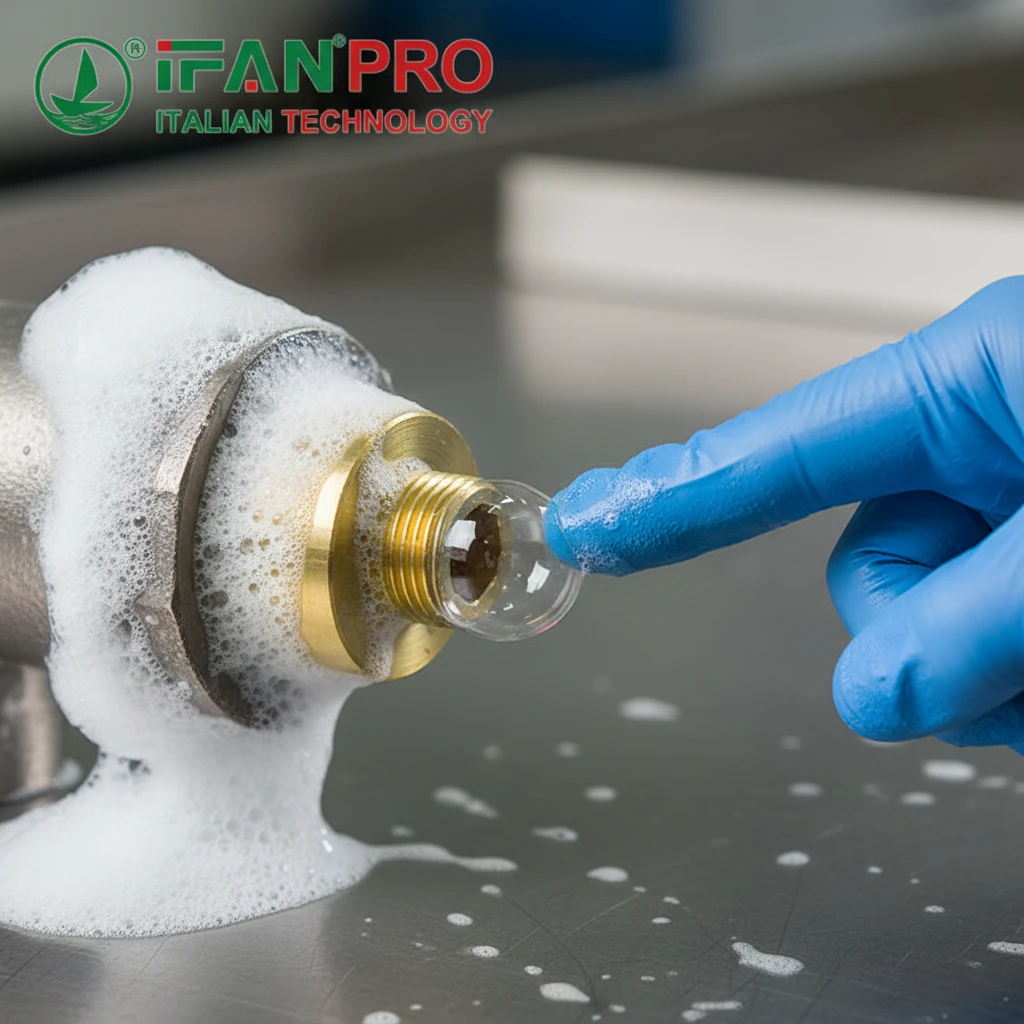
- Soapy Water Test: Mix dish soap with water and spray or brush it generously over every single joint—the adapter threads, the hose nuts, everything. Bubbles will form instantly at the source of any leak. This is the most effective visual leak detection method.
Stage 3: Hydraulic Pressure Test (The Final Proof)
This is the definitive test. Water behaves differently from air and will reveal different leaks.
- Slow Pressurization: Fill the system with water, ensuring all air is bled out. Slowly increase the pressure to the system’s normal operating pressure, or slightly above (check local codes for test pressure requirements, often 1.5x operating pressure).
- Detailed Joint Inspection: With the system pressurized, take a dry paper towel or tissue and wipe it around the base of every connection. A dry towel will show even the smallest weep as a dark spot. Visually inspect for any water droplets.
- Pressure Hold Test: This is critical. Isolate the test section and monitor the pressure gauge for 15-30 minutes. A stable pressure gauge indicates no leaks. Any drop in pressure means there is a leak, even if you can’t see it yet.
Leak Test Summary Table
| Test Stage | Method | What It Catches | Action if Leak is Found |
|---|---|---|---|
| Initial Inspection | Look & Feel | Gross misalignment, loose fittings. | Tighten or re-make the connection. |
| Air & Soap Test | Bubbles | The exact location of even tiny air leaks. | Mark the spot, depressurize, and reseal the connection. |
| Hydraulic Test | Pressure Hold & Wipe | Slow weeps, leaks under water pressure. | Identify the leaking joint, drain, disassemble, re-prepare, and reconnect. |
Never assume a fitting is leak-free. Always test. A proper test gives you and your client confidence in the installation’s reliability.
Conclusion
Correct installation of a brass conversion adapter requires the right tools, meticulous preparation, a logical sequence, and rigorous testing. For reliable, precision-engineered adapters that make this job easier, choose IFAN’s range of brass fittings.


Recent Comments