

Early in my career, I saw a water leak cause major damage because a simple connector failed. That moment taught me that even the smallest parts, like couplings, are vital for a reliable plumbing system.
In plumbing, a coupling is a very short piece of pipe or a fitting with internal threads or sockets at both ends. Its primary function is to permanently connect two pieces of pipe of the same diameter in a straight line, either to extend a run or to repair a damaged section.
While it seems simple, choosing and installing the right coupling is important for a leak-free system. Therefore, let’s look at what couplings do, how they differ from other connectors, and how to use them correctly.
What is the Primary Function of a Pipe Coupling in Plumbing Systems?
A client once called about a burst pipe. The fastest, most reliable fix was a simple coupling, which saved them from a long shutdown.
The primary function of a pipe coupling is to create a permanent, sealed connection between two aligned pipes of the same size. It is used to join pipes together in a straight line to extend a pipeline, or to replace a damaged section of pipe without needing to replace the entire run.
Connecting and Repairing Pipes
Think of a coupling as a bridge for your pipes. Its main job is to connect. In new construction, plumbers use couplings to join standard-length pipes end-to-end to create a continuous run from one point to another. However, these fittings are even more useful for repairs.
For example, if a pipe cracks or corrodes in one spot, you don’t need to replace the whole pipe. Instead, a plumber can cut out the bad section. Then, they can install a new piece of pipe using two couplings—one at each end. Ultimately, this method makes repairs faster and much less expensive.
Creating a Secure Seal
The second key function is to seal the connection tightly to prevent leaks. Manufacturers design couplings to match the connection method of the pipe material. For threaded steel pipes, the coupling has matching internal threads. Similarly, for solvent-weld PVC pipes, the coupling has a smooth socket for glue. In the case of PP-R pipes, the coupling is designed for heat fusion. As a result, this design ensures a secure, long-lasting seal that matches the strength of the pipe itself.
Common Situations Where Couplings Are Essential
You will often find couplings in these situations in both home and industrial plumbing:
- Extending Pipe Runs: Connecting two pipes to make a longer line.
- Repairing Damage: Fixing a small cracked or leaking section.
- Connecting New Fixtures: Adding a branch line to an existing main line.
- System Modifications: Changing the layout of pipes during a renovation.
In short, the coupling is a fundamental component for building and maintaining any piping network. Essentially, its function is simple but important: it makes two pipes act as one.
How Does a Coupling Differ from a Union When Connecting Pipes?
I once watched a maintenance team struggle for hours to disconnect a piped-in water heater because they used couplings everywhere. Knowing when to use a union instead would have saved them time and frustration.
A coupling creates a permanent connection, while a union is designed for a semi-permanent connection that can be taken apart and put back together without cutting the pipe. A union has threaded ends and a central nut that allows the joint to be disconnected, which is necessary for maintaining or replacing valves, pumps, or appliances.
The Key Difference: Permanent vs. Removable
This is the most important distinction. A coupling, once installed, is not meant to be removed. To take it apart, you must cut the pipe. Conversely, a union is specifically made for future access. By unscrewing the large central nut, the two halves of the union separate. Consequently, this allows you to remove a piece of equipment without disturbing the rest of the piping.
Choosing the wrong one leads to problems. For instance, using a coupling where a union is needed turns simple maintenance into a big, costly job. On the other hand, using a union where a simple coupling would work is an unnecessary expense.
Structural Design and Components
Let’s look at how their physical design supports their different jobs.
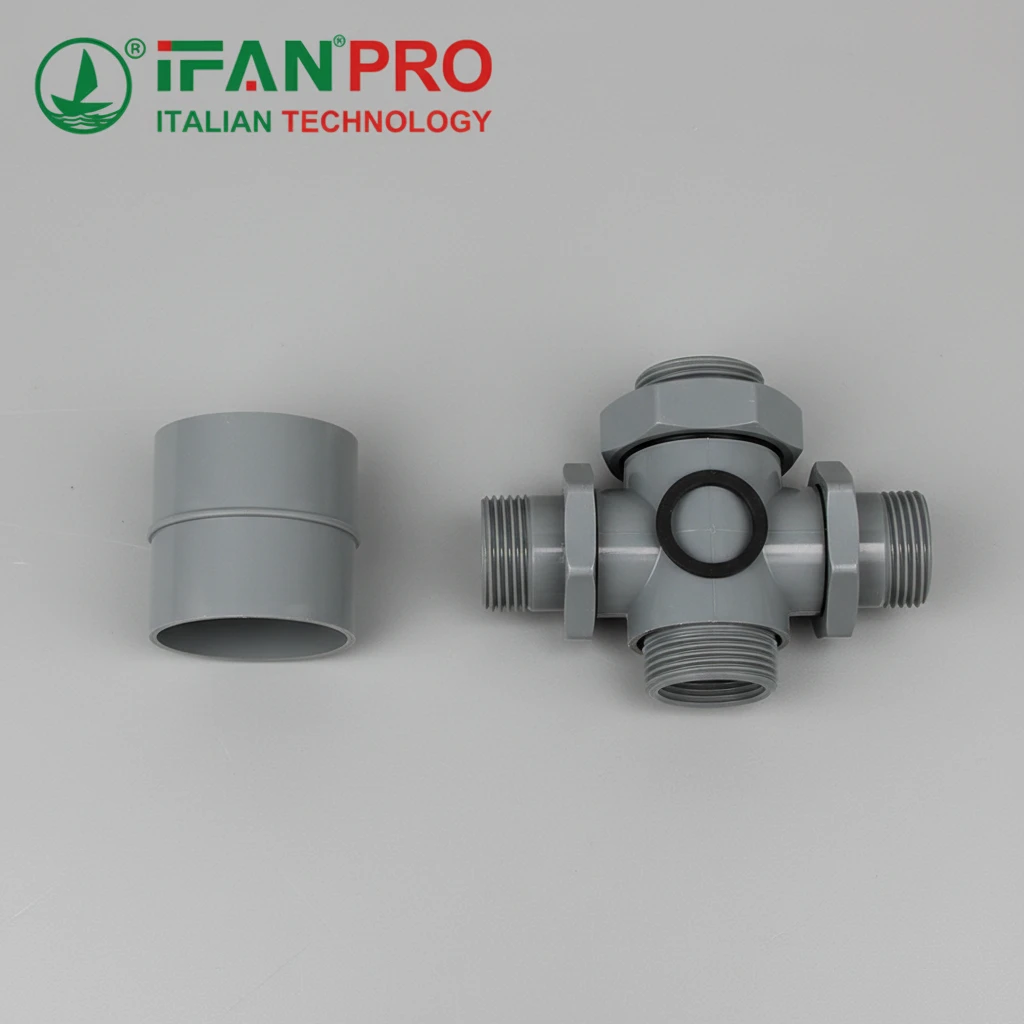
A coupling is simple. It’s usually one solid piece—a short cylinder with the same connection method (threads, socket, etc.) on both insides. Therefore, its job is to be strong and unseen.
Meanwhile, a union is more complex. It has three main parts:
- Two End Pieces: These have external threads to screw into the pipe ends or adjoining fittings.
- A Central Nut: This large nut threads onto one end piece.
- A Sealing Ring: A gasket or mating surface inside that creates the seal when the nut is tightened.
Ultimately, this three-piece design is what allows it to be disconnected.
When to Use Each Fitting
Use this guide to decide which fitting is right for your project:
| Scenario | Recommended Fitting | Reason |
|---|---|---|
| Connecting two pipes in a straight line permanently. | Coupling | It’s cheaper, simpler, and provides a seamless connection. |
| Installing a water heater, pump, or filter that may need future service. | Union | It allows easy removal of the appliance without cutting pipes. |
| Repairing a damaged section of pipe. | Coupling | The repair is intended to be permanent. |
| Final connection to a piece of equipment that is already hard-plumbed. | Union | Provides a future service point. |
| Building a long, continuous run of pipe with no planned breaks. | Coupling | The standard choice for extending pipelines. |
In summary, think about the future. If you might ever need to open that connection for service, install a union. However, if the connection is final and meant to last the life of the pipe, a coupling is the correct and economical choice.
What Types of Couplings Are Used for Different Pipe Materials?
A customer sent us a photo of a failed connection—they used a PVC coupling on a PP-R pipe. The mismatch caused a leak within weeks. Using the right type is not a suggestion; it’s a rule.
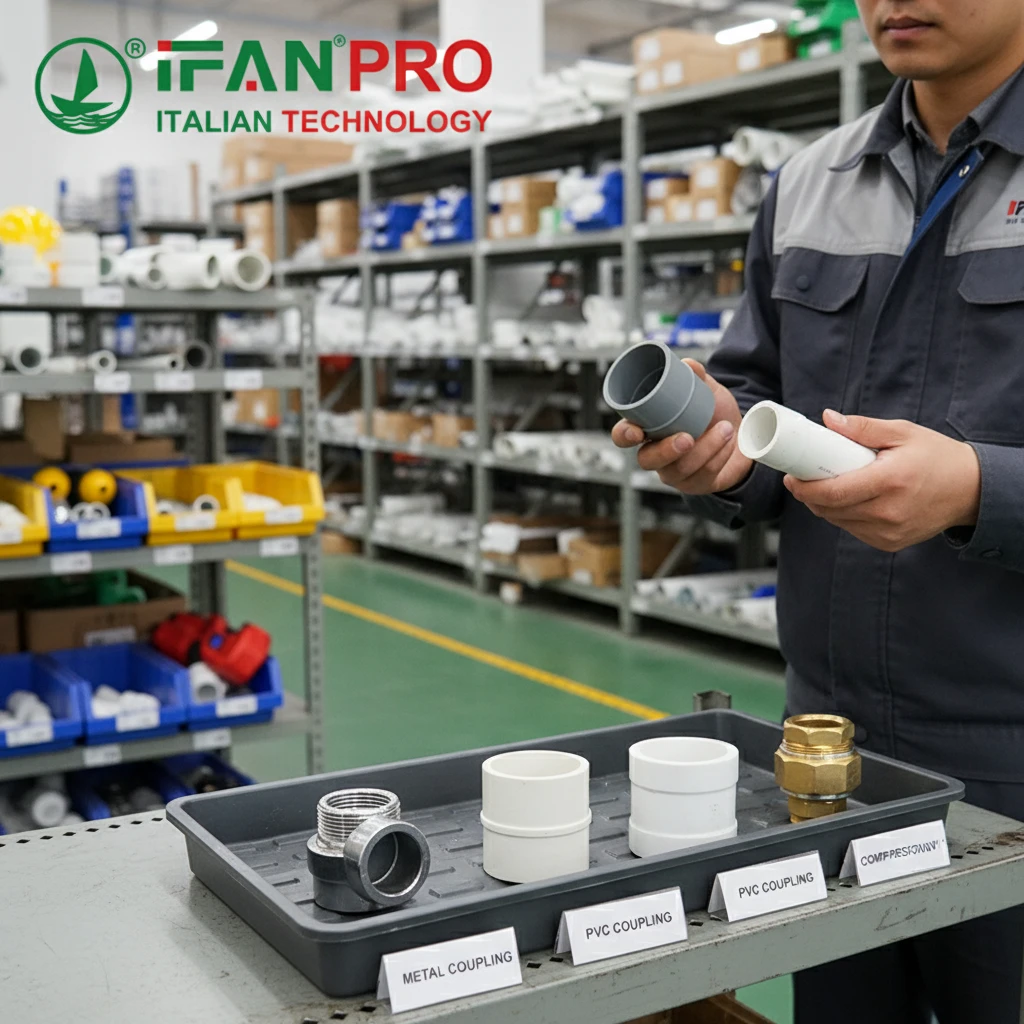
The type of coupling used depends entirely on the pipe material. Common types include threaded couplings for steel or copper, solvent-weld slip couplings for PVC/CPVC, compression couplings for soft copper or PEX, and fusion-weld couplings for PP-R or HDPE pipes. Each type is designed to create a seal compatible with its specific pipe material.
Couplings for Metal Pipes
Metal pipes typically use threads to connect.
- Threaded Couplings: These are the most common for galvanized steel and black iron pipes. The coupling has internal threads, and the pipe ends have external threads. Typically, the installer seals the connection using pipe thread tape or compound. Although they are strong, they can be difficult to align perfectly.
- Compression Couplings: People often use these for soft copper tubing. Specifically, the coupling has a central body with two compression nuts and rings (ferrules). When the nuts are tightened, they squeeze the ferrules onto the pipe. As a result, this action creates a watertight seal without needing threads. They are easier to install but bulkier.
Couplings for Plastic Pipes
Plastic pipes use glue, heat, or compression to seal.
- Slip/Solvent-Weld Couplings (for PVC/CPVC): These are simple sleeves. First, the plumber applies a special solvent cement to the pipe end and the inside of the coupling. Then, they slide them together. The cement chemically melts and fuses the plastic, thereby creating a permanent, monolithic bond.
- Fusion-Weld Couplings (for PP-R, PEX, HDPE): For PP-R, the installer fuses the coupling using a special heating tool. This tool melts the pipe end and coupling socket, which are then joined. Meanwhile, for PEX, expansion or crimp couplings are used with special rings and tools to create a mechanical seal. Overall, these methods create very reliable, leak-free joints.
Choosing the Right Coupling: A Material Guide
Selecting the wrong coupling type is a major cause of leaks. Therefore, this table helps match the coupling to the pipe.
| Pipe Material | Recommended Coupling Type | Connection Method & Key Note |
|---|---|---|
| Galvanized Steel | Threaded Coupling | Seal with thread tape/dope. Prone to corrosion over time. |
| Copper (Rigid) | Threaded Coupling | Pipe ends must be pre-threaded. |
| Copper (Soft) | Compression Coupling | No threads needed; seal made by compressing a ferrule. |
| PVC / CPVC | Solvent-Weld Slip Coupling | Use correct solvent cement (PVC vs. CPVC). Fast and permanent. |
| PP-R | Fusion-Weld Coupling | Requires a dedicated heat fusion tool. Creates the strongest joint. |
| PEX | Crimp or Expansion Coupling | Requires a special crimping/expansion tool and matching rings. |
The Importance of Compatibility
The key lesson is that you cannot mix and match. Specifically, a coupling made for one material will not seal or bond correctly with another. This is because the chemical properties, expansion rates, and connection mechanics are different. Therefore, always use a coupling specified for your exact pipe material and system. For example, reputable suppliers like IFAN ensure their couplings are manufactured to precise standards for material compatibility and performance.
How Do You Properly Install a Coupling to Ensure a Secure Connection?
We audited a factory with chronic leak issues. The problem wasn’t the couplings, but the rushed, sloppy installation. Proper steps make all the difference.
To properly install a coupling, you must prepare the pipe ends correctly (cut square, deburr, clean), apply the right sealant or method (thread tape, solvent, heat), and align the pipes perfectly before making the final, irreversible connection. Following the manufacturer’s instructions for the specific coupling type is essential for a leak-proof seal.
Universal Preparation Steps
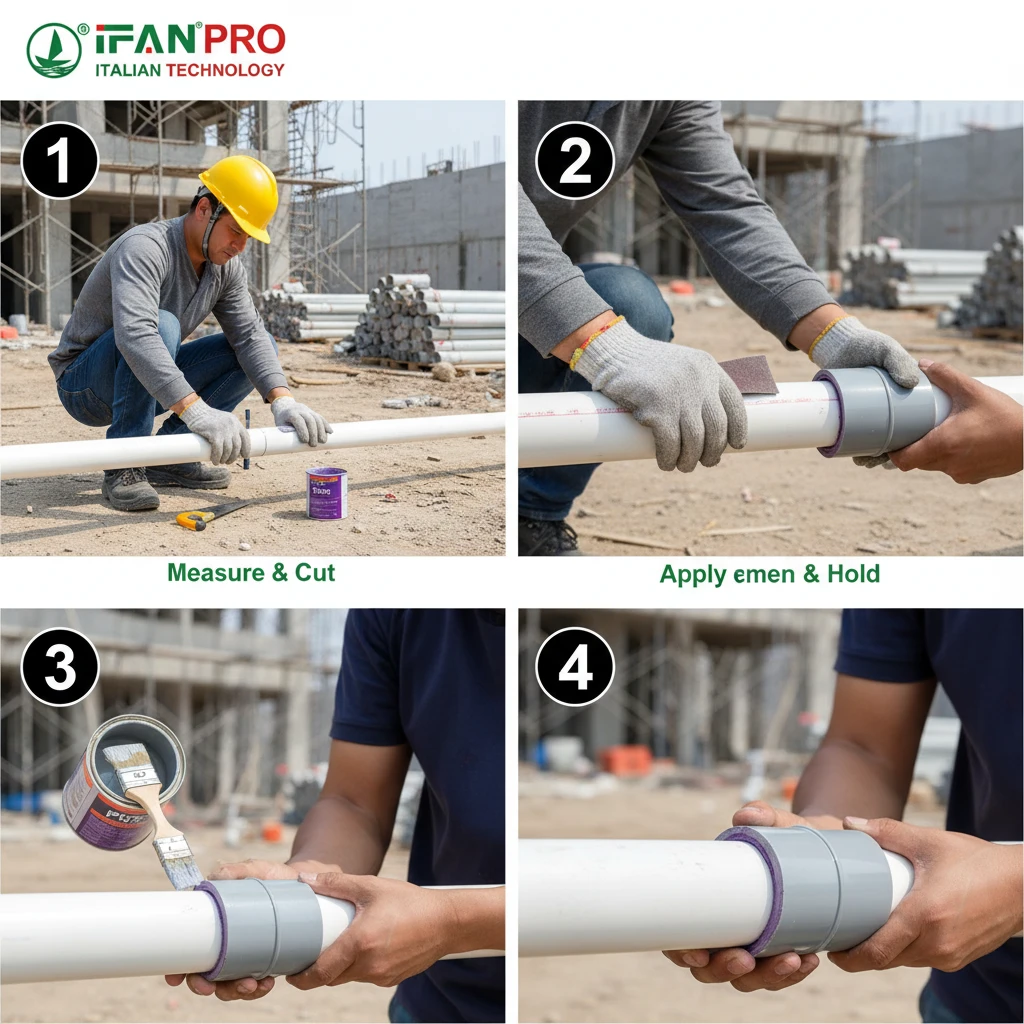
No matter the coupling type, preparation is 80% of a good install. First, you must cut the pipe. Always use a proper pipe cutter, not a saw, to ensure a perfectly square cut. Remember, a crooked cut leaves gaps that cause leaks. Next, clean the pipe ends. For metal, remove burrs with a file. For plastic, remove the glossy outer layer with a deburring tool or sandpaper and wipe away all dust and grease. Ultimately, clean, square pipe ends are the foundation of a good connection.
Installation Methods by Coupling Type
The installation process differs based on the coupling.
For Threaded Couplings:
- Wrap pipe thread tape clockwise around the male threads (2-3 wraps).
- Screw the coupling onto one pipe end by hand until snug.
- Align the second pipe and screw it into the other side of the coupling.
- Finally, use two pipe wrenches—one to hold the coupling, one to turn the pipe—to tighten another turn or two. Importantly, be careful not to overtighten, as this can crack fittings.
For Solvent-Weld Slip Couplings (PVC/CPVC):
- Dry fit the parts first to check alignment.
- Then, apply a primer (if required) to the pipe end and coupling socket.
- Apply a uniform layer of solvent cement to both surfaces.
- Quickly push the pipe into the coupling, giving it a quarter turn to spread the cement.
- Hold it firmly for 15-30 seconds because the joint sets quickly.
For Fusion-Weld Couplings (PP-R):
- First, mark the insertion depth on the pipe with the coupling.
- Then, use the fusion welder with the correct temperature setting.
- Heat the pipe end and coupling socket simultaneously for the time specified in the chart (based on pipe diameter).
- Quickly remove and push the pipe into the coupling up to the mark, holding it still during the cooling time. Importantly, do not twist.
Common Installation Mistakes to Avoid
Here are the pitfalls that lead to failure:
| Mistake | Consequence | How to Avoid It |
|---|---|---|
| Crooked Pipe Cut | Uneven gap prevents a proper seal. | Always use a sharp, guided pipe cutter. |
| Dirty or Oily Pipe | Sealant or cement cannot bond. | Thoroughly clean and dry all surfaces. |
| Insufficient Sealant | Leaves pathways for leaks. | Follow instructions for tape/cement amount. |
| Over-tightening Threads | Can crack the coupling or strip threads. | Tighten until snug, then just a bit more. |
| Moving the Joint During Cure | Breaks the bonding process. | Hold solvent-weld or fusion joints firmly until set. |
Finally, always pressure test the system after installation. This is the only way to confirm that every coupling and joint is secure. In conclusion, a proper installation following these steps will result in a connection that lasts for decades without issue.
Conclusion
A coupling is a simple but essential part for connecting pipes permanently and reliably. For durable, correctly specified couplings for any pipe material, trust IFAN to supply the right fitting for your project.


Recent Comments